Finance
How To Check The Apple Insurance
Published: November 13, 2023
Looking to check the Apple insurance? This guide provides a finance-focused step-by-step process to help you navigate the insurance verification process.
(Many of the links in this article redirect to a specific reviewed product. Your purchase of these products through affiliate links helps to generate commission for LiveWell, at no extra cost. Learn more)
Table of Contents
- Introduction
- What is Apple Insurance?
- Why Should You Check Apple Insurance?
- How to Determine if Your Apple Device is Insured?
- Step 1: Find Your Apple Device’s Serial Number
- Step 2: Visit Apple’s Warranty and Coverage Check Website
- Step 3: Enter Your Apple Device’s Serial Number
- Step 4: Verify Your Apple Device’s Insurance Status
- What to Do If Your Apple Device is Not Insured?
- Conclusion
Introduction
When it comes to our valuable Apple devices, such as iPhones, iPads, or MacBooks, it’s natural to want some peace of mind knowing that they are protected. That’s where Apple insurance comes in. Apple insurance, also known as AppleCare or AppleCare+, offers coverage for your devices against accidental damage, hardware malfunctions, and even theft.
While purchasing Apple insurance is a smart move, it’s equally important to periodically check the status of your coverage. This ensures that your Apple device is still insured and that you can take advantage of any benefits or repairs that may be necessary.
In this article, we will guide you through the process of checking your Apple insurance and determining if your device is covered. Whether you’re a new Apple device owner or you’ve had your device for a while, it’s always a good idea to stay informed about your insurance status.
So, let’s dive in and learn how to check the insurance status of your beloved Apple device.
What is Apple Insurance?
Apple insurance, often referred to as AppleCare or AppleCare+, is an extended warranty program offered by Apple for their range of devices, including iPhones, iPads, MacBooks, and more. It provides coverage for your Apple device beyond the standard one-year manufacturer warranty.
There are two main types of Apple insurance: AppleCare and AppleCare+.
AppleCare is the basic level of insurance that provides additional coverage for your Apple device. It extends the warranty period to two years from the original purchase date and includes phone support from Apple experts for troubleshooting and technical assistance.
On the other hand, AppleCare+ offers a more comprehensive coverage package. In addition to the benefits provided by AppleCare, AppleCare+ includes coverage for accidental damage, such as drops or liquid spills. With AppleCare+, you are eligible for up to two incidents of accidental damage coverage, subject to a deductible fee.
AppleCare and AppleCare+ provide peace of mind by covering not only manufacturing defects but also unforeseen incidents that can damage your device. Whether it’s a cracked screen, a faulty battery, or a malfunctioning camera, Apple insurance ensures that you can get your device repaired or replaced hassle-free.
It’s important to note that Apple insurance is an optional add-on for your device and is available for purchase at the time of buying a new device or within a certain period after the purchase. The cost of Apple insurance varies depending on the device and the type of coverage you choose.
Now that you have a better understanding of what Apple insurance is, let’s move on to why it’s essential to periodically check the insurance status of your Apple device.
Why Should You Check Apple Insurance?
Regularly checking the status of your Apple insurance is crucial for several reasons. Here are the main reasons why you should make it a habit to check your Apple insurance:
1. Ensure coverage validity: Apple insurance has an expiration date, whether it’s after one year with AppleCare or two years with AppleCare+. By checking the insurance status, you can verify that your coverage is still valid, ensuring that your device is protected when you need it most.
2. Plan for repairs or replacements: Accidents happen, and devices can experience unexpected issues. By knowing your insurance coverage status, you can anticipate any potential repair or replacement costs. If your device is insured, you’ll be able to avail yourself of the benefits provided by Apple insurance without incurring hefty out-of-pocket expenses.
3. Peace of mind: Knowing that your Apple device is insured brings peace of mind. You can use your device with confidence, knowing that you have a safety net in case anything goes wrong. From technical issues to accidental damage, you’ll have the reassurance that Apple insurance has you covered.
4. Transferable coverage: In some cases, Apple insurance is transferable to a new owner if you decide to sell your device. By checking the insurance status, you can confirm whether the coverage can be transferred and provide potential buyers with accurate information about the remaining coverage period.
5. Take advantage of additional benefits: Apple insurance often includes additional benefits such as phone support, access to Apple’s Genius Bar, and discounted rates for repairs or accessories. By regularly checking the insurance status, you can stay informed about these benefits and take full advantage of the services available to you.
Checking your Apple insurance status is a simple process that can save you time, money, and hassle in the long run. Now, let’s explore how you can determine whether your Apple device is currently insured.
How to Determine if Your Apple Device is Insured?
Determining whether your Apple device is currently insured is a straightforward process. Follow the steps below to check the insurance status of your device:
Step 1: Find Your Apple Device’s Serial Number
Locate the serial number of your Apple device. You can find it by going to Settings > General > About on your iPhone or iPad, or by clicking on the Apple menu > About This Mac on your MacBook. Alternatively, the serial number is usually printed on the back of the device or on the original packaging.
Step 2: Visit Apple’s Warranty and Coverage Check Website
Go to Apple’s Warranty and Coverage Check website using a web browser on your computer or mobile device.
Step 3: Enter Your Apple Device’s Serial Number
Enter your Apple device’s serial number in the designated field on the website. Make sure to double-check the number to ensure accuracy.
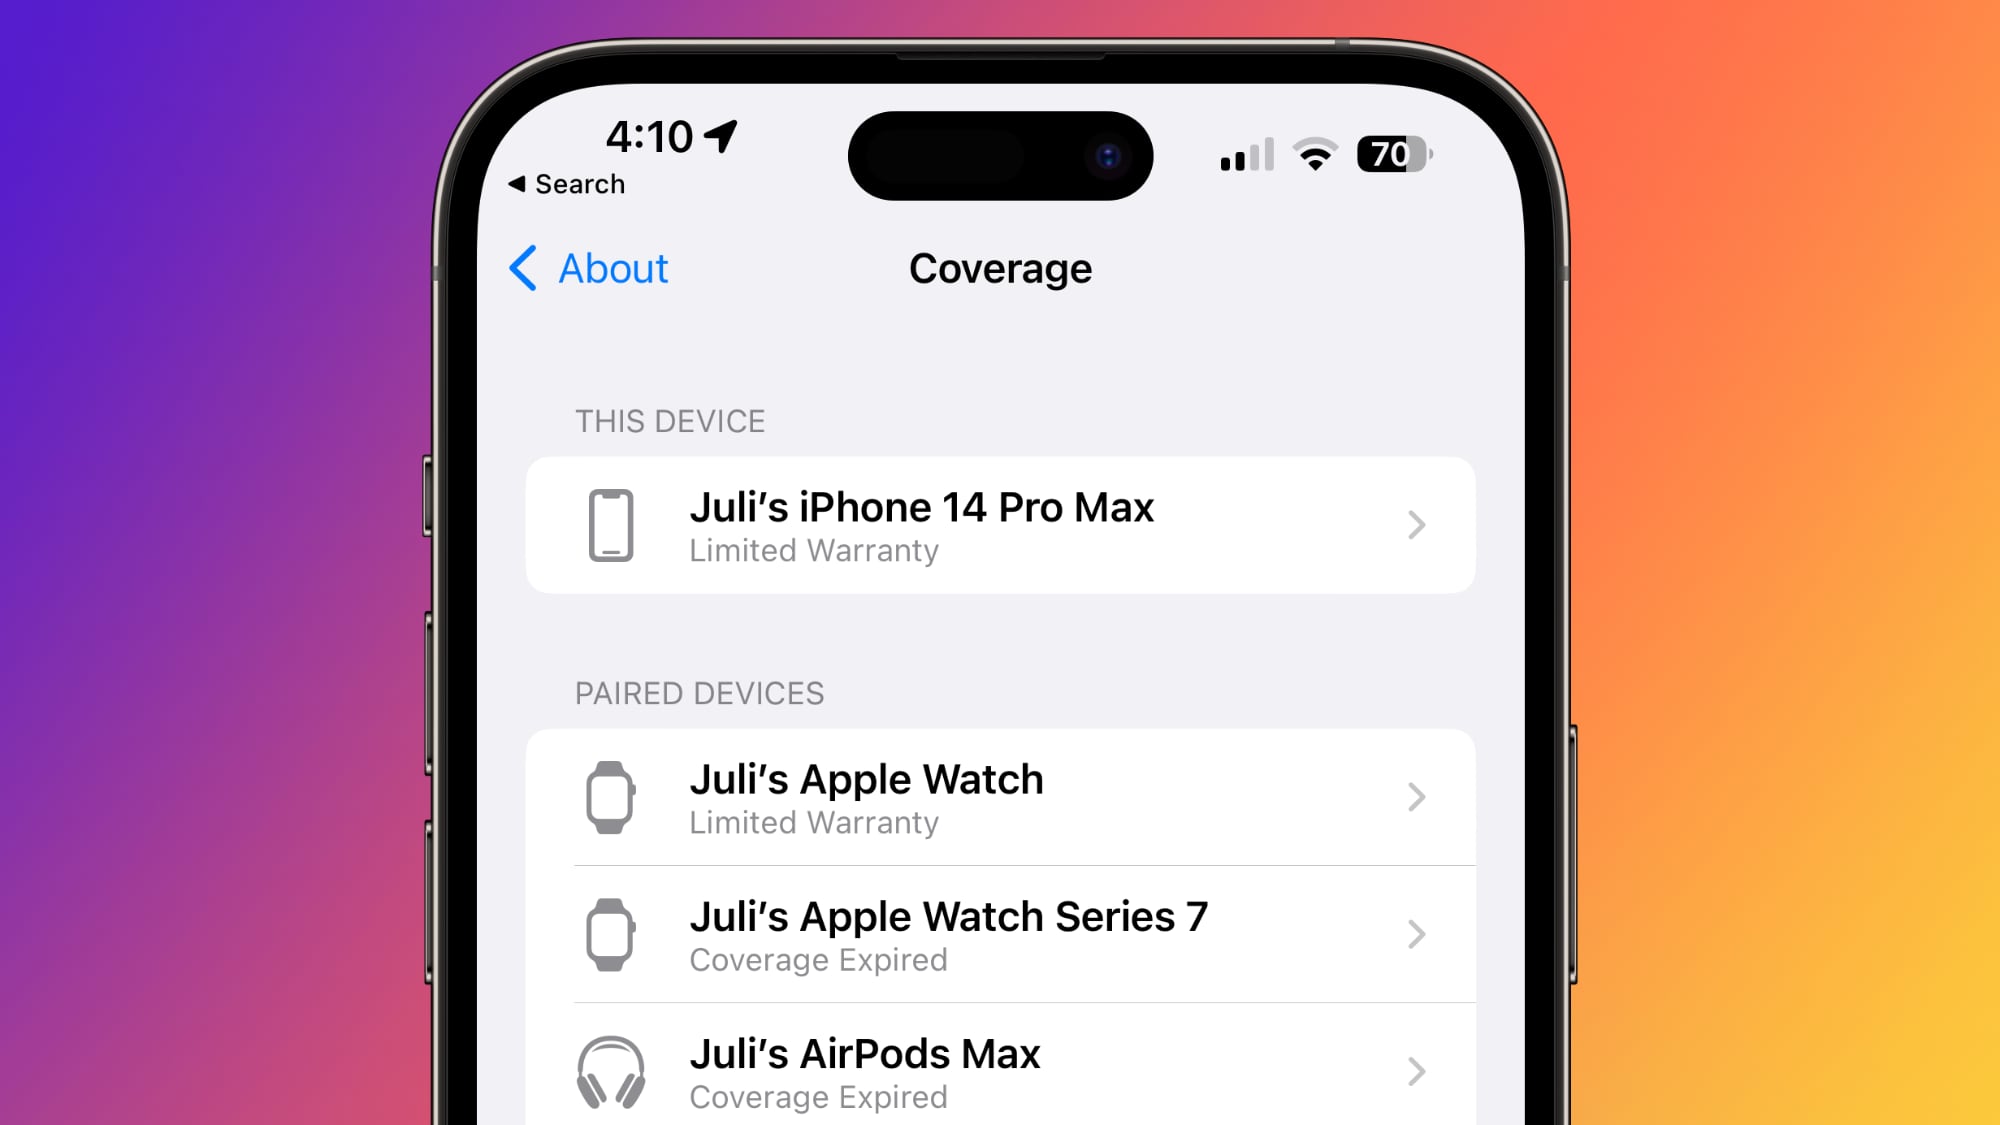
Step 4: Verify Your Apple Device’s Insurance Status
Once you enter the serial number, click on the “Continue” or “Check Coverage” button. The website will then display the insurance status of your Apple device. If it is insured, you’ll be able to see the details of your coverage, including the expiration date. If it is not insured, it will indicate that your device is out of warranty.
By following these simple steps, you can easily check whether your Apple device is currently insured or not. If you discover that your device is not insured, do not worry. There are still options available to protect your device.
Step 1: Find Your Apple Device’s Serial Number
Before you can check the insurance status of your Apple device, you need to locate its serial number. The serial number is a unique identifier specific to your device and is essential for verifying its insurance coverage. Here are the various ways to find your Apple device’s serial number:
1. Settings Menu:
For iPhones and iPads, you can find the serial number by going to Settings > General > About. Scroll down the About page, and you will find the serial number listed alongside other device information like model, version, and IMEI number.
2. Apple Menu:
If you’re using a MacBook, click on the Apple menu located on the top-left corner of the screen. From the drop-down menu, select “About This Mac.” In the window that appears, you will see the serial number displayed along with other details about your MacBook.
3. Device Label:
Typically, Apple devices have the serial number printed on the back of the device, near the bottom. This is true for iPhones, iPads, and some iPod models. MacBook serial numbers are typically located on the bottom of the laptop or on the inside of the battery bay.
4. Original Packaging:
If you have kept the original packaging of your Apple device, you can find the serial number on the box. Look for a label or sticker on the packaging that displays the device’s serial number.
Make sure to double-check the serial number for accuracy before proceeding to the next step. Even a small mistake can lead to inaccurate information about your device’s insurance status.
Once you have located your Apple device’s serial number, you are ready to move on to the next step of checking its insurance coverage.
Step 2: Visit Apple’s Warranty and Coverage Check Website
After finding the serial number of your Apple device, the next step is to visit Apple’s Warranty and Coverage Check website. This online tool provided by Apple allows you to check the insurance status and coverage details of your Apple device. Follow the instructions below to access the website:
1. Open a Web Browser:
Launch your preferred web browser on your computer or mobile device. Apple’s Warranty and Coverage Check website is accessible from any browser, including Safari, Chrome, Firefox, or Internet Explorer.
2. Go to Apple’s Warranty and Coverage Check Website:
Type in the URL for Apple’s Warranty and Coverage Check website in the address bar of your web browser. The URL is https://checkcoverage.apple.com.
3. Wait for the Page to Load:
Once you have entered the URL, wait for the webpage to load. The website will display a simple interface with a text field where you can enter your Apple device’s serial number.
Now that you have arrived at Apple’s Warranty and Coverage Check website, you are prepared to move on to the next step of entering your device’s serial number to check its insurance status and coverage details. Make sure you have your serial number handy as you proceed to Step 3.
Step 3: Enter Your Apple Device’s Serial Number
Now that you are on Apple’s Warranty and Coverage Check website, it’s time to enter your Apple device’s serial number to check its insurance status and coverage details. Follow the instructions below:
1. Locate the Text Field:
On the Apple’s Warranty and Coverage Check webpage, you will see a text field labeled “Enter your serial number.” It is usually positioned prominently on the page and is the key area where you will input your device’s serial number.
2. Enter the Serial Number:
Using your keyboard, carefully type in the serial number of your Apple device into the text field on the website. It is crucial to input the serial number correctly to ensure accurate results. Double-check each character to avoid any discrepancies.
3. Verify Accuracy:
Once you have entered the serial number, take a moment to review it and ensure it matches the serial number you obtained from your device. Any discrepancy may result in incorrect information about your device’s insurance status.
After you have entered and verified the accuracy of your device’s serial number, you are ready to proceed to the final step of verifying your Apple device’s insurance status and coverage details.
Step 4: Verify Your Apple Device’s Insurance Status
After entering your Apple device’s serial number on Apple’s Warranty and Coverage Check website, it’s time to verify the insurance status of your device. Follow the steps below to complete the process:
1. Click on “Continue” or “Check Coverage”:
Once you have entered your device’s serial number, look for a button on the website that says “Continue” or “Check Coverage.” Click on this button to initiate the verification process.
2. Wait for the Results:
After clicking on the button, the website will process your request and retrieve the insurance status and coverage details of your Apple device. This may take a few seconds, so be patient and wait for the results to appear on the screen.
3. Review the Insurance Status and Coverage Details:
Once the results are displayed, carefully review the information provided. The webpage will indicate whether your Apple device is insured or not. If it is insured, you will see the details of your coverage, including the expiration date.
4. Take Note of the Information:
Make a note of the insurance status and coverage details of your device. If your device is insured, take note of the expiration date so you can keep track of when your coverage ends. If your device is not insured, take note of this as well to consider your options for protecting your device.
By following these steps, you will be able to verify the insurance status of your Apple device. Checking this information periodically ensures that you stay informed about the coverage of your device and can take any necessary actions if needed. Whether your device is insured or not, you will have a clearer understanding of its current status and can plan accordingly.
What to Do If Your Apple Device is Not Insured?
If you discover that your Apple device is not currently insured, there are a few options available to protect your device. Here’s what you can do if your Apple device is not insured:
1. Purchase Apple Insurance
If your device is still eligible, you may have the option to purchase Apple insurance, such as AppleCare or AppleCare+. Visit Apple’s official website or contact Apple support to learn more about the insurance options available for your specific device. Apple insurance can provide coverage for accidental damage, hardware malfunctions, and other issues, giving you peace of mind.
2. Consider Third-Party Insurance
If you prefer to explore alternative options, you can consider third-party insurance providers that offer coverage for Apple devices. Many reputable insurance companies offer specialized plans that cover accidental damage, theft, and even loss of your Apple device. Be sure to research and compare different plans to find the best one for your needs.
3. Practice Safe Handling and Maintenance
While insurance can provide financial protection, taking preventive measures can also help minimize the risk of damage or issues with your device. Handle your Apple device with care, use protective cases, and follow best practices for maintenance, such as keeping your device clean and regularly updating its software.
4. Set Aside Emergency Funds
If obtaining insurance is not currently feasible, it’s wise to set aside some emergency funds. Having money set aside specifically for repairs or replacements can provide a safety net in case your device encounters any issues. This way, you can cover the costs instead of being caught off guard by unexpected expenses.
5. Consider Upgrading or Trading-In
If your Apple device is older or nearing the end of its warranty period, it might be a good time to consider upgrading to a newer model or trading it in for a discount on a new device. Apple often offers trade-in programs where you can exchange your old device for credit towards a new one. This can provide an opportunity to start fresh with a fully insured device.
Remember, it’s essential to regularly check the insurance status of your Apple device to stay informed about the coverage and take the necessary steps to protect your investment. Whether that means purchasing insurance, exploring third-party options, or practicing safe handling, being proactive can help ensure your Apple device remains safeguarded.
Conclusion
Checking the insurance status of your Apple device is an important task that should not be neglected. By verifying that your device is insured, you can ensure its protection against accidental damage, hardware malfunctions, and other unforeseen issues. Additionally, knowing the insurance status allows you to plan for repairs, take advantage of additional benefits, and have peace of mind while using your Apple device.
In this article, we discussed the importance of regularly checking your Apple insurance. We covered the basics of what Apple insurance is, why it’s essential to check its status, and how to determine if your device is insured. We also provided options for what to do if your device is not currently insured, including purchasing Apple insurance, considering third-party coverage, practicing safe handling and maintenance, setting aside emergency funds, and exploring upgrade or trade-in options.
Remember, the warranty and coverage of your Apple device have expiration dates, so it’s crucial to stay informed about its insurance status. By following the steps outlined in this article, you can easily check the insurance status of your Apple device and take appropriate action to protect your investment.
Whether you currently own an insured Apple device or need to take steps to secure coverage, staying proactive and informed about your device’s insurance status is key. Don’t wait until an unforeseen incident occurs. Check your Apple device’s insurance status today and enjoy peace of mind knowing that your device is protected.
What's Hot
Latest Articles
Related Post
By: • Finance

By: • Finance

By: • Finance
By: • Finance

By: • Finance
By: • Finance

By: • Finance

By: • Finance

By: • Finance
By: • Finance


By: • Finance

By: • Finance


By: • Finance