Finance
How To Transfer Google Play Credit To PayPal
Published: January 6, 2024
Learn how to transfer your Google Play credit to PayPal and easily manage your finance with our step-by-step guide.
(Many of the links in this article redirect to a specific reviewed product. Your purchase of these products through affiliate links helps to generate commission for LiveWell, at no extra cost. Learn more)
Table of Contents
Introduction
Google Play credit is a convenient and flexible way to purchase apps, games, movies, and more from the Google Play Store. However, there may be instances when you want to transfer your Google Play credit to PayPal. Whether you need the funds for online shopping or simply prefer to have the money in your PayPal account, there are steps you can take to make this transfer.
In this article, we will guide you through the process of transferring Google Play credit to PayPal. We will provide you with step-by-step instructions, ensuring a smooth transfer of funds. By following these steps, you can have your Google Play credit converted into PayPal balance, which can then be used for various purposes.
It is important to note that while transferring Google Play credit to PayPal is possible, it might not be an option available to all users. The ability to transfer credit may depend on your region, currency, and other factors. Additionally, this method is specifically for transferring Google Play credit to PayPal; it does not involve transferring funds from PayPal to Google Play. With that in mind, let’s get started with the process of transferring Google Play credit to PayPal.
Step 1: Create a PayPal Account
The first step in transferring your Google Play credit to PayPal is to have a PayPal account. If you already have a PayPal account, you can skip to the next step. If not, follow the instructions below to create one:
- Go to the PayPal website (www.paypal.com) on your web browser.
- Click on the “Sign Up” button.
- Choose between a personal or business account. For most individuals, a personal account is suitable.
- Provide your email address and create a password for your PayPal account.
- Complete the required information, including your name, address, and phone number.
- Agree to the terms and conditions and click on the “Agree and Create Account” button.
- Verify your email address by clicking on the confirmation link sent to your email.
Once you have successfully created your PayPal account and verified your email, you are ready to move on to the next step.
Step 2: Verify your PayPal Account
After creating your PayPal account, it is essential to verify your account to unlock certain features and increase your account’s security. Verification helps to establish trust and ensure that you are the rightful owner of the account. To verify your PayPal account, follow these steps:
- Log in to your PayPal account using your email address and password.
- Click on the “Settings” icon, typically located in the top-right corner of the page.
- From the dropdown menu, select “Account Settings.”
- Under the “Account” section, click on the “Get Verified” link.
- On the verification page, you will see different options to verify your account. The most common method is linking and confirming a bank account or credit/debit card.
- Choose the preferred verification method and follow the provided instructions.
- For example, if you select the bank account option, you will need to input your bank account details and confirm the small deposit made by PayPal to your account. This process may take a few business days.
- Once your verification process is complete, PayPal will notify you via email.
Verification is an important step to gain full access to your PayPal account’s functionalities, such as sending and receiving higher amounts of money. With your PayPal account verified, you can now proceed to the next step of adding Google Play credit to your PayPal account.
Step 3: Add Google Play Credit to Your PayPal Account
Before you can transfer your Google Play credit to PayPal, you need to add the credit to your PayPal account. This can be done by purchasing digital gift cards using your Google Play credit and then redeeming those gift cards on PayPal. Follow these steps to add Google Play credit to your PayPal account:
- Open your web browser and go to the Google Play Store website.
- Search for “PayPal digital gifts” in the search bar.
- Select the PayPal Digital Gifts page from the search results.
- Browse through the available gift card options and choose the one that suits your needs.
- Select the desired amount for the gift card and click on “Add to cart” or “Buy.”
- Enter your payment information if prompted and complete the purchase using your Google Play credit.
- After the purchase is complete, you will receive an email with the gift card code.
- Open a new tab or window and go to the PayPal website.
- Log in to your PayPal account.
- Click on “Wallet” at the top of the page.
- Under the “Balance” section, click on “Add Money.”
- Enter the gift card code that you received in the email.
- Click on “Add” to transfer the funds from the gift card to your PayPal account.
By following these steps, your Google Play credit will be added to your PayPal account, making it ready for transfer.
Step 4: Transfer Google Play Credit to PayPal
Now that you have successfully added your Google Play credit to your PayPal account, it’s time to transfer the funds. Follow the steps below to complete the transfer:
- Log in to your PayPal account using your email address and password.
- Click on the “Wallet” tab at the top of the page to access your PayPal balance.
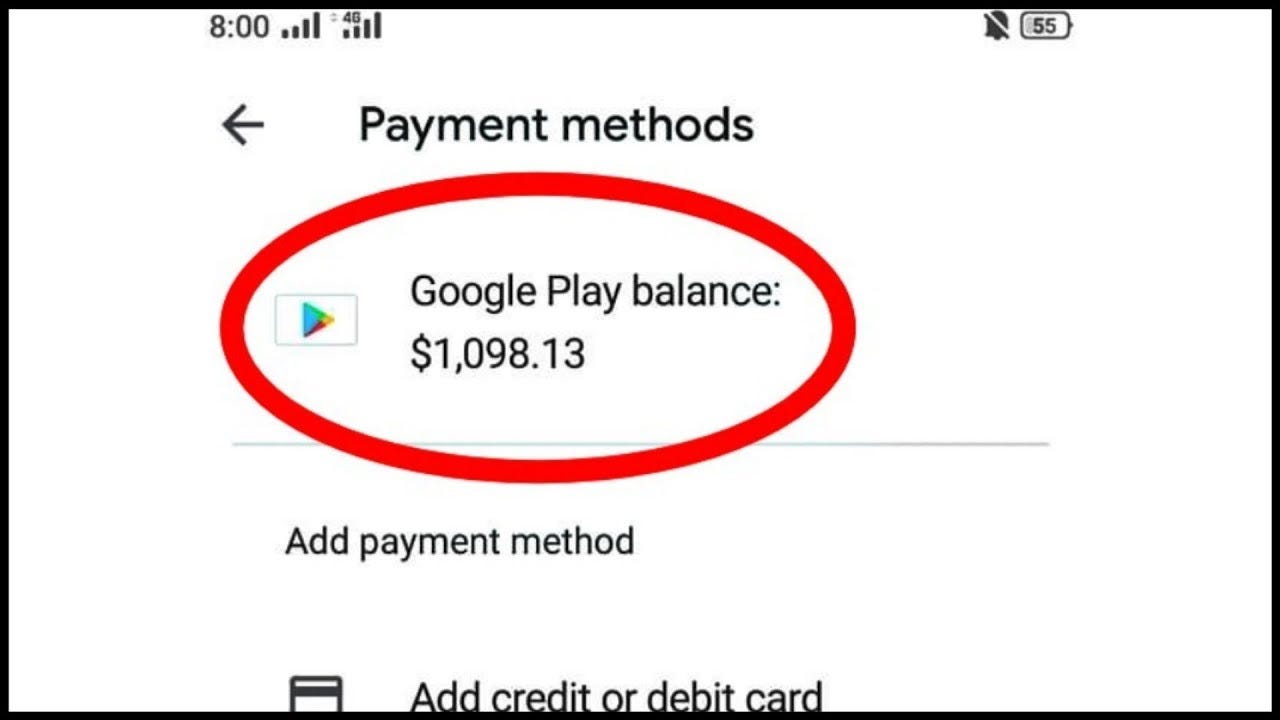
- Under the “Balance” section, you will see your available PayPal balance, which should now include the Google Play credit you added.
- Click on the “Transfer Money” button next to your PayPal balance.
- In the transfer options, select “Transfer to your bank” or “Transfer to your debit or credit card.” Choose the option that suits your preferences.
- Follow the on-screen instructions to complete the transfer process.
- Verify the transfer details and confirm the transaction.
- Once the transfer is complete, you will receive a confirmation email from PayPal.
It is important to note that the transfer process may take some time to complete. The duration can vary depending on factors such as your bank or card issuer’s processing times. Keep an eye on your email and PayPal account for updates regarding the transfer.
With the Google Play credit successfully transferred to your PayPal account, you can now use the funds for online purchases, bill payments, or any other transaction where PayPal is accepted.
Note: Limitations and Considerations
While transferring Google Play credit to PayPal is a viable option for many users, it is important to note that there may be limitations and considerations to keep in mind.
First, not all regions or countries may support the transfer of Google Play credit to PayPal. The availability may vary, so it’s essential to check the terms and conditions or contact the respective support teams for more information.
Additionally, different platforms or services may have their own policies regarding the use of Google Play credit. It’s important to be aware of those policies and restrictions to ensure a seamless transfer process.
Lastly, the transfer process may incur fees or charges depending on your PayPal account type, transaction amount, and other factors. Familiarize yourself with the applicable fees to avoid any unexpected charges.
By keeping these limitations and considerations in mind, you can make an informed decision and successfully transfer your Google Play credit to PayPal.
Conclusion
Transferring your Google Play credit to PayPal can provide you with greater flexibility and convenience when it comes to managing your funds. By following the steps outlined in this article, you can successfully convert your Google Play credit into PayPal balance, allowing you to use the funds for various purposes.
Remember to create a PayPal account if you don’t already have one and verify your account to gain access to all its features. Adding Google Play credit to your PayPal account involves purchasing digital gift cards and redeeming them on PayPal.
Once you have added the credit to your PayPal account, you can proceed with transferring the funds. Choose the appropriate transfer method, either to your bank account or debit/credit card, and complete the transfer process as instructed. Keep in mind that the transfer may take some time to process, depending on various factors.
It is important to note that the transfer of Google Play credit to PayPal may not be available in all regions or countries. Always check the terms and conditions or contact support for more information regarding availability and any associated fees.
By following these steps and considering the limitations and considerations, you can successfully transfer your Google Play credit to PayPal and enjoy the convenience of having your funds readily available for online purchases, bill payments, and more.
Remember to regularly check your PayPal account for updates and monitor your balance to ensure the successful transfer of funds. Now that you have the knowledge and steps to complete the transfer, you can make the most of your Google Play credit and manage your finances in a way that suits your needs.
Enjoy the flexibility and convenience that comes with transferring your Google Play credit to PayPal, and make the most out of your digital funds!
What's Hot
Latest Articles
Related Post
By: • Finance

By: • Finance
By: • Finance

By: • Finance

By: • Finance

By: • Finance

By: • Finance

By: • Finance
By: • Finance
By: • Finance

By: • Finance

By: • Finance


By: • Finance

By: • Finance