
Finance
How To Redeem Prime Pantry Credit
Published: January 12, 2024
Learn how to redeem your Prime Pantry credit and save money on your household expenses. Get expert finance tips and make the most of your savings today!
(Many of the links in this article redirect to a specific reviewed product. Your purchase of these products through affiliate links helps to generate commission for LiveWell, at no extra cost. Learn more)
Table of Contents
Introduction
Welcome to the world of Prime Pantry Credit! As an Amazon Prime member, you have access to a special feature called Prime Pantry, which offers a wide selection of pantry essentials and household items. To make shopping on Prime Pantry even more exciting, Amazon occasionally offers promotional credits that can be applied towards your purchases. In this article, we will guide you through the process of redeeming your Prime Pantry credit, ensuring that you get the most out of your shopping experience.
Shopping on Prime Pantry not only saves you time and effort but also allows you to stock up on your favorite household items in a cost-effective manner. With the added benefit of Prime Pantry credits, you can enjoy even greater savings on your purchases. Whether you’re restocking your pantry, replenishing cleaning supplies, or trying out new products, this guide will help you navigate through the process and make the most of your Prime Pantry credit.
So, let’s dive in and explore how you can easily redeem your Prime Pantry credit and enjoy the convenience of having essential items delivered right to your doorstep!
Step 1: Accessing your Prime Pantry Credit
Before you can start using your Prime Pantry credit, you’ll need to ensure that you have a valid Amazon Prime membership. Once that’s taken care of, follow these simple steps to access your Prime Pantry credit:
- Log in to your Amazon account and go to the Amazon homepage.
- Hover over the “Account & Lists” button located on the top right corner of the page.
- From the drop-down menu, select “Your Account” to navigate to your account settings page.
- Scroll down until you find the “Prime” section and click on “Prime Pantry” to access the dedicated Prime Pantry page.
- On the Prime Pantry page, you’ll see the available Prime Pantry credits listed under the “Clip Coupons & Apply Credits” section. Take note of the amount and expiration date of your credit.
It’s important to remember that Prime Pantry credits typically have an expiration date, so be sure to use them before they expire. Now that you know how to access your Prime Pantry credit, let’s move on to the next step: browsing Prime Pantry products!
Step 2: Browsing Prime Pantry Products
Now that you have accessed your Prime Pantry credit, it’s time to start browsing through the wide range of products available. Follow these steps to browse Prime Pantry products and find the items you need:
- On the Prime Pantry page, you will see a variety of categories listed on the left-hand side of the page. These categories include groceries, household essentials, beauty, health, and more.
- Click on the category that corresponds to the type of product you are looking for. For example, if you want to buy snacks, click on the “Snacks” category.
- Once you’re in the category page, you can further refine your search by using the filters located on the left-hand side. You can filter by brand, price range, customer ratings, and more.
- Browse through the product listings and click on the items that catch your interest. This will take you to the individual product page, where you can find more details about the item.
- Read the product description, check the reviews, and make sure it meets your requirements.
- If you’re happy with the product, click the “Add to Cart” or “Add to Pantry” button to add it to your Pantry Box. The Pantry Box is where you’ll collect all the items you want to purchase.
- Repeat these steps for each category or product you wish to explore.
By carefully browsing through the Prime Pantry products, you can find all the essentials you need while taking advantage of your Prime Pantry credit. Now that you know how to browse and select products, let’s move on to the next step: adding products to your Pantry Box.
Step 3: Adding Products to your Pantry Box
Now that you’ve found the products you want to purchase, it’s time to add them to your Pantry Box. The Pantry Box serves as a virtual shopping cart where you can collect all the items you wish to buy. Follow these steps to add products to your Pantry Box:
- On the individual product page, select the desired quantity of the item you want to add. You can adjust the quantity by using the “+” and “-” buttons.
- Once you’ve set the quantity, click on the “Add to Cart” or “Add to Pantry” button. This will add the product to your Pantry Box.
- If you’re not done shopping, you can continue browsing through the categories and repeat the process to add more items to your Pantry Box.
- If you change your mind about a product and want to remove it from your Pantry Box, simply go to your Pantry Box and click on the “Delete” button next to the item you wish to remove.
- You can also update the quantity of an item in your Pantry Box by clicking on the “+” or “-” buttons in the quantity column.
By adding products to your Pantry Box, you can conveniently collect all the items you want to purchase in one place. This makes it easier to review your selected items and make any necessary changes before proceeding to checkout. Now that you know how to add products to your Pantry Box, let’s move on to the next step: checking out.
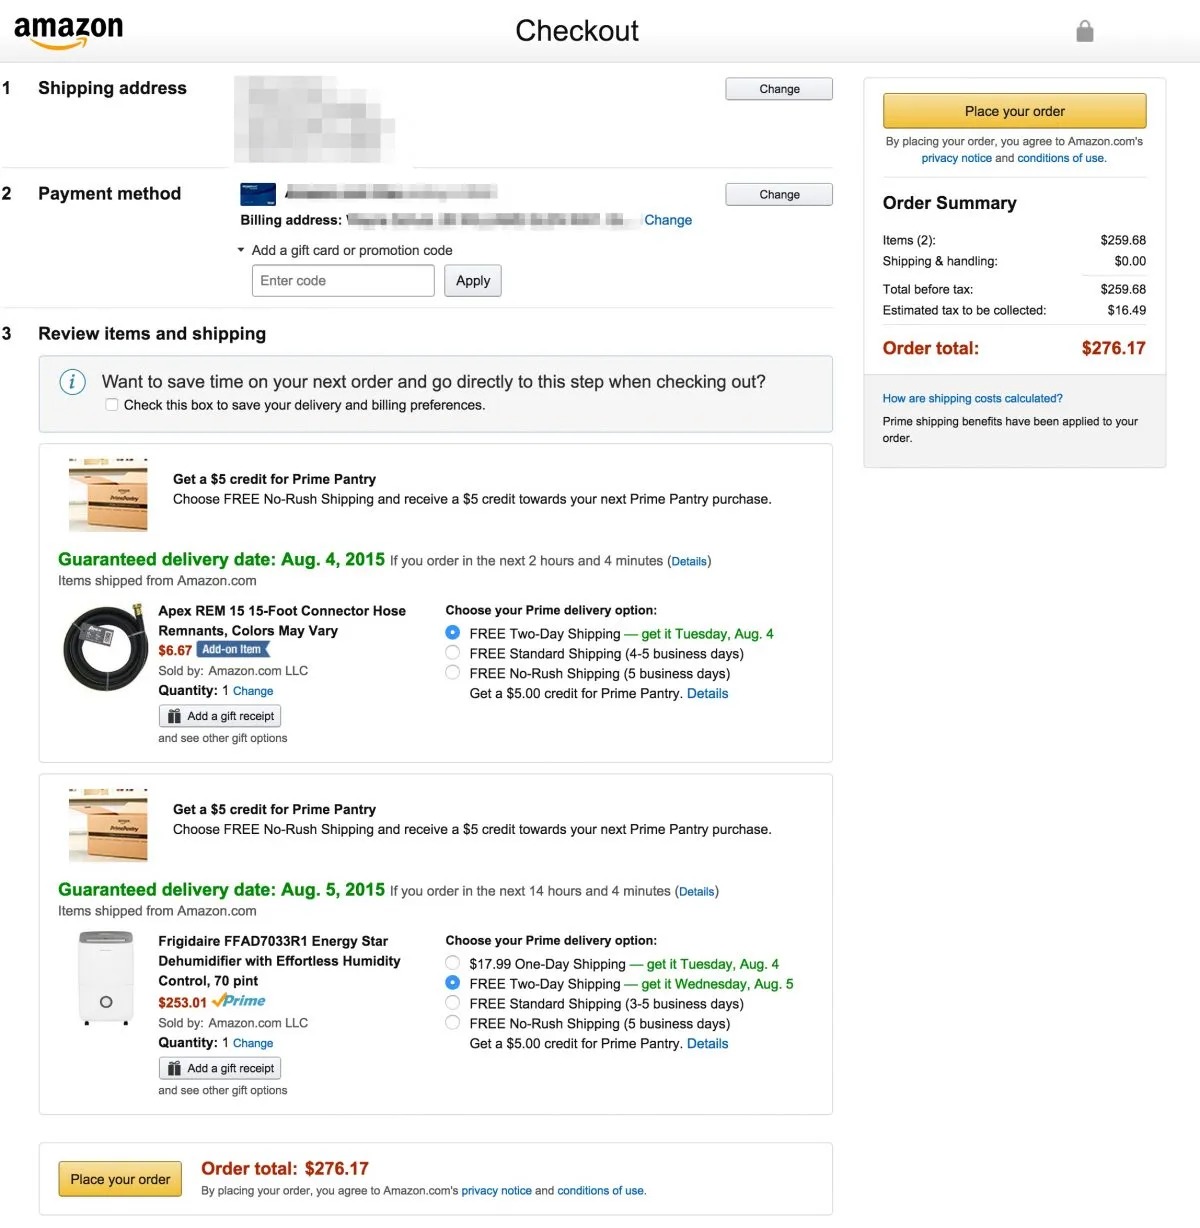
Step 4: Checking Out
After you have added all the desired products to your Pantry Box, it’s time to proceed to checkout. The checkout process is straightforward and can be completed in just a few simple steps. Follow along to navigate through the checkout process:
- Click on the “Cart” or “Pantry Box” icon located on the top right corner of the Prime Pantry page.
- Review the items in your Pantry Box to ensure they are correct and the quantities are accurate.
- If you have any items in your Pantry Box that you no longer wish to purchase, simply click on the “Delete” button next to the item to remove it.
- Once you have verified and edited your Pantry Box, click on the “Proceed to Checkout” button.
- Next, you will be prompted to choose a delivery address. Select the address where you want your Prime Pantry items to be delivered.
- After choosing the address, you will have the option to change the delivery date and time slot if available in your area.
- Review the order details, including the subtotal, taxes, and any applicable delivery fees.
- If you have any additional coupons or promotional codes, you can apply them at this stage to save even more.
- Finally, click on the “Place your order” button to complete the checkout process.
Once you have successfully placed your order, you will receive a confirmation email with the details of your purchase. Congratulations! You’re one step closer to redeeming your Prime Pantry credit. In the next step, we will explore how to apply your Prime Pantry credit to your order. Let’s move on to step 5: applying Prime Pantry credit.
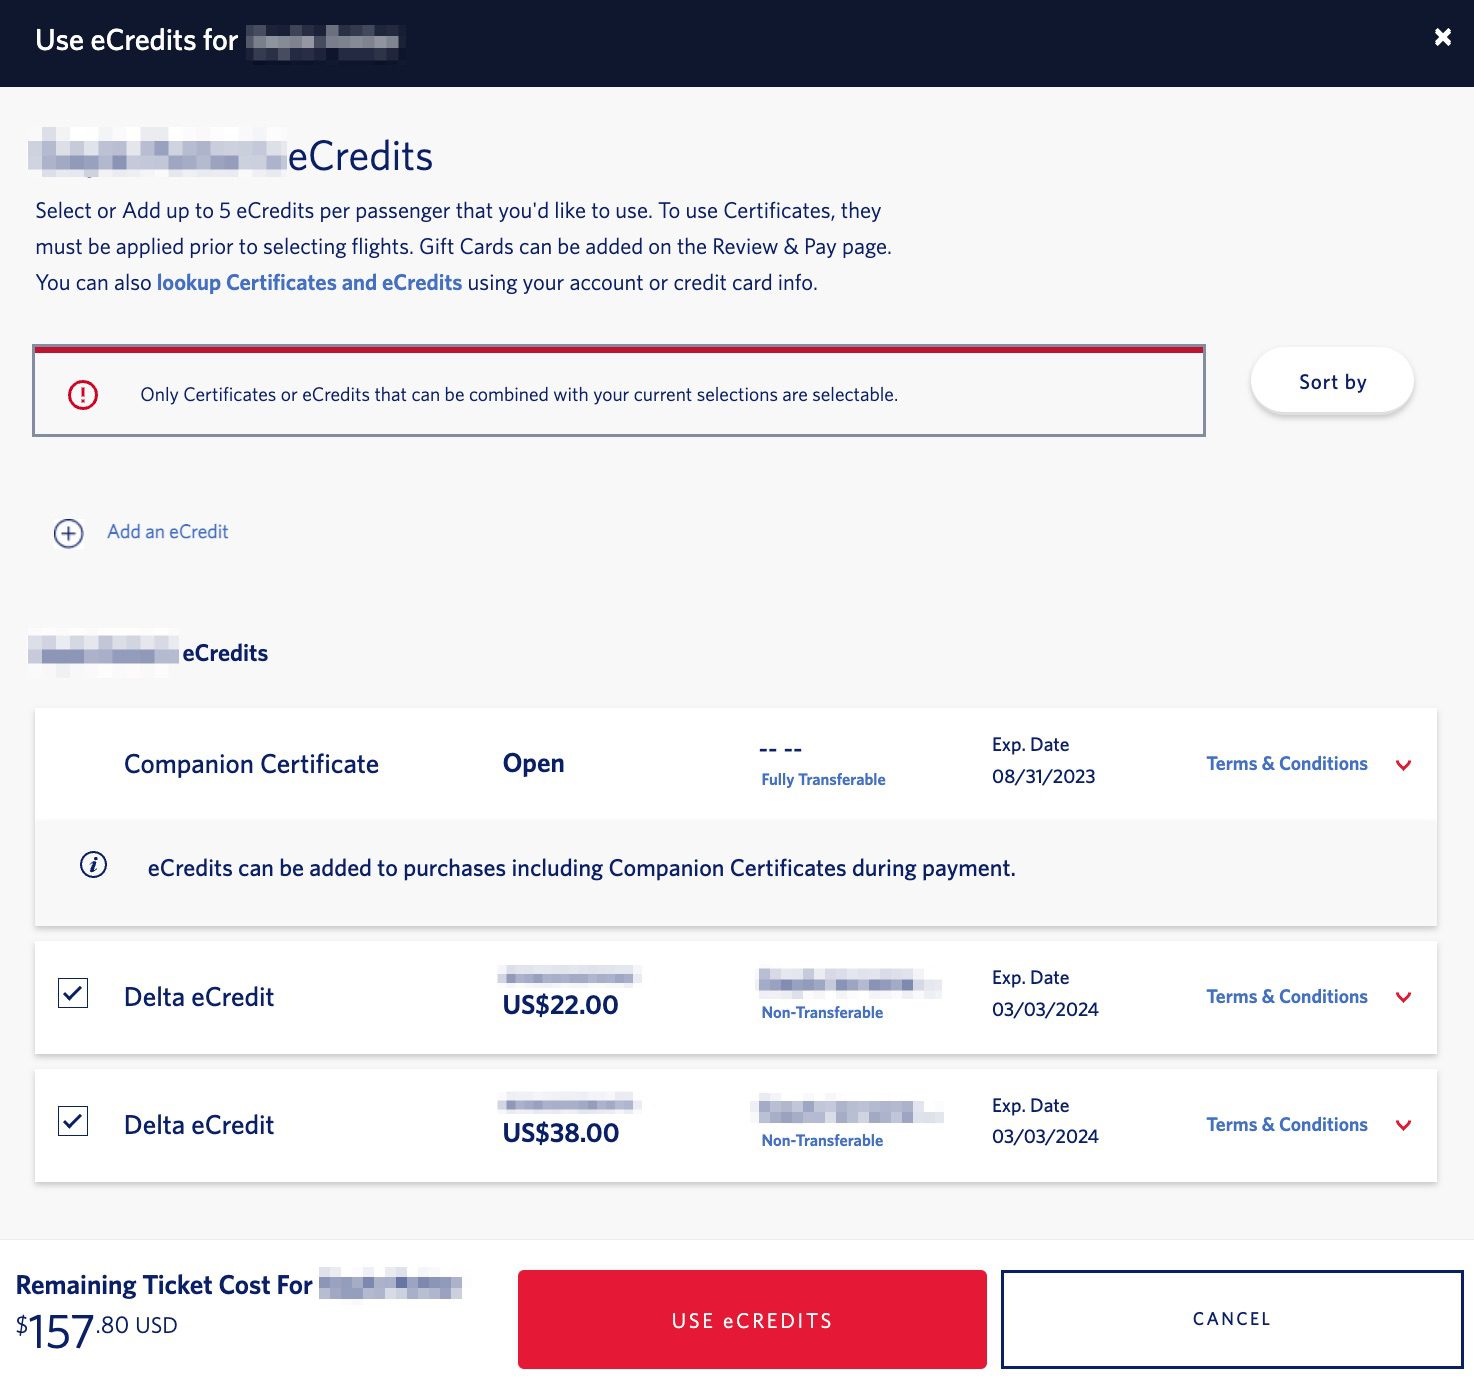
Step 5: Applying Prime Pantry Credit
Now that you’ve reached the final steps of your Prime Pantry order, it’s time to apply your Prime Pantry credit towards your purchase. Follow these simple steps to redeem your credit:
- During the checkout process, you will see the “Clip Coupons & Apply Credits” section. Here, you can find a list of available credits and coupons that can be applied to your order.
- Look for your Prime Pantry credit in the list and click on the “Clip Coupon” button next to it. This will apply the credit to your order.
- Once applied, you should see the credit deducted from your order total.
- Ensure that the credit has been successfully redeemed by reviewing the updated order total.
It’s important to note that Prime Pantry credits are typically applied automatically during checkout. However, in some cases, you may need to manually apply the credit using the steps mentioned above. Be sure to double-check that the credit is applied before completing your purchase.
Congratulations! You have successfully redeemed your Prime Pantry credit. Now it’s time to complete your purchase and look forward to receiving your items. In the final step, we will wrap up the process and provide some closing thoughts. Let’s move on to step 6: completing your purchase.
Step 6: Completing your Purchase
You’re almost there! In this final step, we will guide you through completing your Prime Pantry purchase and finalizing the transaction. Follow these steps to successfully complete your purchase:
- Review the order summary to ensure that all the details, including the items, quantities, and prices, are accurate. Take a moment to double-check everything before proceeding.
- If you have any final changes to make, such as removing or adding items, you can click on the “Edit Cart” or “Edit Order” button to make the necessary adjustments.
- Once you’re satisfied with the order, click on the “Proceed to Checkout” or “Continue with Payment” button to move forward.
- If prompted, select your preferred payment method or enter new payment details if necessary.
- Verify the billing address associated with your payment method.
- Review any additional fees, such as taxes or delivery charges, and ensure that you are comfortable with the total cost.
- Finally, click on the “Place your order” or equivalent button to confirm and complete your Prime Pantry purchase.
Once the order is placed, you will receive a confirmation email with all the details of your purchase. You can also track your order through your Amazon account. Sit back, relax, and eagerly await the arrival of your Prime Pantry items at your doorstep.
Remember, Prime Pantry offers the convenience of doorstep delivery for all your pantry essentials and household needs. With your Prime Pantry credit, you have the opportunity to save even more on your purchases. Enjoy the benefits of Prime Pantry and make the most of your shopping experience!
Congratulations on completing your Prime Pantry purchase and successfully redeeming your credit. Happy shopping!
Conclusion
Congratulations! You have now mastered the process of redeeming your Prime Pantry credit and taking advantage of the convenience and savings it offers. By following the steps outlined in this guide, you can confidently navigate the Prime Pantry platform, browse through a wide variety of products, add them to your Pantry Box, and redeem your credit at the checkout.
Prime Pantry provides a streamlined and efficient way to stock up on your pantry essentials and household items. With the added benefit of Prime Pantry credits, you can enjoy even greater savings on your purchases. Whether you’re looking for snacks, cleaning supplies, personal care products, or other everyday necessities, Prime Pantry has you covered.
Remember to regularly check your Prime Pantry credits and their expiration dates so that you don’t miss out on the opportunity to use them. By staying proactive, you can make the most of the promotional offers and maximize your savings.
So, why wait? Start exploring Prime Pantry today, take advantage of your Prime Pantry credits, and enjoy the convenience of having your favorite products delivered right to your doorstep. Happy shopping!
What's Hot
Latest Articles
Related Post

By: • Finance

By: • Finance

By: • Finance

By: • Finance

By: • Finance
By: • Finance
By: • Finance

By: • Finance
By: • Finance

By: • Finance


By: • Finance

By: • Finance

By: • Finance

By: • Finance