Finance
How To Remove Keratin Bonds At Home
Published: October 14, 2023
Learn how to remove keratin bonds at home and save money on salon expenses. Discover finance-friendly methods to safely remove hair extensions with ease.
(Many of the links in this article redirect to a specific reviewed product. Your purchase of these products through affiliate links helps to generate commission for LiveWell, at no extra cost. Learn more)
Table of Contents
Introduction
Welcome to our guide on how to remove keratin bonds at home. If you have ever gotten hair extensions with keratin bonds and it’s time for you to remove them, you may be wondering if you can do it yourself. The good news is that with the right tools and techniques, you can safely remove keratin bonds in the comfort of your own home.
Keratin bonds are a popular method for attaching hair extensions. These bonds are made of a protein called keratin, which is similar to the natural protein found in human hair. They are attached to your natural hair using a heated tool, and they provide a secure and long-lasting hold. However, when it comes time to remove the extensions, it’s important to do it correctly to avoid damaging your hair.
In this guide, we will walk you through the step-by-step process of removing keratin bonds at home. We will provide you with the necessary tools and materials needed for the job, and we will share some tips and tricks to make the process easier and more effective.
It’s important to note that if you are not confident in your ability to remove the keratin bonds yourself, it’s always best to seek professional help. However, if you are up for the challenge and want to save some money, then read on to learn how to remove keratin bonds at home.
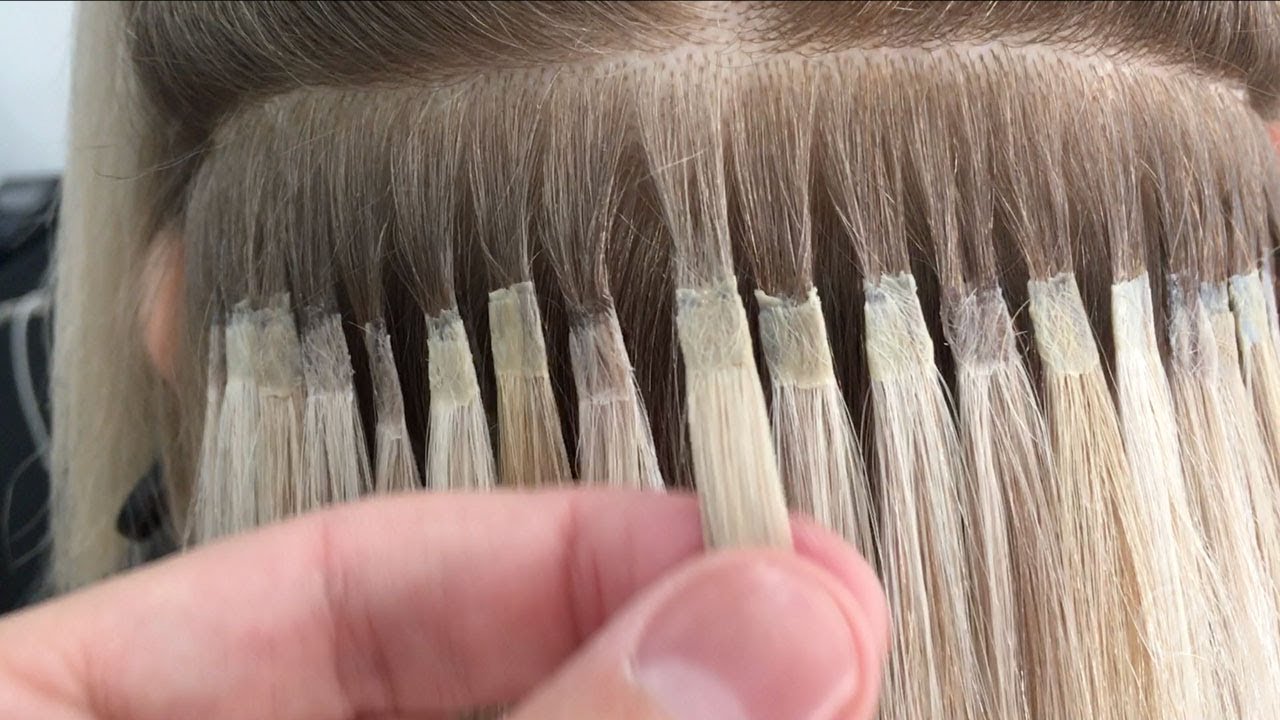
What are Keratin Bonds?
Keratin bonds, also known as fusion bonds, are a popular method used to attach hair extensions to natural hair. These bonds are made of a protein called keratin, which is a natural component of human hair. The goal of keratin bonds is to create a secure and long-lasting attachment between the extensions and your own hair.
When getting hair extensions with keratin bonds, a professional stylist will use a heated tool, usually a hot glue gun or a special fusion tool, to melt the keratin and attach the extensions to small sections of your natural hair. The melted keratin then hardens, creating a bond between the extensions and your own hair.
Keratin bonds are popular for several reasons. First, they provide a natural and seamless look, as the bonds are typically small and discreet. They also offer a strong hold, allowing the extensions to stay in place for an extended period of time. Additionally, keratin bonds are versatile and can be used with various hair types and textures.
One important thing to note is that keratin bonds are not a one-size-fits-all solution. The size and shape of the bonds can vary depending on the brand or type of extensions being used, as well as the technique used by the stylist. It’s crucial to consult with a professional or read the manufacturer’s instructions to understand the specific details and maintenance requirements for your particular keratin bond extensions.
When it comes time to remove keratin bonds, it’s essential to proceed with caution to avoid damaging your natural hair. Next, we will dive into the tools and materials you will need to safely remove keratin bonds at home.
Tools and Materials Needed
Before you begin the process of removing keratin bonds, it’s important to gather all the necessary tools and materials. Having everything on hand will make the process smoother and more efficient. Here are the tools and materials you will need:
- Wide-tooth comb or detangling brush: This will help you gently detangle your hair before and during the removal process.
- Clip or hair tie: You will need something to section off your hair, keeping it out of the way as you work on removing the bonds.
- Oil-based hair product: Choose a hair product that is oil-based, such as coconut oil or almond oil. This will help to loosen the keratin bonds for easier removal.
- Keratin bond remover gel: This is a specialized product designed to dissolve the keratin bonds. Look for a high-quality bond remover gel specifically made for hair extensions.
- Keratin bond remover tool: This tool is specifically designed to break apart the keratin bonds without causing damage to your hair. It usually looks like a small hook or clamp.
- Heat source: You will need a heat source, such as a hair dryer or a flat iron, to soften and loosen the keratin bonds for removal.
- Towel or cloth: Have a towel or cloth nearby to wipe away any excess oil or bond remover gel.
- Shampoo and conditioner: After removing the keratin bonds, you will want to wash and condition your hair to remove any remaining residue and keep your hair healthy.
Make sure to gather all these tools and materials before you start the process. This will ensure a smooth and successful removal of the keratin bonds. In the next section, we will walk you through the step-by-step process of removing the bonds from your hair.
Step 1: Prepare Your Hair
The first step in removing keratin bonds is to properly prepare your hair. This will help ensure that the removal process is smooth and minimizes any potential damage to your natural hair. Here’s how to prepare your hair:
- Start by gently brushing your hair with a wide-tooth comb or detangling brush to remove any tangles or knots. This will make it easier to work with your hair during the removal process.
- Section off your hair using a clip or hair tie. Divide your hair into manageable sections, starting from the nape of your neck and working your way up to the crown of your head. This will make it easier to focus on one section at a time.
- Apply an oil-based hair product, such as coconut oil or almond oil, to the sections of hair where the keratin bonds are attached. The oil will help to loosen the bonds, making them easier to remove.
- Gently massage the oil into your hair, focusing on the areas with the keratin bonds. This will ensure that the oil gets distributed evenly and thoroughly coats the bonds.
By preparing your hair in this way, you are setting a solid foundation for the keratin bond removal process. The oil will begin working to loosen the bonds, making the next steps more effective and efficient. In the next section, we will discuss how to apply heat to the bonds for further loosening.
Step 2: Apply Oil
After preparing your hair, the next step in removing keratin bonds is to apply oil to further loosen the bonds. The oil acts as a lubricant, making it easier to separate the bonds from your natural hair. Here’s how to apply oil:
- Take a small amount of oil-based hair product, such as coconut oil or almond oil, and warm it between your palms. This will make the oil easier to apply and spread throughout your hair.
- Starting from the bottom section of your hair, apply the oil to the areas where the keratin bonds are attached. Make sure to focus on the bonds themselves, as well as the surrounding hair.
- Gently massage the oil into your hair, ensuring that it coats the bonds completely. Use your fingers to work the oil into the hair, helping to break down the adhesive properties of the keratin bonds.
- Continue applying oil and massaging it into each section of hair with keratin bonds until all the bonds have been thoroughly coated.
The oil will help to break down the bond adhesive, making it easier to separate the extensions from your natural hair. This step is crucial to avoid any unnecessary pulling or tugging during the bond removal process. Once you have applied the oil, you are ready to move on to the next step: separating the bonds.
Step 3: Separate the Bonds
After applying oil to your hair, the next step in removing keratin bonds is to separate the bonds from your natural hair. This process requires careful and gentle handling to prevent any damage to your hair. Here’s how to separate the bonds:
- Take a small section of hair with the keratin bond and hold it between your fingers.
- Using a keratin bond remover tool, gently clamp or hook onto the bond, making sure to grip it close to the root of your hair.
- Apply gentle pressure and wiggle the remover tool back and forth to loosen the bond. Be patient and avoid pulling or tugging, as this can cause breakage or damage to your hair.
- Once the bond has loosened, use your fingers to carefully unravel and separate the extension hair from your natural hair. Take your time and work from the top down to avoid any unnecessary pulling.
- Continue this process with each individual bond, working your way through each section of hair with keratin bonds.
It’s important to remember to be patient and gentle throughout this step. Rushing or forcefully removing the bonds can lead to hair breakage or damage. Take breaks if needed and be mindful of any discomfort or pulling sensation. Once you have separated all the bonds, it’s time to move on to the next step: applying heat.
Step 4: Heat the Bonds
With the bonds separated, the next step in removing keratin bonds is to apply heat. Heat helps to further soften the bonds, making them easier to remove from your natural hair. Here’s how to heat the bonds:
- Choose a heat source, such as a hair dryer or a flat iron, and set it to a low-to-medium heat setting. Make sure not to use excessive heat, as this can cause damage to your hair.
- Hold the heat source near the keratin bond, keeping it a safe distance to avoid direct contact with your hair. Gently apply heat to the bond by directing the airflow or the heat plates of the flat iron towards the bond.
- Continue applying heat to the bond for a few seconds, or until you feel the bond start to soften. Be careful not to overheat the bond or your hair.
- Once the bond has softened, use the keratin bond remover tool or your fingers to gently slide or wiggle the bond off your hair. The softened bond should easily come off without causing any discomfort or breakage to your hair.
- Repeat this process for each keratin bond, applying heat and removing them one at a time.
Take your time during this step and be mindful of the heat you are applying. Too much heat can cause damage to your hair, so always prioritize the health and safety of your natural hair. After removing all the bonds, it’s time to move on to the next step: washing and conditioning your hair.
Step 5: Remove the Bonds
After applying heat to soften the keratin bonds, the next step in removing them is the actual removal process. With the bonds loosened, they can be safely removed from your natural hair. Here’s how to remove the bonds:
- Take your fingers or the keratin bond remover tool and gently slide or wiggle the softened bond off your hair. Start from the top and work your way down to avoid any unnecessary pulling or tugging.
- If you encounter any resistant bonds that do not easily come off, avoid forcing it. Instead, apply a bit more heat and/or oil to further loosen the bond before attempting to remove it again.
- Continue removing each bond one by one, taking care to be gentle and patient throughout the process.
- As you remove the bonds, place them aside in a designated container or area to ensure they are properly discarded or saved if they are reusable.
It’s important to note that some keratin bonds may leave behind a bit of residue or stickiness on your natural hair. Don’t worry, as this can be addressed in the next step. Once you have successfully removed all the bonds, it’s time to move on to the final step: washing and conditioning your hair.
Step 6: Wash and Condition Your Hair
After removing the keratin bonds, it is essential to wash and condition your hair to remove any residue and keep your natural hair healthy and nourished. Here’s how to wash and condition your hair:
- Start by rinsing your hair with warm water. Use your fingers to gently massage your scalp and ensure that all the leftover residue from the bond removal process is rinsed away.
- Apply a hydrating shampoo to your hair, focusing on the roots and working your way down to the ends. Gently lather the shampoo and rinse thoroughly.
- Follow up with a moisturizing conditioner, applying it generously throughout your hair. Leave the conditioner on for a few minutes to allow it to deeply nourish your strands.
- Rinse your hair thoroughly with cool water to seal the cuticles and promote shine.
- Once you have rinsed out the conditioner, towel-dry your hair by gently squeezing out the excess water. Avoid rough towel-drying, as this can cause hair breakage.
- Apply a leave-in conditioner or a hair serum to protect and nourish your hair. This will help to restore moisture and maintain the health of your natural hair.
- Allow your hair to air dry if possible. If you need to use heat styling tools, take precautions by using a heat protectant spray to minimize damage.
By washing and conditioning your hair after removing the keratin bonds, you ensure that your natural hair is clean, nourished, and ready for styling. Regular hair care maintenance will help your natural hair remain healthy and continue to grow strong.
Remember, if you are unsure about any aspect of the keratin bond removal process or if you encounter difficulties, it is always recommended to seek professional help to avoid any potential damage to your hair. With careful attention and patience, you can successfully remove keratin bonds at home and maintain the health and integrity of your natural hair.
Conclusion
Removing keratin bonds at home can be a cost-effective and convenient way to take out your hair extensions. With the right tools, materials, and techniques, you can safely and effectively remove the bonds without causing damage to your natural hair.
Throughout this guide, we’ve covered the step-by-step process of removing keratin bonds at home. From preparing your hair and applying oil to separating the bonds, applying heat, and finally removing the bonds, each step is crucial to a successful bond removal process.
Remember to take your time, be patient, and prioritize the health of your hair. Rushing or using excessive force can result in hair breakage or damage. If you encounter any difficulties, it’s always best to seek professional help to ensure a seamless and damage-free bond removal experience.
After removing the keratin bonds, don’t forget to wash and condition your hair to remove any residue and maintain its health and vitality. By following these steps and taking good care of your natural hair, you can enjoy the benefits of hair extensions and keep your hair looking beautiful.
We hope that this guide has provided you with valuable insights and instructions on how to remove keratin bonds at home. Whether you’re transitioning to a new hairstyle or simply ready to remove your extensions, following these steps will help you achieve the desired results. Take care of your hair, explore new styles, and enjoy the freedom of maintaining your look in the comfort of your own home!
What's Hot
Latest Articles
Related Post

By: • Finance
By: • Finance

By: • Finance

By: • Finance
By: • Finance

By: • Finance

By: • Finance

By: • Finance
By: • Finance

By: • Finance


By: • Finance

By: • Finance

By: • Finance