Finance
How To Transfer Apple Cash To Apple Savings
Published: January 16, 2024
Learn how to transfer funds from your Apple Cash account to your Apple Savings account. Take control of your finances with this easy step-by-step guide. #Finance
(Many of the links in this article redirect to a specific reviewed product. Your purchase of these products through affiliate links helps to generate commission for LiveWell, at no extra cost. Learn more)
Table of Contents
Introduction
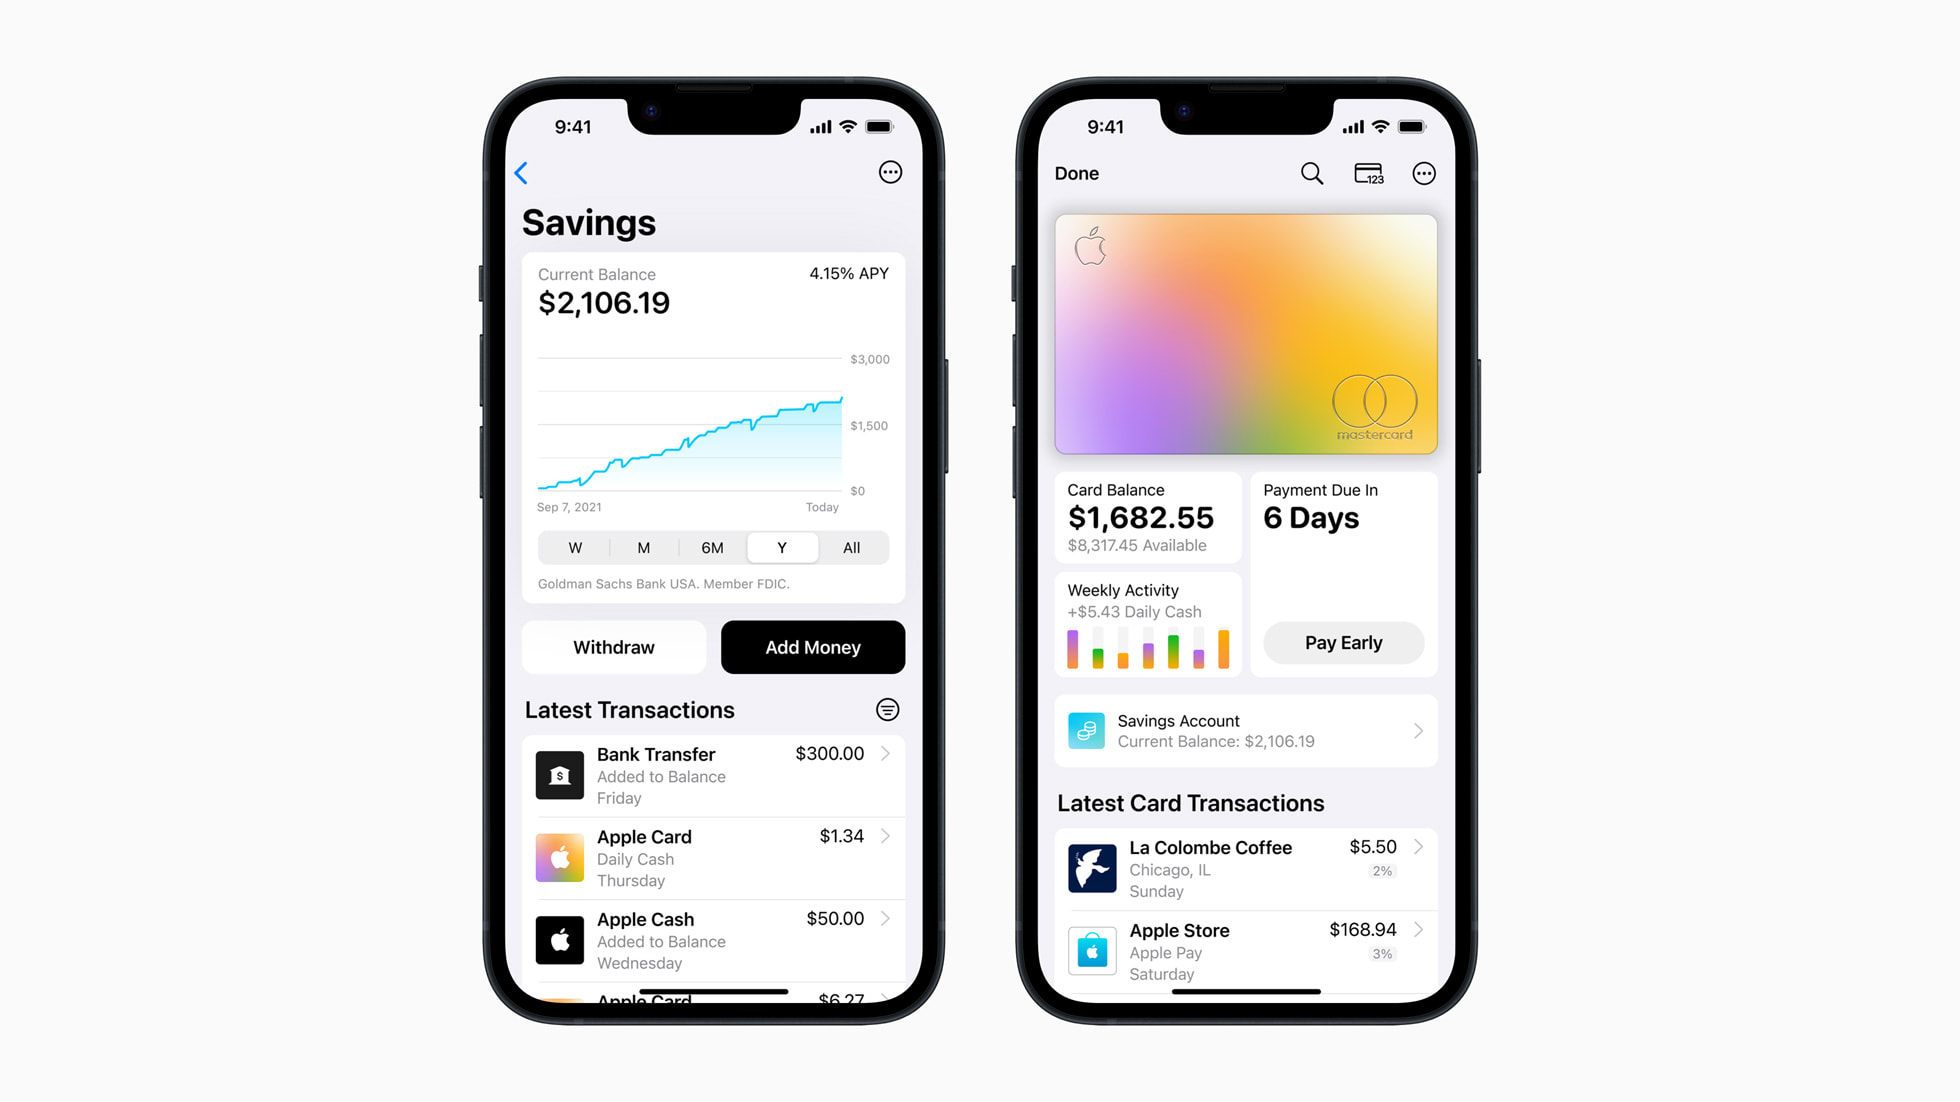
Transferring funds from your Apple Cash account to your Apple Savings account is a convenient way to manage your finances and save money. Apple Cash, a feature of Apple Pay, allows you to send, receive, and store money directly from your iPhone or Apple Watch. Apple Savings, on the other hand, is a virtual savings account provided by Apple in partnership with Green Dot Bank. It offers a competitive interest rate and the flexibility to manage your savings within the Apple ecosystem.
Whether you want to save for a future expense, build an emergency fund, or simply grow your savings, transferring funds from Apple Cash to Apple Savings can help you reach your financial goals. In this article, we will guide you through the process of transferring money seamlessly between these two accounts.
Please note that to follow these steps, you’ll need an iPhone or Apple Watch with Apple Pay activated, as well as a verified Apple Cash account. If you haven’t set up Apple Cash yet, you can do so through the Wallet app on your device.
Now let’s dive into the step-by-step process of transferring funds from Apple Cash to Apple Savings and start optimizing your savings strategy!
Step 1: Open the Apple Cash App
The first step in transferring funds from Apple Cash to Apple Savings is to open the Apple Cash app on your iPhone or Apple Watch. The app icon resembles a green dollar sign ($) inside a white circle.
To open the app on your iPhone, locate the Wallet app on your home screen and tap on it. Once you’re in the Wallet app, scroll down to find the Apple Cash card and tap on it to open the Apple Cash app.
If you’re using an Apple Watch, simply press the side button on your watch to access the app selection screen. Find the Wallet app icon and tap on it to open the app. Once you’re in the Wallet app, swipe left or right until you see the Apple Cash card, and tap on it to open the Apple Cash app.
Once you have successfully opened the Apple Cash app, you will have access to various features and options for managing your money.
It is important to note that Apple Cash is only available in the United States, so if you’re located outside of the U.S, you may not have access to this feature.
Now that you have opened the Apple Cash app, let’s move on to the next step, which is linking your Apple Cash account to Apple Savings.
Step 2: Link Apple Cash to Apple Savings
Now that you have the Apple Cash app open, the next step is to link your Apple Cash account to your Apple Savings account. This will allow you to seamlessly transfer funds between the two accounts.
To link your Apple Cash account to Apple Savings, follow these steps:
- From the Apple Cash app’s home screen, tap on the “Bank Accounts” option.
- Next, tap on the “Link Bank Account” button.
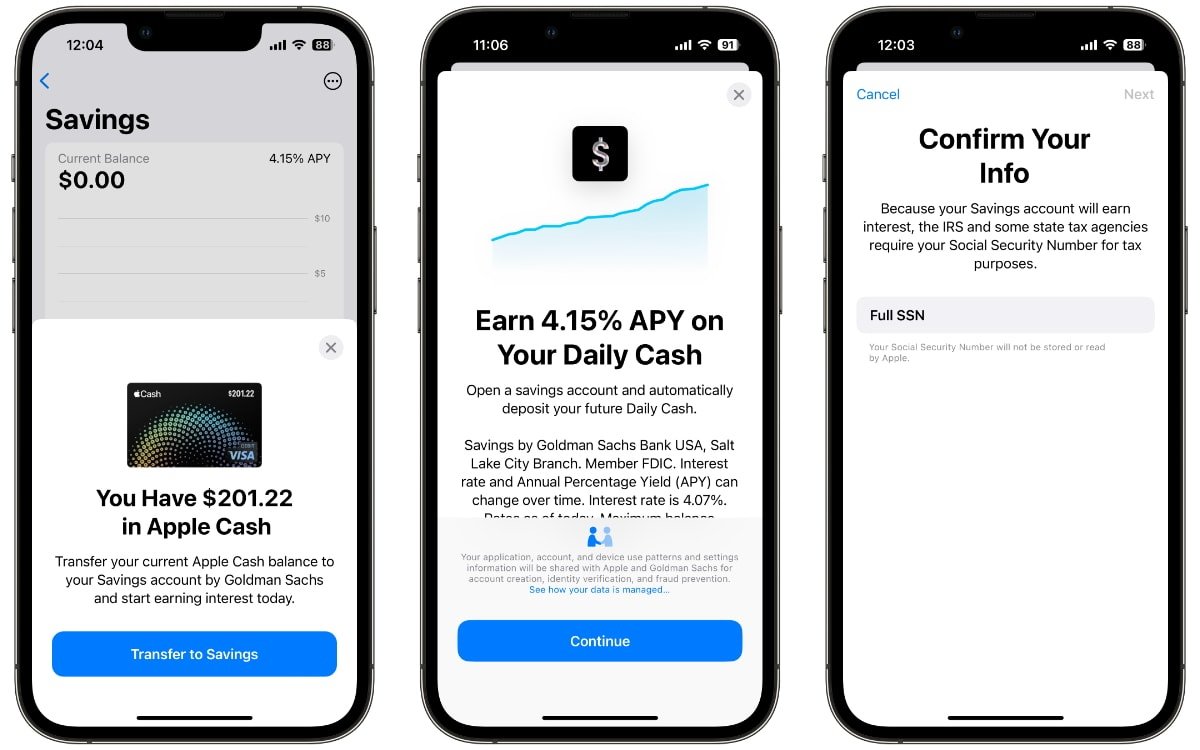
- You will be prompted to enter your personal details, including your full name, date of birth, and Social Security number (or other identification information).
- Once you have provided the requested information, tap on the “Continue” button.
- Follow the on-screen instructions to verify your identity. This may involve answering security questions or providing additional documentation.
- After successfully verifying your identity, you will be directed to a page where you can link your Apple Cash account to Apple Savings.
- Tap on the “Link Account” button and enter your Apple Savings account information, including the account number and routing number.
- After entering the required information, tap on the “Save” button to link your Apple Cash account to Apple Savings.
Once your accounts are linked, you will be able to transfer funds from your Apple Cash balance to your Apple Savings account with ease.
It is worth noting that, at the time of this article’s writing, Apple Savings is only available to customers who have successfully completed the identity verification process and maintain an active Apple Cash account.
Now that you have linked your Apple Cash account to Apple Savings, let’s move on to the next step: transferring money from Apple Cash to Apple Savings.
Step 3: Transfer Money from Apple Cash to Apple Savings
With your Apple Cash account linked to Apple Savings, you can now proceed to transfer money from Apple Cash to Apple Savings. This step allows you to move funds from your spending account to your savings account seamlessly.
To transfer money from Apple Cash to Apple Savings, follow these steps:
- Open the Apple Cash app on your iPhone or Apple Watch.
- From the app’s home screen, locate the “Transfer to Bank” option and tap on it.
- You will be presented with the option to choose the amount you want to transfer. Enter the desired amount using the on-screen keypad.
- After entering the amount, review the transfer details to ensure accuracy.
- If everything looks correct, tap on the “Transfer” button to initiate the transfer.
- Wait for the transfer process to complete. This may take a few moments, so please be patient.
Once the transfer is complete, the funds will be deducted from your Apple Cash account and added to your Apple Savings account. You can now enjoy the benefits of having your money in a separate savings account and potentially earn interest on your savings.
It is important to note that there may be transfer limits imposed by Apple or your financial institution. These limits can vary depending on factors such as your account status and transaction history. If you encounter any issues or have concerns regarding transfer limits, it is advisable to contact Apple Support for further assistance.
Now that you have successfully transferred money from Apple Cash to Apple Savings, let’s move on to the final step: confirming the transfer.
Step 4: Confirm the Transfer
After transferring money from your Apple Cash account to your Apple Savings account, it is important to confirm the transfer to ensure it was executed successfully.
To confirm the transfer, follow these steps:
- Open the Apple Cash app on your iPhone or Apple Watch.
- From the app’s home screen, locate the “Transfers” tab and tap on it.
- You will see a list of recent transfers. Find the transfer you made from Apple Cash to Apple Savings and tap on it.
- Review the details of the transfer, including the amount transferred and the date and time.
- If all the details are correct, you can consider the transfer confirmed.
Confirming the transfer gives you peace of mind and ensures that the funds have been successfully moved from your Apple Cash account to your Apple Savings account. It also allows you to keep track of your financial transactions and maintain accurate records.
If you notice any discrepancies or issues with the transfer, such as an incorrect amount or an unsuccessful transfer, it is recommended to contact Apple Support or your financial institution for assistance. They will be able to investigate the issue and provide further guidance.
Congratulations! You have successfully transferred money from your Apple Cash account to your Apple Savings account and confirmed the transfer. Your savings are now secure and ready to grow as you continue to manage your finances through the convenience of Apple’s ecosystem.
Remember to regularly review your savings goals, contribute to your Apple Savings account, and monitor your progress as you work towards achieving financial success.
Thank you for following this step-by-step guide. We hope it has been helpful in assisting you with transferring money from Apple Cash to Apple Savings. Happy saving!
Conclusion
Transferring funds from your Apple Cash account to your Apple Savings account is a simple and efficient way to manage your finances and work towards your savings goals. By following the steps outlined in this guide, you can seamlessly move money from your spending account to your savings account within the Apple ecosystem.
With Apple Cash, you have the convenience of sending, receiving, and storing money right from your iPhone or Apple Watch. Apple Savings, on the other hand, provides you with a virtual savings account that offers competitive interest rates, allowing your savings to grow over time.
By linking your Apple Cash account to Apple Savings, you can easily transfer funds between the two accounts with just a few taps. This helps you separate your spending and savings, making it easier to track your progress and stay committed to your financial goals.
Remember to regularly review your savings goals, contribute to your Apple Savings account, and monitor your progress. Taking advantage of the features and benefits offered by Apple Cash and Apple Savings can help you optimize your savings strategy and achieve financial success.
If you encounter any issues or have questions along the way, don’t hesitate to reach out to Apple Support or your financial institution for assistance. They are there to help you navigate the transfer process and address any concerns you may have.
Congratulations on taking the first step towards managing your finances and building your savings with Apple Cash and Apple Savings. Start transferring money today and watch your savings grow!
What's Hot
Latest Articles
Related Post

By: • Finance
By: • Finance

By: • Finance

By: • Finance
By: • Finance

By: • Finance
By: • Finance
By: • Finance

By: • Finance

By: • Finance

By: • Finance


By: • Finance
By: • Finance