Home>Finance>How To Transfer Money From Checking To Savings (Chase)
Finance
How To Transfer Money From Checking To Savings (Chase)
Published: January 16, 2024
Learn how to transfer money seamlessly from your Chase checking account to your savings account in this helpful finance guide. Manage your finances efficiently with Chase.
(Many of the links in this article redirect to a specific reviewed product. Your purchase of these products through affiliate links helps to generate commission for LiveWell, at no extra cost. Learn more)
Table of Contents
- Introduction
- Step 1: Sign in to your Chase online banking account
- Step 2: Navigate to your checking account
- Step 3: Locate the “Transfer Money” option
- Step 4: Select your savings account as the recipient
- Step 5: Specify the transfer amount
- Step 6: Review and confirm the transaction
- Step 7: Verify the transfer in your savings account
- Step 8: Keep track of your transfer history
- Step 9: Additional tips and considerations
- Conclusion
Introduction
Transferring money from your checking account to your savings account is a convenient and strategic way to manage your finances. Whether you’re looking to save for an upcoming expense, build an emergency fund, or simply grow your savings over time, transferring money from checking to savings is a smart move.
In this article, we will guide you through the process of transferring money from your checking to savings account with Chase, a well-known and widely used banking institution. Chase offers a user-friendly online banking platform that allows you to easily manage your accounts and perform various financial transactions, including transfers between accounts.
By following our step-by-step instructions, you’ll be able to transfer money from your Chase checking account to your savings account in no time. We’ll also provide you with some additional tips and considerations to make the most of your transfer and keep track of your finances.
Please note that the steps outlined in this guide specifically pertain to transferring money from a Chase checking account to a Chase savings account. If you’re using a different banking institution, the process may slightly differ. However, the general principles and concepts discussed here can still be applied to most online banking platforms.
So, whether you’re saving up for a dream vacation or building a rainy day fund, let’s dive into the process of transferring money from your Chase checking account to your savings account.
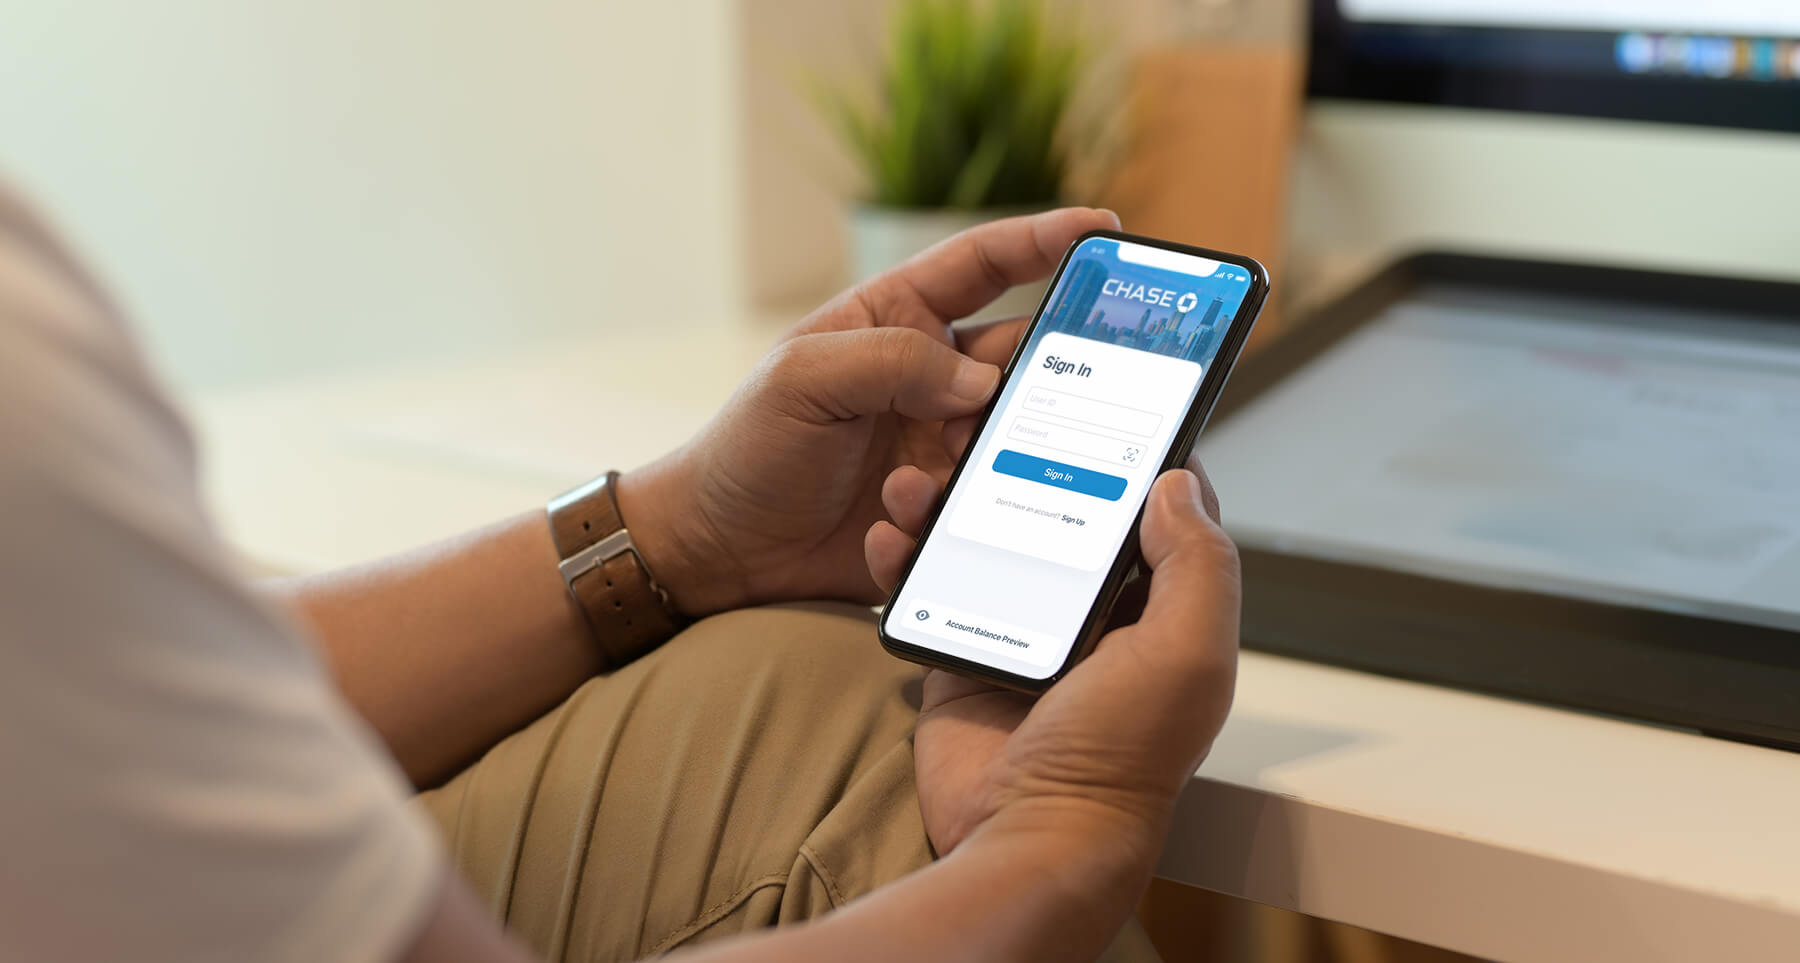
Step 1: Sign in to your Chase online banking account
The first step to transferring money from your Chase checking account to your savings account is to sign in to your Chase online banking account. If you don’t have an account, you can easily create one by visiting the Chase website and clicking on the “Enroll Now” button.
Once you have your online banking credentials, follow these steps:
- Go to the Chase website or open the Chase mobile app on your smartphone or tablet.
- Click on the “Sign In” button located at the top right corner of the page. This will take you to the login screen.
- Enter your Chase username and password in the respective fields.
- Click on the “Sign In” button to log in to your account.
Make sure to use a secure internet connection and keep your login credentials confidential to ensure the safety of your personal and financial information.
By signing in to your Chase online banking account, you gain access to a wide range of features and services that allow you to manage your accounts, view transactions, pay bills, and, of course, transfer money between your checking and savings accounts.
If you’re having trouble signing in or accessing your account, you can contact Chase customer support for assistance. They are available 24/7 and will be able to help you resolve any issues you may encounter.
Now that you’re signed in, let’s move on to the next step: navigating to your checking account.
Step 2: Navigate to your checking account
After signing in to your Chase online banking account, the next step is to navigate to your checking account. Here’s how you can do it:
- Once you’re logged in, you’ll be taken to the account overview page that displays a summary of your accounts.
- Look for a section labeled “Accounts” or “My Accounts” on the page. This is where you’ll find all of your linked Chase accounts.
- Locate your checking account in the list. It is usually displayed with the account name, account number, and current balance.
- Click on your checking account to access its details and transactions.
Chase’s online banking platform provides a user-friendly interface that makes it easy to find and navigate to your different accounts. You may also have the option to customize your dashboard to prioritize your most frequently used accounts for quicker access in the future.
Once you’ve successfully navigated to your checking account, you’re one step closer to transferring money to your savings account.
Now, let’s move on to the next step: locating the “Transfer Money” option.
Step 3: Locate the “Transfer Money” option
With your Chase online banking account open and your checking account selected, the next step is to locate the “Transfer Money” option. Follow these simple steps:
- Look for a navigation menu or sidebar on the left-hand side of your screen. This menu will contain various options and features related to your accounts.
- Scan the menu for an option labeled “Transfers” or “Transfer Money”. It may be listed under a section such as “Move Money”, “Payments”, or “Send Money”.
- Click on the “Transfers” or “Transfer Money” option to proceed.
Chase’s online banking platform is designed to be intuitive and user-friendly, so locating the “Transfer Money” option should be straightforward. If you’re having trouble finding it, you can use the search bar on the page and type in “transfer” to quickly locate the relevant option.
Once you’ve successfully located the “Transfer Money” option, you’re ready to move on to the next step: selecting your savings account as the recipient of the transfer.
Step 4: Select your savings account as the recipient
After navigating to the “Transfer Money” section in your Chase online banking account, it’s time to select your savings account as the recipient of the transfer. Follow these steps:
- On the “Transfer Money” page, you will typically see two account fields: “From” and “To”. The “From” field should already be populated with your checking account.
- Click on the “To” field to open a drop-down menu or a list of your eligible accounts.
- Scroll through the list or use the search function to locate and select your savings account. You may need to click on the account name or checkbox to confirm your selection.
By selecting your savings account as the recipient, you’re indicating that you want to transfer money from your checking account to your savings account. This step ensures that the funds are allocated correctly and deposited into your desired account.
Note that if you don’t see your savings account listed, it’s possible that it is not linked to your online banking profile. In that case, you may need to contact Chase customer support or visit a branch to link your savings account. Once linked, you’ll be able to select it as the recipient for future transfers.
Now that you’ve successfully selected your savings account, let’s move on to the next step: specifying the transfer amount.
Step 5: Specify the transfer amount
After selecting your savings account as the recipient, the next step is to specify the transfer amount. Here’s how you can do it:
- In the “Transfer Money” section of your Chase online banking account, you’ll typically see a field or option labeled “Amount”.
- Click on the “Amount” field to activate it and enter the desired transfer amount.
- Make sure to double-check the amount you enter to ensure accuracy. You may also have the option to select a pre-set amount or choose from a list of common transfer amounts.
When specifying the transfer amount, keep in mind any minimum or maximum limits set by Chase or any fees associated with the transfer. It’s also important to consider your available balance in the checking account to ensure you have sufficient funds for the transfer.
Chase’s online banking platform may offer additional options or features related to the transfer amount. For example, you may be able to set up recurring transfers or schedule the transfer for a specific date in the future.
Once you’ve entered the transfer amount and reviewed all the details, you’re ready to move on to the next step: reviewing and confirming the transaction.
Step 6: Review and confirm the transaction
After specifying the transfer amount, it’s important to review and confirm the transaction before finalizing it. Follow these steps to ensure accuracy:
- Take a moment to carefully review the details of the transfer on the confirmation screen. Check the transfer amount, the “From” and “To” accounts, and any scheduled or recurring options.
- If everything looks correct, click on the “Review” or “Confirm” button to proceed. This will typically be located at the bottom of the page.
- Some online banking platforms may require you to provide additional security measures, such as entering a one-time verification code sent to your registered phone number or email address.
- Follow any additional prompts or steps provided to finalize the transaction.
It’s vital to review the transaction details to avoid any mistakes or errors. Double-checking ensures that the correct amount is being transferred from your checking account to your savings account, and that the correct accounts are selected.
If you notice any discrepancies or need to make changes, most online banking platforms offer the option to go back and modify the transfer before confirming it.
Once you’ve reviewed and confirmed the transaction, Chase will process the transfer, and the funds will be deducted from your checking account and deposited into your savings account. The timeframe for the transfer to complete may vary, so it’s important to check your account balance and transaction history to verify the successful transfer.
Now that you’ve reviewed and confirmed the transaction, let’s move on to the next step: verifying the transfer in your savings account.
Step 7: Verify the transfer in your savings account
After completing the transfer from your checking account to your savings account, it’s important to verify that the transaction has been successfully processed. Here’s how you can do it:
- Return to the account overview page or navigate to your savings account within your Chase online banking account.
- Check the account balance to ensure that the transferred amount reflects in your savings account. It may take a few moments for the transaction to be processed and for the updated balance to be displayed.
- Review the transaction history to confirm that the transfer from your checking account is listed with the correct amount and date.
Verifying the transfer in your savings account ensures that the funds have been successfully deposited and that your savings balance reflects the newly transferred amount.
If you don’t see the transfer reflected in your savings account, don’t panic. Sometimes, transfers may take a little longer to appear due to processing timelines or delays in system updates. However, if the transfer doesn’t show up after a reasonable amount of time, it’s best to contact Chase customer support for assistance and clarification.
By regularly checking your account balance and transaction history, you can stay on top of your finances and ensure that all transfers are accurately recorded.
Now that you’ve verified the transfer in your savings account, let’s move on to the next step: keeping track of your transfer history.
Step 8: Keep track of your transfer history
Keeping track of your transfer history is an essential part of managing your finances effectively. By monitoring your transfer activity, you can stay informed about your savings goals, identify any discrepancies, and maintain an accurate record of your financial transactions. Here’s how you can do it:
- In your Chase online banking account, navigate to your account activity or transaction history section. This is where you can view a detailed record of all your financial transactions, including transfers.
- Look for a filter or search option that allows you to narrow down the results to only show transfer transactions.
- Set a date range to review transfers within a specific period, making it easier to track your recent activity.
- Take note of the transfer details, such as the date, amount, and the accounts involved. This information will help you reconcile your records and ensure accuracy.
- You may also have the option to export or download your transfer history for further analysis or record-keeping purposes.
By regularly checking and reviewing your transfer history, you can quickly identify any errors or discrepancies that may require attention. It also provides you with a clear overview of your savings progress and helps you stay on track with your financial goals.
If you notice any unauthorized transfers or discrepancies in your transfer history, it’s crucial to contact Chase customer support immediately. They will assist you in investigating and resolving any issues related to your transfer activity.
Now that you know how to keep track of your transfer history, let’s move on to the final step: additional tips and considerations for a smooth transfer process.
Step 9: Additional tips and considerations
While transferring money from your checking to savings account with Chase is a relatively straightforward process, here are some additional tips and considerations to ensure a smooth and successful transfer:
- Set up automatic transfers: To make saving even easier, consider setting up automatic transfers from your checking to savings account. This way, a specified amount will be transferred regularly without the need for manual intervention.
- Monitor transfer limits: In some cases, there may be limits on the amount you can transfer from your checking account to your savings account in a single transaction or within a specific time period. Be aware of these limits to avoid any inconvenience.
- Consider transfer fees: While Chase generally does not charge fees for internal transfers between your own accounts, it’s always a good idea to double-check for any potential fees. Some exceptions may apply depending on your account type or specific circumstances.
- Keep track of your account balances: Regularly monitoring your account balances is essential to ensure that you have sufficient funds in your checking account to cover transfers to your savings account. Avoid overdraft situations by keeping a close eye on your available balances.
- Stay vigilant against fraud: Be cautious about sharing your online banking credentials and personal information. Always access your Chase online banking account through official channels, use secure internet connections, and regularly review your account activity for any suspicious transactions.
- Utilize mobile banking: Chase offers a mobile banking app that allows you to conveniently manage your accounts on the go. Consider downloading the app to access your accounts, initiate transfers, and monitor your financial activity anytime, anywhere.
By following these additional tips and considerations, you can make the most of your transfer process and ensure the security and efficiency of your financial transactions.
With the completion of Step 9, you’ve successfully learned how to transfer money from your Chase checking account to your savings account. Congratulations on taking control of your finances and working towards your savings goals!
If you have any further questions or need assistance, don’t hesitate to reach out to Chase customer support. They are there to help you navigate the online banking platform and address any concerns you may have.
Happy saving!
Conclusion
Transferring money from your Chase checking account to your savings account is a practical and effective way to manage your finances and work towards your savings goals. With Chase’s user-friendly online banking platform, the process is quick and convenient. By following the step-by-step instructions outlined in this guide, you can easily transfer money between your accounts with confidence.
Remember to sign in to your Chase online banking account, navigate to your checking account, locate the “Transfer Money” option, select your savings account as the recipient, specify the transfer amount, and review and confirm the transaction. Once the transfer is complete, verify it in your savings account and keep track of your transfer history for accurate record-keeping.
By following additional tips and considerations, such as setting up automatic transfers, monitoring transfer limits and fees, and staying vigilant against fraud, you can make the most of your transfer process and ensure the security and efficiency of your financial transactions.
As you continue to transfer money from your checking to savings account, you’ll be able to grow your savings, work towards your financial goals, and achieve greater financial stability.
Should you require any assistance, don’t hesitate to reach out to Chase customer support. They are there to provide guidance, answer your questions, and address any concerns you may have.
Now, armed with the knowledge and guidance from this article, take control of your finances and start saving with confidence!
What's Hot
Latest Articles
Related Post
By: • Finance
By: • Finance


By: • Finance

By: • Finance
By: • Finance
By: • Finance

By: • Finance
By: • Finance

By: • Finance

By: • Finance


By: • Finance

By: • Finance

By: • Finance