Finance
How To Pay Off Apple Credit Card
Published: November 11, 2023
Learn how to effectively manage your finances and pay off your Apple Credit Card with our step-by-step guide. Take control of your finances today!
(Many of the links in this article redirect to a specific reviewed product. Your purchase of these products through affiliate links helps to generate commission for LiveWell, at no extra cost. Learn more)
Table of Contents
Introduction
Welcome to our comprehensive guide on how to pay off your Apple Credit Card. If you’re a frequent Apple user or an avid tech enthusiast, chances are you’ve come across their Apple Credit Card. Offering attractive benefits and rewards, this credit card has become quite popular among Apple fans.
While it’s exciting to have a credit card that earns you rewards with every purchase, it’s equally important to manage your credit card debt responsibly. In this guide, we’ll walk you through the steps you need to take to pay off your Apple Credit Card balance efficiently.
Before we dive into the payment process, let’s understand how the Apple Credit Card works. The Apple Credit Card is a collaboration between Apple and Goldman Sachs, providing users with a digital-first approach to credit card management. With its sleek design and seamless integration with Apple Wallet, the Apple Credit Card offers various benefits such as daily cashback rewards, low interest rates, and no annual fees.
Now that we have a brief overview of the Apple Credit Card, let’s move on to the steps you need to follow to pay off your balance. Whether you prefer making manual payments or setting up automatic payments, we’ve got you covered.
Step 1: Understanding the Apple Credit Card
Before you can effectively pay off your Apple Credit Card, it’s essential to have a clear understanding of its features and terms. Let’s delve into the details:
Interest Rates: The Apple Credit Card offers a range of variable interest rates based on your creditworthiness. It’s important to be aware of the interest rate applicable to your card, as this will impact your monthly payments and overall repayment strategy.
Rewards Program: One of the primary benefits of the Apple Credit Card is its rewards program. For every purchase made with the card, you’ll earn daily cashback rewards. These rewards are instantly added to your Apple Cash card, which can be used for future purchases or transferred to your bank account.
No Annual Fees: Unlike many traditional credit cards, the Apple Credit Card doesn’t charge any annual fees. This is a significant advantage for cardholders, as it eliminates the need to budget for an additional expense.
Easy Accessibility: As the Apple Credit Card is a digital-first card, it provides users with seamless accessibility via the Apple Wallet app. You can easily view your balance, make payments, and track transactions directly from your iPhone or other Apple devices.
Apple Cash: The Apple Credit Card is linked to Apple Cash, a digital wallet that allows you to store money and make payments. This feature is particularly useful for making quick payments towards your credit card balance.
By familiarizing yourself with these key aspects of the Apple Credit Card, you’ll be better equipped to manage your payments and make informed financial decisions. Now that we’ve covered the basics, let’s move on to setting up your Apple Card payments.
Step 2: Setting Up Apple Card Payments
Setting up Apple Card payments is a crucial step in ensuring timely and hassle-free repayment. Here’s how you can do it:
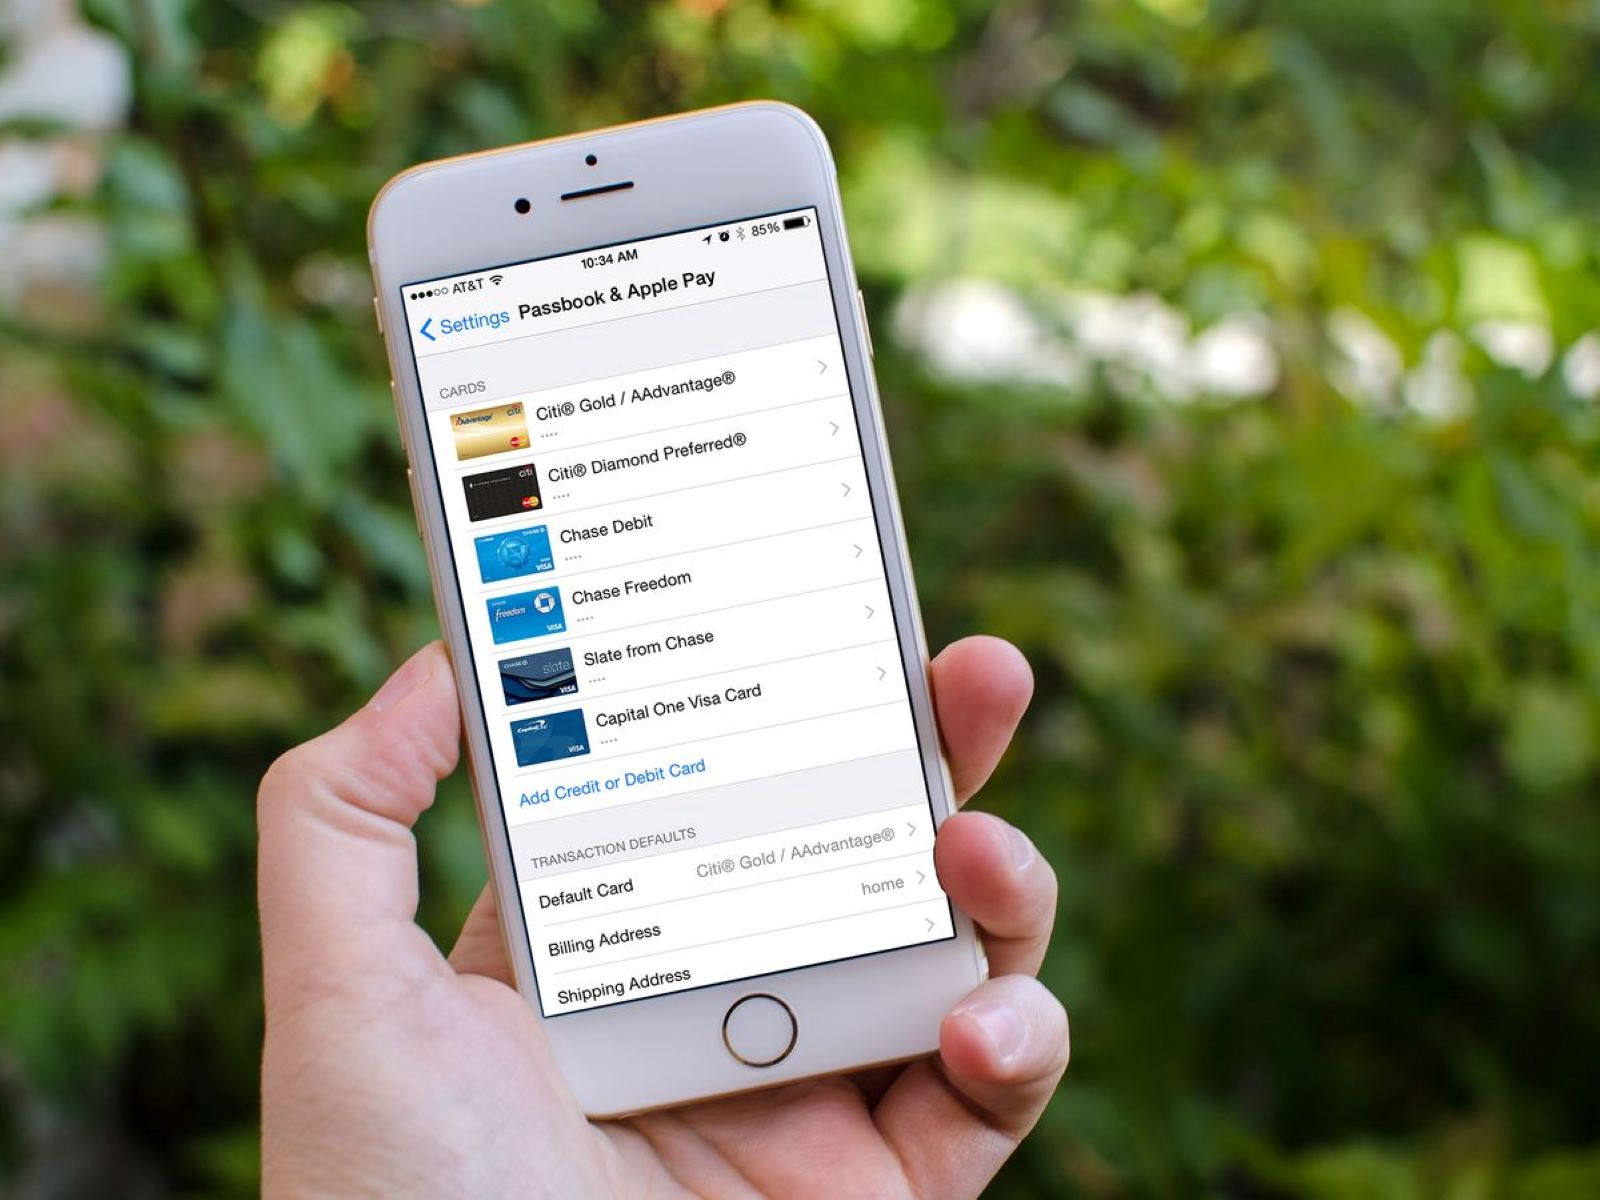
1. Add Apple Card to Apple Wallet: If you haven’t already, you’ll need to add your Apple Credit Card to your Apple Wallet. Open the Wallet app on your iPhone, tap the plus sign (+), and follow the prompts to add your card. You may need to provide some additional information, such as your card details and security verification.
2. Enable Apple Card Payments: Once your Apple Card is added to your Apple Wallet, you’ll need to enable Apple Card payments. Open the Wallet app, select your Apple Card, tap the three-dot menu icon in the top-right corner, and choose “Card Information.” Scroll down to “Monthly Installments” and enable it. This will allow you to make payments towards your Apple Card balance.
3. Link a Bank Account: To facilitate payments, you’ll need to link a bank account to your Apple Wallet. Open the Wallet app, select your Apple Card, tap on the “Card Information” option, and scroll down to find “Bank Accounts.” Follow the prompts to link your preferred bank account. This will give you the option to make payments directly from your linked bank account.
4. Set Up Payment Schedule: It’s crucial to establish a payment schedule that works for you. Open the Wallet app, select your Apple Card, tap on the “Card Information” option, and scroll down to find “Scheduled Payments.” Select the “Pay my balance in full” option if you want to pay off your entire balance each month. Alternatively, you can choose a different payment amount or set a specific payment date.
5. Verify Payment Details: Before finalizing your payment settings, make sure to review and verify the payment details. Double-check your bank account information, payment amount, and payment schedule to avoid any potential issues or discrepancies.
Once you’ve completed these steps, you’re all set up to make payments towards your Apple Card balance. In the next step, we’ll explore how to make manual payments if you prefer more control over the payment process.
Step 3: Making Manual Payments
If you prefer to have more control over your Apple Card payments, you can make manual payments whenever you want. Here’s how:
1. Open the Wallet app: Launch the Wallet app on your iPhone or other Apple device.
2. Select your Apple Card: Once you’re in the Wallet app, locate and select your Apple Card.
3. Tap on “Pay,” then “Pay Now”: Look for the “Pay” button and tap on it. Then, choose the “Pay Now” option.
4. Enter payment amount: You’ll be prompted to enter the payment amount you wish to make. Input the desired amount.
5. Choose funding source: Next, you’ll need to select the funding source for the payment. It can be your linked bank account or your Apple Cash balance.
6. Review and confirm: Take a moment to review the payment details, including the amount and the funding source. Once you’re satisfied, confirm the payment.
7. Verify the payment: Depending on the funding source you’ve chosen, you may be required to provide additional verification measures, such as Touch ID or Face ID.
That’s it! You’ve successfully made a manual payment towards your Apple Card balance. Keep in mind that making manual payments allows you to have more control over when and how much you pay, but it’s important to stay consistent and make timely payments to avoid any late fees or interest charges.
If you’re looking for a more convenient and automated approach to paying off your Apple Card balance, you can consider enrolling in automatic payments, which we’ll explore in the next step.
Step 4: Enrolling in Automatic Payments
If you prefer a hands-off approach to managing your Apple Card payments, enrolling in automatic payments is a convenient option. Here’s how you can set it up:
1. Open the Wallet app: Launch the Wallet app on your iPhone or other Apple device.
2. Select your Apple Card: Once you’re in the Wallet app, locate and select your Apple Card.
3. Tap on “Scheduled Payments”: Look for the “Scheduled Payments” option and tap on it.
4. Choose “Pay my balance in full”: To ensure that your balance is paid off in full each month, select the “Pay my balance in full” option. This will automatically pay off your entire balance on the due date.
5. Verify payment details: Take a moment to review and verify the payment details. Ensure that your linked bank account is selected as the funding source for the automatic payments.
6. Enable automatic payments: Once you’ve reviewed the payment details, enable automatic payments by toggling the switch or selecting the “Enable” option.
7. Set up payment reminders: If you’d like to receive notifications or reminders about your upcoming automatic payments, you can set up payment reminders in the Wallet app. This will help you stay informed and ensure that you have sufficient funds in your bank account for the payment.
With automatic payments set up, you can rest assured that your Apple Card balance will be paid off in full each month, alleviating the need for manual payments or the risk of missing a payment due date. However, it’s still important to regularly monitor your transactions and review your monthly statements to detect any discrepancies or fraudulent activity.
In the next step, we’ll explore how you can pay off your Apple Card balance if you’d like to make accelerated payments or pay more than the minimum amount due.
Step 5: Paying Off Apple Card Balance
When it comes to paying off your Apple Card balance, you have the flexibility to choose between making the minimum payment, paying the statement balance, or paying off the entire balance. Here are the options available:
1. Minimum Payment: The minimum payment is the lowest amount you’re required to pay each month to maintain your account in good standing. It’s important to note that making only the minimum payment will result in interest charges on the remaining balance. If you choose to make the minimum payment, you can easily do so through the Wallet app by selecting the “Pay” option and entering the minimum payment amount.
2. Statement Balance: The statement balance is the total amount of transactions made during a billing cycle. Paying off the statement balance in full each month will ensure that you avoid accumulating any interest charges. To pay the statement balance, follow the same steps for making a manual payment and enter the statement balance as the payment amount.
3. Paying Off the Entire Balance: If you have the means to pay off your entire Apple Card balance, it’s advisable to do so. Paying off the entire balance will help you avoid interest charges and improve your credit utilization ratio. To pay off the entire balance, select the “Pay” option in the Wallet app and enter the full balance amount as your payment.
Remember that making timely and consistent payments is crucial to maintaining a healthy credit score and avoiding unnecessary fees. It’s recommended to pay more than the minimum payment whenever possible to accelerate your debt payoff and reduce interest charges over time.
In addition to making payments through the Wallet app, you can also use Apple Cash or link an external bank account for convenient payment options. Now that you know how to pay off your Apple Card balance, let’s move on to the final step to help you keep track of your payments and transactions.
Step 6: Tracking Payments and Transactions
Keeping track of your payments and transactions is essential to maintaining control of your Apple Credit Card and staying on top of your financial situation. Here’s how you can easily track your payments and monitor your transactions:
1. Wallet App: The Wallet app is your go-to tool for managing your Apple Credit Card. Open the app on your iPhone or other Apple device to access important information about your card, including your current balance, available credit, and recent transactions.
2. Notifications: Enable notifications for your Apple Credit Card to receive real-time updates on payment confirmations, upcoming payment due dates, and any suspicious or unusual activity on your account. These notifications will help you stay informed and ensure that you’re aware of any changes or updates regarding your card.
3. Monthly Statements: Review your monthly statements to get a comprehensive overview of your spending, payments, and any fees or interest charges. Your statement will provide detailed information about each transaction, including the date, merchant, and amount. It’s recommended to review your statements regularly and compare them to your own records to ensure accuracy.
4. Transaction History: The Wallet app allows you to access your transaction history, which includes a complete list of all your past purchases and payments. You can easily navigate through the transaction history to find specific transactions and examine the details.
5. Exporting Data: If you need to keep a record of your transactions or want to analyze your spending patterns, you can export your transaction data from the Wallet app. This feature allows you to create reports or track your expenses using third-party tools or spreadsheets.
6. Online Account Management: Alongside the Wallet app, you can also manage your Apple Credit Card online through the Apple Card website. By logging into your account, you’ll have access to additional features, such as updating your personal information, viewing your billing history, and downloading statements.
By taking advantage of these tools and resources, you can effectively track your payments, monitor your transactions, and stay on top of your Apple Credit Card activity. It’s important to remain vigilant and report any fraudulent or unauthorized transactions to your credit card issuer immediately.
Now that you’ve learned how to pay off your Apple Credit Card and track your payments, you’re equipped with the knowledge to manage your credit card responsibly. Remember to always make timely payments, review your statements, and stay on top of your financial obligations to maintain a healthy credit profile.
Conclusion
Congratulations! You’ve reached the end of our comprehensive guide on how to pay off your Apple Credit Card. By understanding the features of the Apple Credit Card, setting up payments, and tracking your transactions, you now have the tools to manage your credit card responsibly and strategically.
Remember that paying off your balance in a timely manner is crucial to avoiding interest charges and maintaining a good credit standing. Whether you choose to make manual payments or opt for automatic payments, the key is to stay consistent and make payments that align with your financial goals.
As you navigate the world of credit cards, it’s important to prioritize financial responsibility and stay mindful of your spending habits. While the rewards and benefits of the Apple Credit Card can be enticing, always ensure that you’re using credit wisely and keeping your overall financial health in mind.
In addition to paying off your balance, don’t forget to regularly review your transactions, monitor your credit card statements, and report any suspicious or unauthorized activity to your credit card issuer. Being proactive in managing your Apple Credit Card can help you maintain control and protect your financial well-being.
We hope this guide has provided you with the knowledge and confidence to navigate the payment process for your Apple Credit Card effectively. By staying informed, taking advantage of the available tools, and making responsible financial decisions, you’ll be well on your way to mastering your Apple Credit Card and achieving your financial goals.
Remember, managing credit is a journey, and it’s essential to continually educate yourself and adapt as your financial needs change. Stay informed, make informed decisions, and enjoy the benefits and rewards that come with responsible credit card usage.
Now, go ahead and take control of your Apple Credit Card payments. Good luck, and may your financial journey be a successful one!
What's Hot
Latest Articles
Related Post
By: • Finance

By: • Finance
By: • Finance

By: • Finance
By: • Finance
By: • Finance

By: • Finance
By: • Finance

By: • Finance

By: • Finance


By: • Finance


By: • Finance

By: • Finance