Finance
How To Do Bookkeeping In Excel
Modified: March 1, 2024
Learn how to do bookkeeping in Excel and manage your finances effectively. This comprehensive guide will teach you the essential techniques to track and organize your expenses.
(Many of the links in this article redirect to a specific reviewed product. Your purchase of these products through affiliate links helps to generate commission for LiveWell, at no extra cost. Learn more)
Table of Contents
Introduction
Welcome to the world of bookkeeping in Excel! Whether you’re a small business owner looking to manage your finances or an individual aiming to track your personal expenses, Excel is a powerful tool that can make your bookkeeping tasks easier and more efficient.
Bookkeeping is the process of recording and organizing financial transactions, and Excel offers various features and functionalities that can help streamline this process. With its flexibility and customization options, Excel allows you to design your own bookkeeping system tailored to your specific needs.
In this article, we will guide you through the essential steps of bookkeeping in Excel. From setting up your workbook to generating financial reports, we’ll cover everything you need to know to effectively manage your finances. Whether you’ve never used Excel before or you’re already familiar with the basics, this guide will provide you with the knowledge and tools to confidently handle your bookkeeping tasks.
Before we dive into the practical aspects of bookkeeping in Excel, let’s start by understanding the importance of keeping accurate financial records. Proper bookkeeping not only helps you keep track of your income and expenses, but it also enables you to analyze your financial health, make informed financial decisions, and meet regulatory requirements.
By maintaining accurate and up-to-date records, you gain insights into your cash flow, profitability, and financial trends. This information can guide business strategies, identify opportunities for growth, and help you plan for the future.
Whether you’re a solopreneur, a freelancer, or a small business owner, Excel provides a cost-effective solution for managing your finances. Rather than investing in expensive accounting software, you can leverage Excel’s capabilities to create your own customized bookkeeping system.
Throughout this guide, we’ll demonstrate step-by-step instructions and provide useful tips to help you navigate through Excel’s features effectively. So, let’s get started on your bookkeeping journey and gain control over your financial records in Excel!
Setting Up Your Excel Workbook
Before you begin recording your financial transactions, it’s important to set up an organized and structured Excel workbook. This will help you maintain consistency and efficiency throughout your bookkeeping process. Here are the key steps to follow when setting up your Excel workbook:
- Create a New Workbook: Open Excel and start by creating a new workbook. This will serve as a blank canvas for your bookkeeping records.
- Designate Worksheets: Within the workbook, designate different worksheets for specific purposes. For example, you may have separate worksheets for income, expenses, and financial reports. To add a new worksheet, simply click on the “+” button at the bottom of the Excel window.
- Set Up Columns: On each worksheet, set up columns to organize your data. Common column headings include date, description, income, expenses, and account balances. Customize the column widths to ensure readability and easy data entry.
- Format Cells: Apply formatting to cells to enhance visibility and readability. You can use bold font for headings, apply number formats to monetary values, and use different colors to highlight important information.
- Create Headers and Footers: Consider adding headers and footers to your worksheets for consistency and professionalism. Headers can include your company name or the worksheet title, while footers can display page numbers or additional notes.
- Utilize Formulas and Functions: Excel offers a wide range of formulas and functions that can automate calculations and save you time. For example, you can use the SUM function to calculate total income or expenses, or the IF function to categorize transactions.
- Save and Organize: Once your workbook is set up, save it in a secure location on your computer or cloud storage. Create a clear folder structure for your bookkeeping files to ensure easy retrieval and backup.
By following these steps, you’ll have a well-structured Excel workbook that serves as the foundation for your bookkeeping tasks. This organized setup will enable you to efficiently record and analyze your financial transactions as you proceed with your bookkeeping journey.
Creating a Chart of Accounts
A chart of accounts is an essential component of your Excel bookkeeping system. It is a categorized list of all the accounts you use to track your financial transactions. By creating a chart of accounts, you can easily classify and organize your income, expenses, assets, liabilities, and equity.
To create a chart of accounts in Excel, follow these steps:
- Identify Account Categories: Start by identifying the main categories of accounts relevant to your business or personal finances. Common categories include assets, liabilities, equity, income, and expenses.
- Create Account Codes: Assign a unique code or number to each account within each category. This code helps with sorting and organizing the accounts later on.
- Name Accounts: Give a descriptive name to each account that accurately represents its purpose. For example, under the expense category, you may have accounts such as rent, utilities, marketing, and office supplies.
- Group Accounts: Group similar accounts together under subcategories. For example, you may create a subcategory for travel expenses and include accounts for airfare, accommodation, and meals.
- Establish Hierarchy: Organize the accounts in a hierarchical structure, with broader categories at the top and more specific accounts below. This hierarchy helps in generating meaningful financial reports.
- Add Account Details: Include additional details for each account, such as its type (e.g., asset, liability), the date it was established, and any relevant notes or instructions.
Remember, the chart of accounts should be tailored to your specific needs. It should accurately reflect the financial aspects of your business or personal finances. Take the time to carefully plan and customize your chart of accounts to ensure it aligns with your reporting and analysis requirements.
Once you have created your chart of accounts in Excel, you can refer to it when entering transactions. By selecting the appropriate account code or name, you can accurately categorize each transaction and maintain a clear record of your financial activities.
The chart of accounts will serve as a roadmap for your bookkeeping process, ensuring consistency and accuracy in recording and tracking financial transactions. It will also play a crucial role in generating financial reports and providing insights into the financial health of your business or personal finances.
Entering Transactions
Now that you have your Excel workbook set up and a chart of accounts in place, it’s time to start entering your financial transactions. Whether it’s income, expenses, or other financial activities, accurately recording and categorizing transactions is essential for maintaining proper books.
Here’s a step-by-step process to enter transactions in Excel:
- Open the Relevant Worksheet: Depending on the type of transaction, open the appropriate worksheet in your Excel workbook. For example, if it’s an income transaction, navigate to the income worksheet.
- Date: Start by entering the date of the transaction in the corresponding cell or column. This helps with tracking and organizing transactions chronologically.
- Description: Provide a brief description of the transaction, clearly indicating what it refers to. This can include details such as the client name, vendor, or purpose of the transaction.
- Account: Select the appropriate account from your chart of accounts for categorizing the transaction. This helps in accurately classifying the transaction and maintaining consistency.
- Amount: Enter the monetary value of the transaction in the corresponding cell or column. Be mindful of positive and negative values, depending on whether it’s income or an expense.
- Additional Details: If necessary, include any additional information or notes related to the transaction in a separate column or field. This can be helpful for future reference or clarification.
Repeat this process for each transaction you need to record. As you progress, the worksheet will gradually populate with entries, creating a comprehensive and up-to-date record of your financial activities.
To ensure accuracy and prevent errors, it’s a good practice to regularly review your entries and cross-reference them with supporting documents such as receipts or invoices. Additionally, consider implementing data validation techniques to maintain data integrity within your Excel workbook.
In order to maintain clean and organized books, it’s highly recommended to enter transactions in a timely manner. This will prevent backlogs, reduce the risk of missing or duplicated entries, and allow for real-time monitoring of your financial position.
By diligently entering transactions into your Excel workbook, you’ll have an accurate record of your financial activities that can be used for various purposes, including generating financial reports, analyzing trends, and preparing tax documentation.
Recording Income
Recording income accurately is crucial for maintaining an accurate financial record and understanding the financial health of your business or personal finances. In your Excel bookkeeping system, you can easily track and categorize your income using the following steps:
- Open the Income Worksheet: Start by opening the dedicated income worksheet within your Excel workbook.
- Date: Enter the date of the income transaction in the corresponding cell or column.
- Description: Provide a brief description of the income source, such as client name, product sold, or services rendered.
- Account: Select the income account from your chart of accounts that corresponds to the nature of the income. This can include accounts such as sales revenue, consulting fees, or rental income.
- Amount: Enter the amount of income received for the transaction in the corresponding cell or column. Make sure to use appropriate formatting for monetary values.
- Additional Details: If needed, include any additional details or notes regarding the income transaction in a separate column or field.
Repeat this process for each income transaction you need to record. By entering income transactions in a timely manner, you’ll have an up-to-date record of your revenue sources.
In addition to recording the income itself, it’s important to maintain supporting documentation such as invoices or receipts. This documentation will serve as evidence of the income received and can be useful for verification or reference purposes.
Regularly reviewing and reconciling your income entries against bank statements or other financial documentation is essential to ensure accuracy and identify any discrepancies. This process will help you spot errors, address any missing or duplicated entries, and maintain the integrity of your financial records.
By diligently recording income in your Excel bookkeeping system, you’ll have a clear understanding of the sources and amounts of revenue you generate. This information can be invaluable for tracking business growth, making informed financial decisions, and producing financial reports for stakeholders or tax purposes.
Recording Expenses
Recording expenses accurately is essential for tracking your spending, managing your cash flow, and assessing the financial health of your business or personal finances. In your Excel bookkeeping system, you can easily track and categorize your expenses using the following steps:
- Open the Expenses Worksheet: Start by opening the dedicated expenses worksheet within your Excel workbook.
- Date: Enter the date of the expense transaction in the corresponding cell or column.
- Description: Provide a brief description of the expense, such as the vendor or the purpose of the expenditure.
- Account: Select the expense account from your chart of accounts that corresponds to the nature of the expense. This can include accounts such as office supplies, utilities, rent, or travel.
- Amount: Enter the amount spent on the expense transaction in the corresponding cell or column. Ensure you use appropriate formatting for monetary values.
- Additional Details: If necessary, include any additional details or notes regarding the expense transaction in a separate column or field.
Repeat this process for each expense transaction you need to record. By entering expenses in a timely manner, you can maintain an up-to-date record of your expenditures.
Accurate record-keeping also involves attaching or referencing supporting documentation such as receipts, invoices, or bills for each expense. This documentation serves as evidence of the expense incurred and can be useful for verification purposes.
Regularly reviewing and reconciling your expense entries against bank statements or other financial records is essential to ensure accuracy and identify any discrepancies. This process allows you to catch errors, address any missing or duplicated entries, and maintain the integrity of your financial records.
By diligently recording expenses in your Excel bookkeeping system, you’ll have a clear understanding of your spending patterns and can identify areas for potential cost savings or budget adjustments. This information is valuable for budgeting, financial analysis, and preparing accurate financial reports.
Managing Inventory
If you deal with inventory in your business, effectively managing it is crucial for maintaining optimal stock levels, fulfilling customer orders, and maximizing profitability. In your Excel bookkeeping system, you can keep track of your inventory using the following steps:
- Create an Inventory Worksheet: Start by creating a separate worksheet dedicated to your inventory management within your Excel workbook.
- Product Details: Enter relevant product details such as the product name, description, SKU (Stock Keeping Unit), and cost per unit.
- Initial Stock: Record the initial stock quantity of each product at the beginning of the accounting period.
- Purchases: Enter the details of each purchase, including the date, supplier, quantity purchased, and the cost per unit. This will update your inventory levels accordingly.
- Sales: Record each sale by entering the details such as the date, customer, product sold, quantity sold, and the selling price per unit. Ensure that the inventory quantities are adjusted accordingly to reflect the stock sold.
- Stock Adjustments: If there are any stock adjustments, such as returns or damages, make the necessary adjustments to the inventory quantities as well.
- Calculations: Utilize Excel formulas and functions to automatically calculate metrics like the current stock quantity, cost of goods sold (COGS), and inventory value. This will provide you with valuable insights into your inventory levels and financial performance.
Regularly updating your inventory records in Excel will help you maintain accurate stock levels, identify slow-moving or obsolete items, and make informed purchasing decisions. It is recommended to conduct periodic physical counts of your inventory to reconcile with the recorded quantities and identify any discrepancies.
In addition to tracking inventory quantities and values, consider utilizing Excel’s conditional formatting feature to highlight low stock levels or track expiration dates for perishable items. This can help you proactively manage your inventory and minimize stockouts or inventory holding costs.
By effectively managing your inventory in Excel, you can optimize your stock levels, ensure prompt fulfillment of customer orders, reduce carrying costs, and ultimately enhance your profitability. Using Excel’s flexibility and functionalities, you can tailor your inventory management system to meet the specific needs of your business.
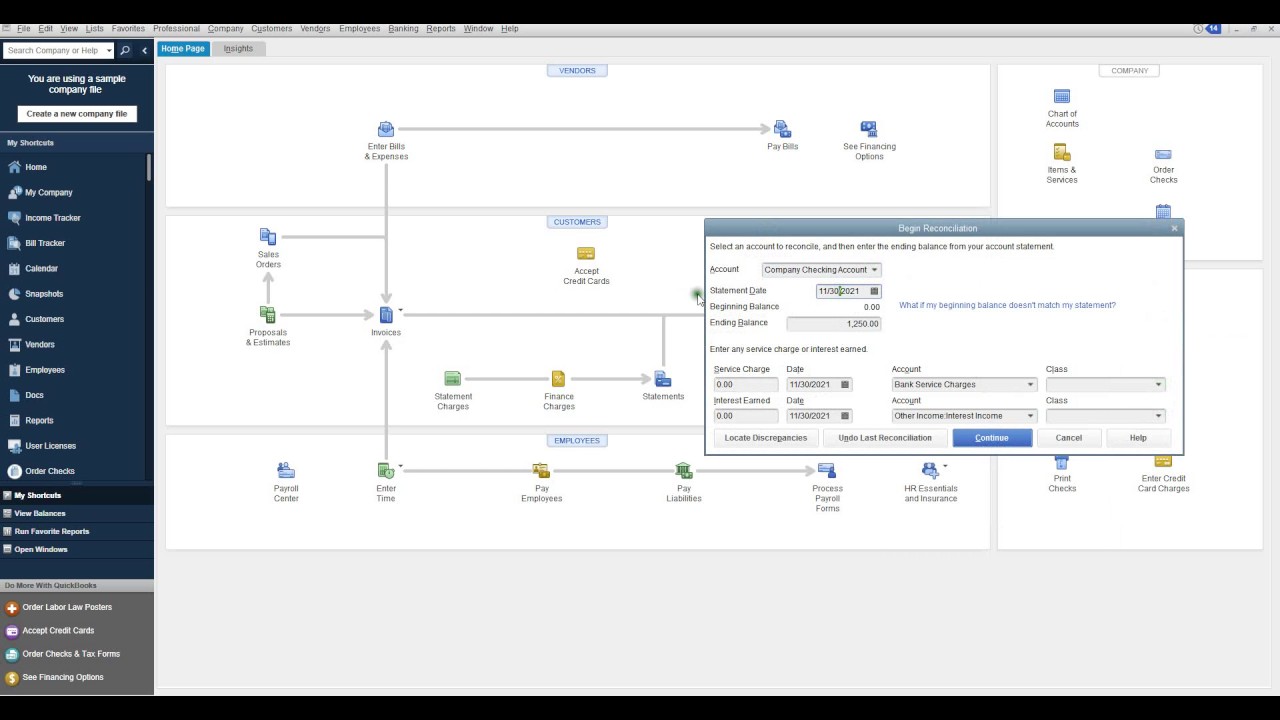
Reconciling Accounts
Reconciling your accounts is a critical step in maintaining accurate and reliable financial records. It involves comparing your recorded transactions in Excel with external sources, such as bank statements or credit card statements, to ensure that they match and are free from discrepancies. Reconciling accounts helps you identify any errors, missing transactions, or fraudulent activities. Here are the key steps to reconcile accounts in Excel:
- Gather Statements: Collect your bank statements, credit card statements, or any other relevant financial statements that need to be reconciled.
- Open the Relevant Worksheet: Open the worksheet in your Excel workbook that corresponds to the account you are reconciling.
- Compare Transactions: Compare the transactions listed in your Excel worksheet with those in the external statements. Check for any differences, such as missing transactions or discrepancies in amounts or dates.
- Tick Off Transactions: As you verify each transaction in your Excel sheet against the statements, mark them as verified to indicate that they have been reconciled.
- Investigate Discrepancies: If you come across any discrepancies between your Excel records and the external statements, investigate the causes. It could be a data entry error, a missed transaction, or a bank error.
- Make Adjustments: If you identify any errors or missing transactions during the reconciliation process, make the necessary adjustments in your Excel workbook to match the external statements.
- Document Discrepancies: Keep a record of any discrepancies discovered during the reconciliation process. This documentation will be helpful for future reference and for identifying recurring issues.
Regularly reconciling your accounts ensures the accuracy and integrity of your financial records. It provides you with confidence in the reliability of your data and helps you make informed financial decisions based on accurate information.
By reconciling your accounts in Excel, you have the added advantage of using Excel’s features such as formulas and filters to streamline the process. The flexibility and customization options of Excel make it a powerful tool for reconciling accounts efficiently.
Remember to conduct regular reconciliations, ideally on a monthly basis, to promptly address any discrepancies and maintain up-to-date and accurate financial records. This practice will give you a clear and accurate overview of your financial position and enable you to identify potential issues and take necessary actions in a timely manner.
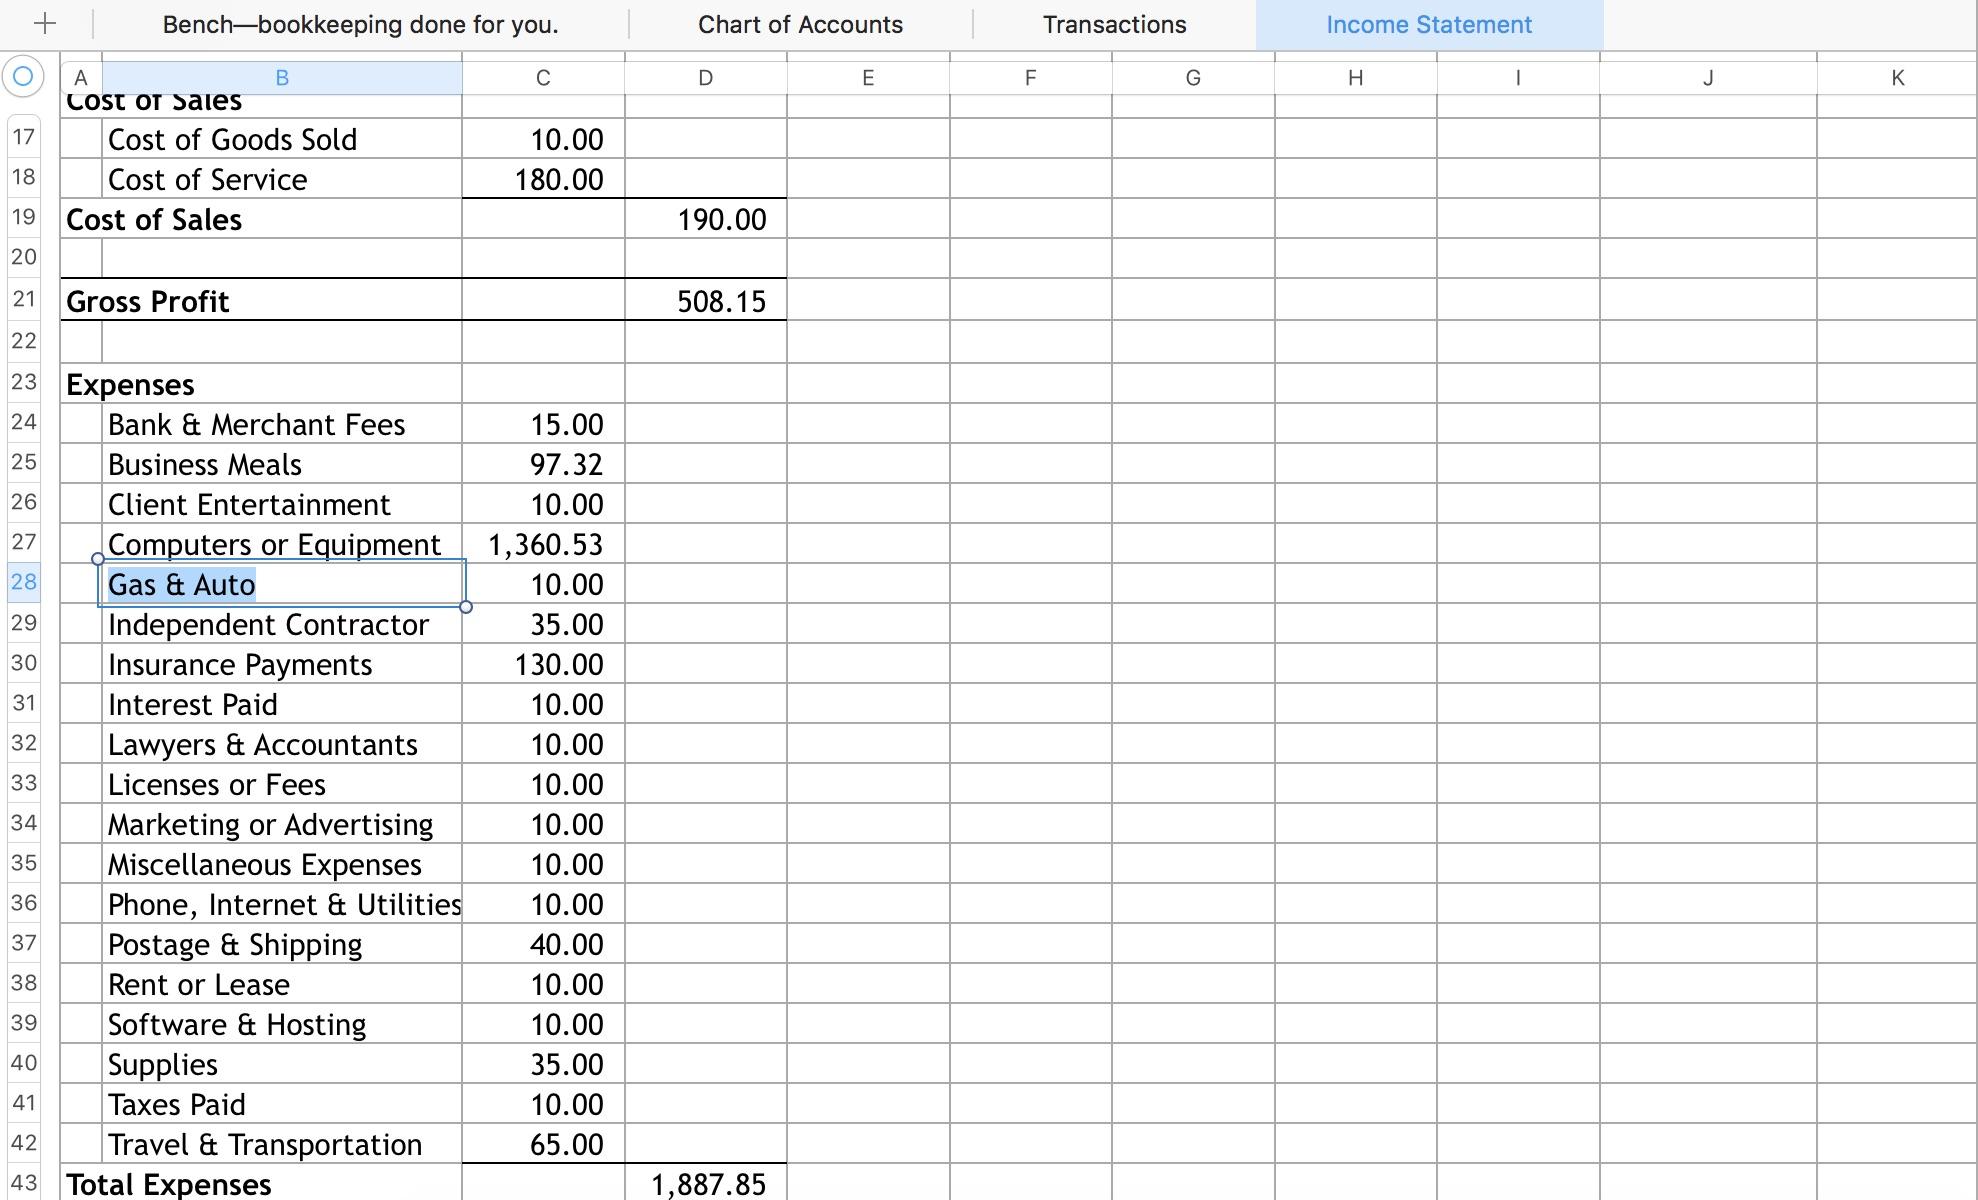
Generating Financial Reports
Financial reports provide a comprehensive overview of the financial health and performance of your business or personal finances. In Excel, you can generate various financial reports to gain insights into your income, expenses, profitability, and cash flow. Here are some key reports you can create:
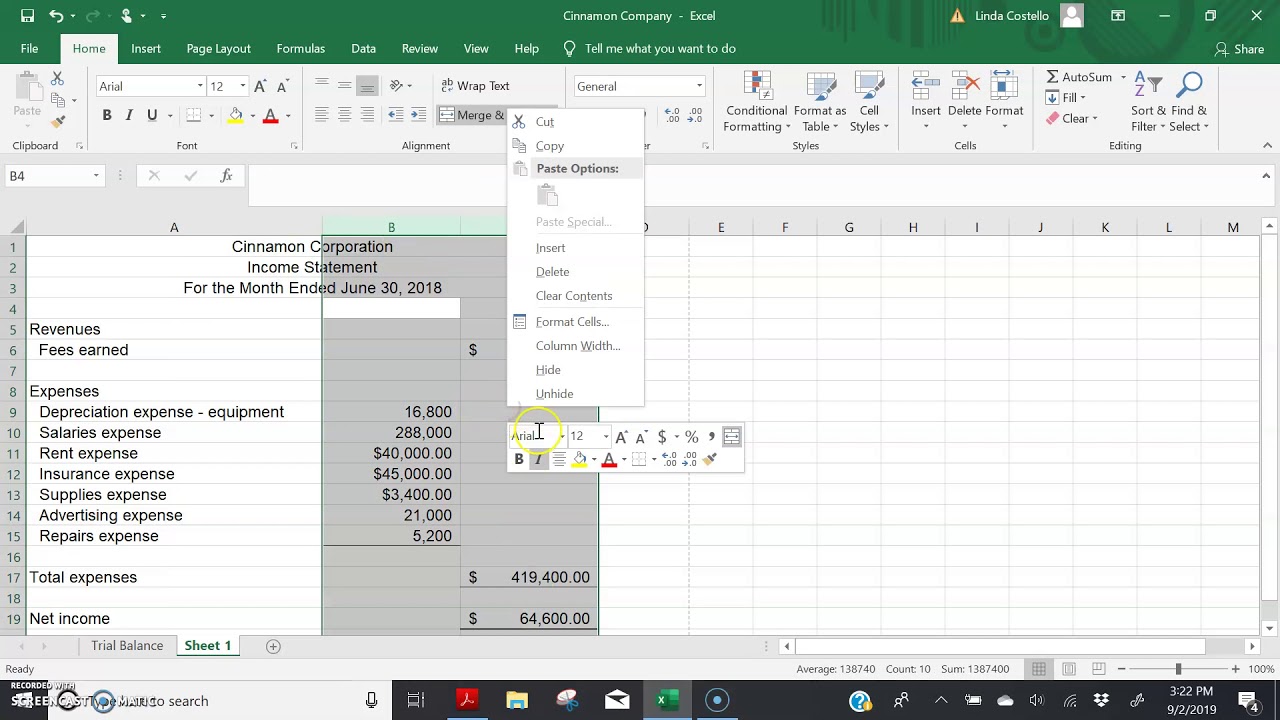
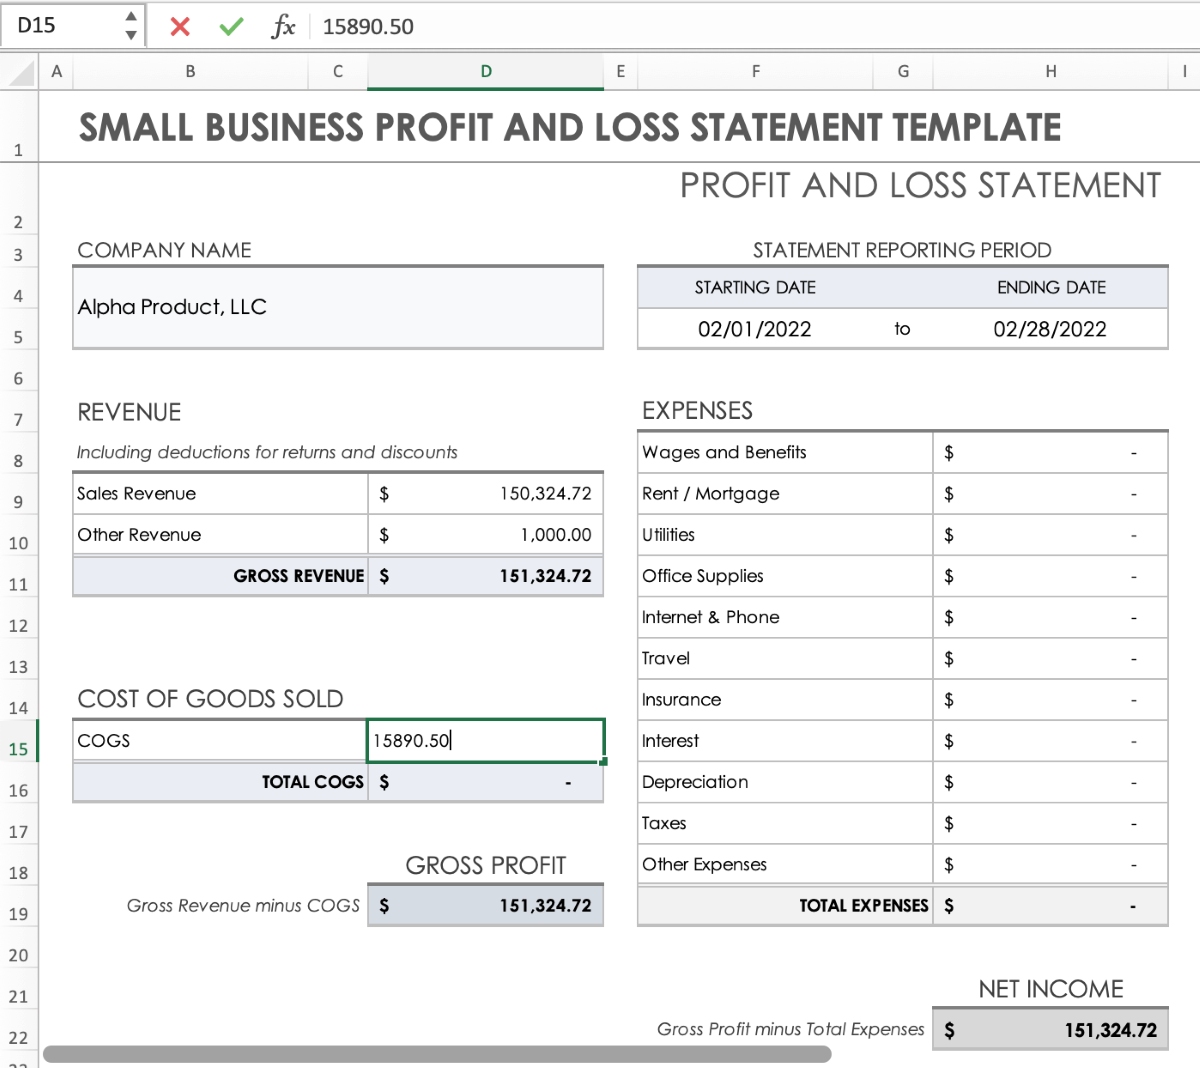
- Profit and Loss Statement: Also known as the income statement, this report summarizes your income, expenses, and net profit or loss over a specific period. It helps you assess the overall profitability of your business or personal finances.
- Balance Sheet: This report presents your assets, liabilities, and equity at a specific point in time. It provides a snapshot of your financial position and helps you analyze your liquidity and net worth.
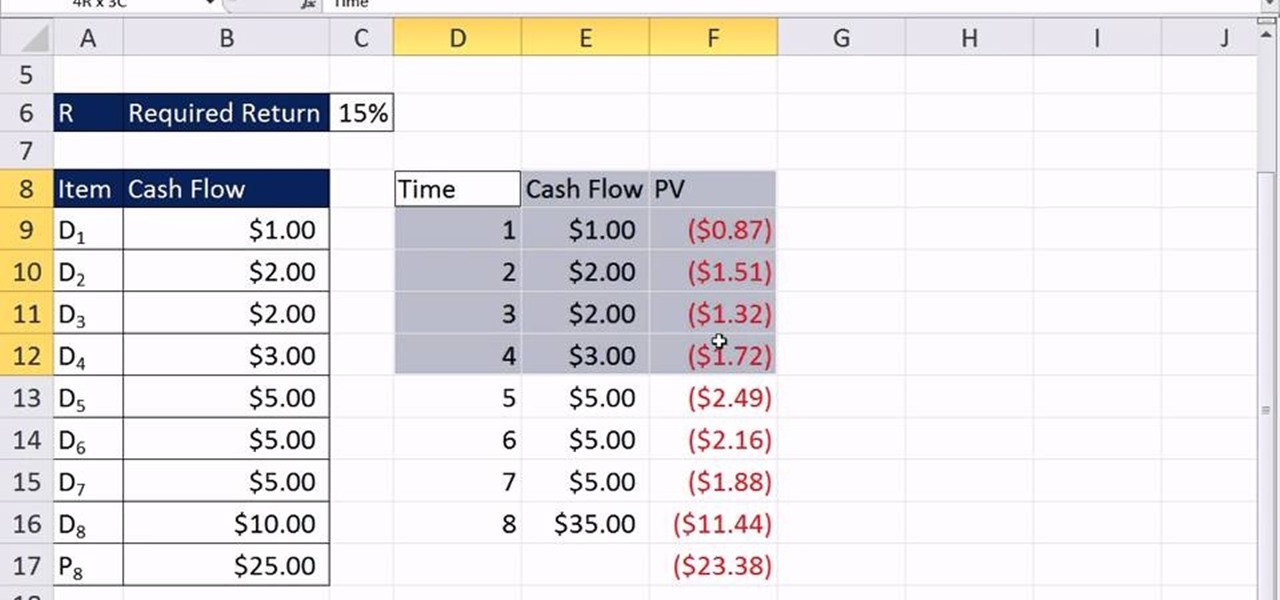
- Cash Flow Statement: This report tracks the inflows and outflows of cash from your business or personal finances. It highlights the sources and uses of cash, helps you identify cash flow patterns, and assesses your ability to meet financial obligations.
- Accounts Receivable Aging Report: If you have customers who owe you money, this report helps you track and manage outstanding invoices. It categorizes receivables based on the length of time they have been outstanding, allowing you to take appropriate actions to collect payments.
- Accounts Payable Aging Report: This report tracks your outstanding bills and helps you manage your vendor payments. It categorizes payables based on the length of time they have been outstanding, ensuring timely payments and maintaining positive relationships with suppliers.
To generate these financial reports in Excel, you can utilize various tools and features available, such as:
- Formulas and functions to calculate totals and perform calculations.
- Pivot tables to summarize and analyze your financial data.
- Conditional formatting to highlight key information or trends in the reports.
- Data validation to ensure data accuracy and consistency.
By regularly generating these financial reports in Excel, you can monitor the financial health of your business or personal finances, identify trends, and make informed decisions. These reports not only provide you with a comprehensive view of your financial performance but also serve as essential tools for communicating with stakeholders, preparing tax filings, and securing financing.
Remember to update your Excel workbook with the latest financial data before generating the reports. This ensures that the reports reflect the most current and accurate information.
With Excel’s versatility, you can customize and tailor the financial reports to suit your specific needs and preferences. Invest time in familiarizing yourself with the different functionalities of Excel to maximize the value and effectiveness of your financial reports.
Closing the Books
Closing the books is the process of finalizing your financial records for a specific period, typically at the end of a month, quarter, or year. It involves completing essential tasks to ensure that your books are accurate and ready for the next accounting period. In Excel, you can follow these steps to effectively close the books:
- Complete all Transactions: Ensure that all financial transactions for the period have been recorded in your Excel workbook. This includes recording income, expenses, purchases, sales, and any other relevant financial activities.
- Reconcile Accounts: Perform a thorough reconciliation of your accounts, comparing your recorded transactions with external statements such as bank statements or credit card statements. Address any discrepancies or issues that arise during the reconciliation process.
- Adjust Entries: Make any necessary adjusting entries to account for accruals, prepayments, or other adjustments that may be required at the end of the accounting period. These entries ensure that your financial statements reflect accurate and complete information.
- Review Financial Reports: Generate and review key financial reports such as the profit and loss statement, balance sheet, and cash flow statement. Analyze the reports for any anomalies or significant changes, ensuring that they provide an accurate representation of your financial position and performance.
- Close Temporary Accounts: If you have temporary accounts such as revenue and expense accounts, close them by transferring their balances to permanent accounts such as retained earnings or the owner’s equity account. This step resets the temporary accounts for the next accounting period.
- Backup Your Excel Workbook: Create a backup copy of your Excel workbook to ensure that your financial records are securely stored and protected. This backup provides a safety net in case of any unexpected data loss or errors.
Closing the books in Excel allows you to maintain accurate and organized financial records, ensuring that you start the next accounting period with a clean slate. It also helps in the preparation of financial statements, tax filings, and year-end financial analysis.
Keep in mind that the steps and processes may vary depending on the nature of your business and the specific requirements of your accounting system. It’s always a good idea to consult with an accountant or financial professional to ensure that you are closing the books accurately and in accordance with applicable accounting principles and regulations.
By diligently closing the books in Excel, you establish a reliable foundation for financial record-keeping and gain a clear understanding of your business or personal financial performance. This enables you to make informed decisions, plan for the future, and maintain compliance with financial reporting obligations.
Conclusion
Congratulations on completing your journey through bookkeeping in Excel! Throughout this guide, we have explored the essential steps of setting up your Excel workbook, creating a chart of accounts, entering transactions, and generating financial reports. We’ve also discussed the importance of reconciling accounts, managing inventory, and closing the books at the end of each accounting period.
Excel offers a powerful and flexible solution for bookkeeping, allowing you to customize your system according to your specific needs. By leveraging Excel’s features and functionalities, you can efficiently track income, expenses, and other financial activities, gaining valuable insights into the financial health of your business or personal finances.
Remember, accuracy and consistency are key when it comes to bookkeeping. Regularly update your Excel workbook with the latest transactions, reconcile your accounts, and generate financial reports to monitor your financial position and make informed decisions.
As your business or personal finances grow, you may consider transitioning to dedicated accounting software to handle more complex bookkeeping tasks. However, Excel can still serve as a valuable tool for small businesses and individuals, providing a cost-effective solution that can be customized to suit your needs.
Lastly, it’s important to stay informed about changes in accounting regulations and best practices. Consult with an accountant or financial professional to ensure that your bookkeeping practices adhere to applicable standards, especially when it comes to taxation and financial reporting.
By mastering bookkeeping in Excel, you have taken a significant step towards managing your finances effectively. With accurate records and insightful financial reports at your disposal, you are better equipped to make strategic decisions, optimize your profitability, and achieve your financial goals.
Now it’s time to put your knowledge into practice. Start implementing these techniques in your own Excel workbook, and enjoy the benefits of organized, reliable, and efficient bookkeeping. Best of luck on your financial journey!
What's Hot
Latest Articles
Related Post

By: • Finance

By: • Finance

By: • Finance

By: • Finance

By: • Finance
By: • Finance
By: • Finance

By: • Finance
By: • Finance
By: • Finance

By: • Finance

By: • Finance

By: • Finance

By: • Finance

By: • Finance