Finance
How To Link Credit Card To Magic Band
Published: November 11, 2023
Learn how to easily link your credit card to your Magic Band and manage your finances conveniently.
(Many of the links in this article redirect to a specific reviewed product. Your purchase of these products through affiliate links helps to generate commission for LiveWell, at no extra cost. Learn more)
Table of Contents
Introduction
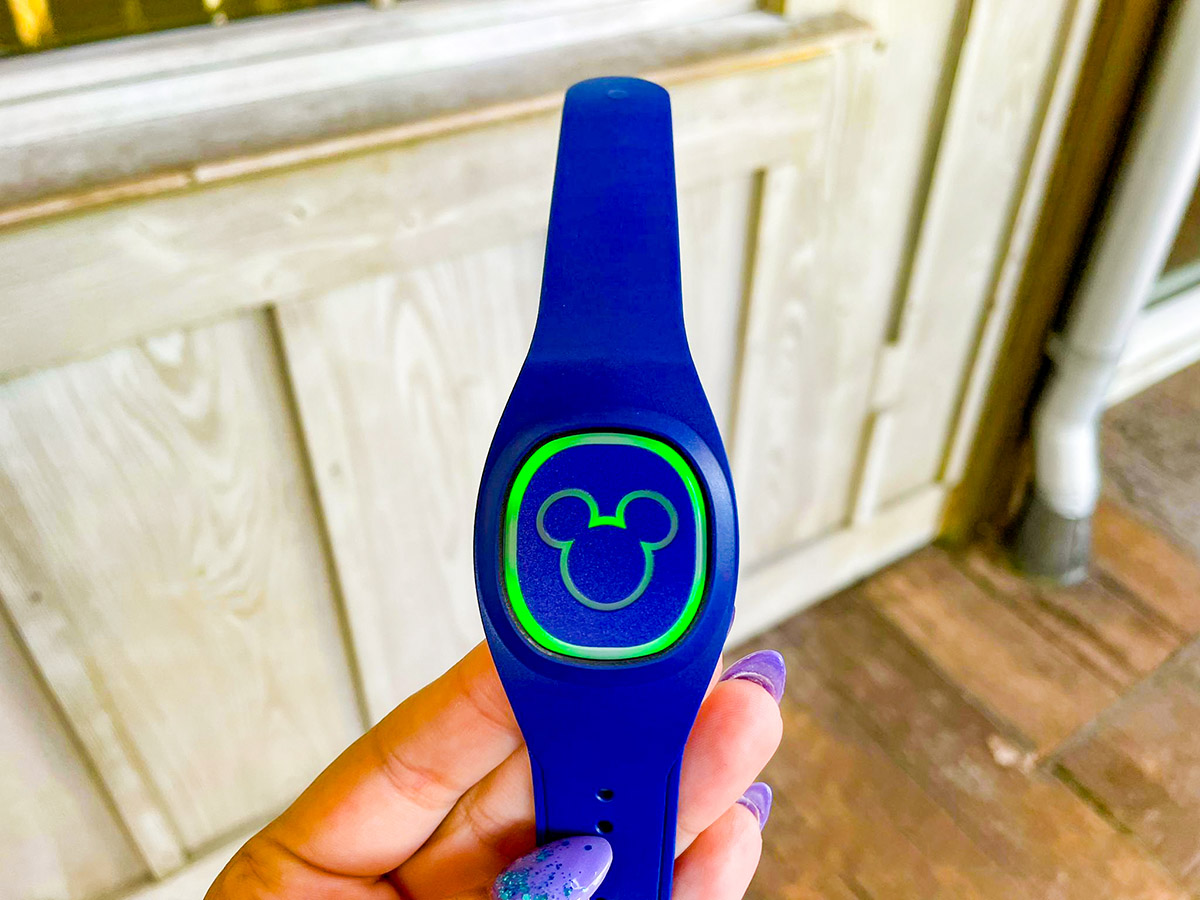
Welcome to the world of Disney magic! If you’re planning a visit to the Walt Disney World Resort, you’ll want to make the most of your experience by taking advantage of the various conveniences offered. One of these conveniences is the ability to link your credit card to your Magic Band. This innovative piece of wearable technology not only serves as your park ticket, but also allows for contactless payments throughout the resort. No need to carry around cash or credit cards – simply tap your Magic Band and the transaction is complete!
Linking your credit card to your Magic Band offers a host of benefits, including seamless and convenient payments for meals, merchandise, and other expenses during your stay. Whether you’re staying at a Disney Resort hotel or visiting the parks for the day, this feature enables you to effortlessly make purchases with just a flick of your wrist.
In this guide, we will walk you through the process of linking your credit card to your Magic Band step by step. We’ll cover everything from accessing your Magic Band account to troubleshooting common issues. So let’s get started and make your Disney experience even more magical!
Step 1: Accessing your Magic Band account
Before you can link your credit card to your Magic Band, you’ll need to ensure that you have access to your Magic Band account. Here’s how you can get started:
- Visit the official Walt Disney World website or download the My Disney Experience mobile app.
- If you haven’t already done so, create an account or log in with your existing Disney account.
- Once logged in, navigate to the “My Magic Bands and Cards” section. This is typically located under the “My Disney Experience” or “My Account” tab.
- If you’re using the mobile app, you can find this section by clicking on the menu icon and selecting “My Magic Bands and Cards.”
- On the My Magic Bands and Cards page, you should see a list of all the Magic Bands associated with your account, as well as any credit cards linked.
By following these steps, you’ll have successfully accessed your Magic Band account and are ready to move on to the next step of linking your credit card.
Step 2: Navigating to the “Link Credit Card” section
Once you have accessed your Magic Band account, the next step is to locate the “Link Credit Card” section. Follow these instructions to find it:
- Scroll down on the My Magic Bands and Cards page until you see the option to add or manage your credit cards. This may be labeled as “Link Credit Card” or “Manage Payment Methods.”
- Click on the “Link Credit Card” button or a similar option, and you will be directed to a new page.
- On this page, you may see a list of any existing credit cards that are already linked to your Magic Band. You can review and manage these cards as needed.
- If you haven’t linked a credit card yet, there should be an option to “Add New Card” or “Link a Credit Card.” Click on this option to proceed.
By following these steps, you will have successfully navigated to the “Link Credit Card” section of your Magic Band account, setting the stage for the next step of adding your credit card details.
Step 3: Adding your credit card details
Now that you have accessed the “Link Credit Card” section of your Magic Band account, it’s time to add your credit card details. Follow these steps to ensure a seamless process:
- On the page where you can manage your credit cards, click on the option to “Add New Card” or “Link a Credit Card.” This will prompt a form for you to enter your credit card information.
- Fill in the necessary fields with your credit card details, including the cardholder name, card number, expiration date, and security code. Ensure that you double-check the information for accuracy.
- Some systems might also require you to enter your billing address associated with the credit card. Provide the required information accordingly.
- Read through and accept any terms and conditions or privacy policies related to linking your credit card to your Magic Band.
- Click on the “Link Card” or “Save” button to submit your credit card information.
Once you have completed these steps, your credit card will be linked to your Magic Band, allowing for convenient and secure transactions throughout the Walt Disney World Resort.
Note: It’s important to ensure that you are using a valid and active credit card when linking it to your Magic Band. Additionally, it’s a good practice to monitor your transactions regularly to ensure the accuracy and security of your financial information.
Step 4: Verifying the link
After adding your credit card details to your Magic Band account, it’s essential to verify that the link was successful. Follow these steps to ensure that your credit card is properly linked:
- Visit the “My Magic Bands and Cards” section of your account again.
- Scroll down to the section where you can manage your credit cards.
- You should now see the credit card you recently linked displayed in the list. Take a moment to review the card details and ensure that they are correct.
- To confirm the link, you can also perform a test transaction. Visit a participating location within the Walt Disney World Resort and make a small purchase using your Magic Band. This will verify that your credit card is properly linked and functioning.
- If the test transaction goes smoothly and your card is charged accordingly, then congratulations – your credit card is successfully linked to your Magic Band!
Verifying the link is an important step to ensure that you can confidently use your Magic Band for payments during your visit. It provides peace of mind and saves you from any inconvenience that may arise from an incorrect or incomplete link.
If you encounter any issues or find that your credit card is not properly linked, double-check that you followed all the steps accurately. If the problem persists, you may need to contact Guest Services for further assistance.
Step 5: Making payments with your Magic Band
Now that your credit card is successfully linked to your Magic Band, you’re ready to enjoy the convenience of making payments throughout the Walt Disney World Resort. Here’s how you can use your Magic Band for seamless transactions:
- When making a purchase at a participating location, simply locate the contactless payment terminal.
- Tap your Magic Band against the designated area on the terminal.
- Wait for a moment while the transaction is processed. You may be asked to confirm the payment amount on the terminal or provide a PIN if prompted.
- Once the transaction is complete, you will receive a confirmation either on the terminal or on your Magic Band’s display. You can also ask for a receipt if desired.
- Remember to keep track of your purchases throughout your visit, either through the My Disney Experience app or by noting them down. This will help you stay within your budget and have a clear overview of your expenses.
Using your Magic Band for payments offers a seamless and hassle-free experience. It eliminates the need to carry around cash or plastic cards, allowing you to focus on enjoying your time at the resort.
It’s important to note that your Magic Band is linked to the credit card you added during the setup process. Therefore, all transactions made with your Magic Band will be charged to that specific credit card.
If you have multiple Magic Bands linked to your account, each one will have access to the same credit card and can be used independently. This is particularly useful for families or groups who want to manage their expenses separately.
Enjoy the convenience of making contactless payments with your Magic Band and embrace the true magic that the Walt Disney World Resort has to offer!
Troubleshooting common issues
While linking your credit card to your Magic Band is usually a smooth process, there may be some hiccups along the way. Here are a few common issues that you may encounter and some troubleshooting tips:
- Invalid card information: Double-check that the credit card details you entered are accurate, including the card number, expiration date, and security code. Even a small error can prevent successful linking.
- Expired or inactive card: Ensure that the credit card you are attempting to link is not expired or inactive. Contact your card issuer if necessary to confirm its status.
- Unsupported card: Some prepaid cards or international credit cards may not be compatible with the Magic Band payment system. Check with your card issuer to determine if your card can be used for contactless payments at the resort.
- Payment declined: If your card is declined during a transaction, it could be due to insufficient funds, a temporary hold on your card, or other issues. Verify with your card issuer and ensure that your credit limit is sufficient for the transaction.
- Lost or stolen Magic Band: If your Magic Band is lost or stolen, report it immediately through the My Disney Experience app or contact Guest Services. They can deactivate the band to prevent unauthorized transactions.
- Inaccurate charges: If you notice any discrepancies in your credit card statements related to Magic Band transactions, contact Guest Services to resolve the issue. They will be able to assist you in clarifying and resolving any billing concerns.
If you encounter any other issues or have questions regarding your linked credit card and Magic Band, don’t hesitate to reach out to Disney’s Guest Services. They are dedicated to ensuring a positive and enjoyable experience for all guests.
Remember to stay vigilant and monitor your credit card statements regularly to ensure the security and accuracy of your transactions.
By being aware of these common troubleshooting tips, you can address any potential issues that may arise and continue to enjoy the convenience of using your Magic Band for payments at the Walt Disney World Resort.
Conclusion
Linking your credit card to your Magic Band at the Walt Disney World Resort is a game-changer when it comes to convenience and seamless transactions. By following the steps outlined in this guide, you can easily set up and enjoy the benefits of using your Magic Band as a contactless payment method.
With your credit card linked to your Magic Band, you can make purchases for meals, merchandise, and other expenses throughout the resort without the need to carry cash or cards. Simply tap your Magic Band and the transaction is complete.
Remember to access your Magic Band account, navigate to the “Link Credit Card” section, add your credit card details accurately, verify the link, and familiarize yourself with the process of making payments with your Magic Band. Keep in mind the troubleshooting tips provided to address any common issues that may arise.
The Magic Band and linked credit card system provides a seamless and secure experience, ensuring that your focus remains on enjoying the magic of the Walt Disney World Resort. Make the most of your visit by taking advantage of this convenient payment option and embrace the true enchantment of the Disney experience.
So, get ready to tap your way into a world of seamless payments and unforgettable moments with your Magic Band!
What's Hot
Latest Articles
Related Post

By: • Finance

By: • Finance

By: • Finance

By: • Finance
By: • Finance

By: • Finance

By: • Finance

By: • Finance
By: • Finance

By: • Finance


By: • Finance

By: • Finance
By: • Finance