Finance
How To Record Investments In Quickbooks
Modified: December 30, 2023
Learn how to accurately record and track your investments in QuickBooks to effectively manage your finances. Maximize your financial potential with our step-by-step guide.
(Many of the links in this article redirect to a specific reviewed product. Your purchase of these products through affiliate links helps to generate commission for LiveWell, at no extra cost. Learn more)
Table of Contents
- Introduction
- Step 1: Setting Up Accounts for Investments
- Step 2: Recording Initial Investment
- Step 3: Recording Purchases and Sales of Investments
- Step 4: Recording Dividend and Interest Income
- Step 5: Handling Investment Expenses
- Step 6: Reconciling Investment Accounts
- Step 7: Generating Investment Reports
- Conclusion
Introduction
Welcome to our comprehensive guide on how to record investments in QuickBooks! Investing can be an exciting and rewarding venture, but it also requires proper bookkeeping to effectively track and manage your investments. QuickBooks, one of the leading accounting software platforms, offers a range of features to help you accurately record and monitor your investment transactions.
In this article, we will walk you through the step-by-step process of setting up accounts for investments in QuickBooks, recording initial investments, tracking purchases and sales of investments, handling dividend and interest income, managing investment expenses, reconciling investment accounts, and generating investment reports. By following these guidelines, you will be able to maintain accurate records, make informed investment decisions, and gain valuable insights into the performance of your investment portfolio.
Whether you are an individual investor, a small business owner, or a financial professional, this guide will provide you with the knowledge and tools necessary to effectively manage your investments in QuickBooks. Let’s dive in and learn how to optimize your accounting practices for investment tracking and reporting!
Step 1: Setting Up Accounts for Investments
Before you can start recording your investment transactions in QuickBooks, you need to set up the necessary accounts to track your investments. Here are the steps to follow:
- Create an Investment Account: In QuickBooks, go to the Chart of Accounts and click on “New.” Select the account type as “Investment” and provide a name for the account, such as “Investment Portfolio.”
- Create Sub-Accounts: To further organize your investments, you can create sub-accounts under the main investment account. For example, you can create sub-accounts for stocks, bonds, mutual funds, or any other investment types that you have.
- Set the Opening Balance: If you already have existing investments, you will need to enter the opening balance for each investment account. This represents the current value of the investments at the time you start using QuickBooks for tracking.
- Link Bank Accounts: If you have a separate bank account specifically for your investments, you can link it to the investment account in QuickBooks. This allows for easier reconciliation and tracking of investment-related transactions.
By setting up these accounts, you create a clear structure for organizing and managing your investments within QuickBooks. It helps ensure accurate tracking of your investment portfolio and enables you to generate meaningful reports and insights.
Once you have set up the accounts, you are ready to move on to the next step: recording your initial investment.
Step 2: Recording Initial Investment
Recording your initial investment accurately is crucial for maintaining the integrity of your investment records in QuickBooks. Follow these steps to record your initial investment:
- Create a Purchase Transaction: In QuickBooks, navigate to the account in which you made the initial investment. Click on “Record Deposits” or “Write Checks” depending on the transaction type.
- Enter the Investment Details: Provide the necessary details such as the date of the investment, the amount invested, and the investment account you created in Step 1. You can also add a memo to include any additional notes or details.
- Assign the Expense Account: If the initial investment was made using funds from a specific expense account, you can assign it here. This step is optional and may not apply to all investment scenarios.
- Save and Verify the Transaction: Review the entered information for accuracy, then save the transaction. This will record your initial investment in QuickBooks.
By accurately recording your initial investment, you establish a starting point for tracking the performance and value of your investments. It also allows you to include the initial investment amount in your investment portfolio reports and analysis.
Once you have recorded your initial investment, you can proceed to the next step: recording purchases and sales of investments.
Step 3: Recording Purchases and Sales of Investments
As you continue to invest, it’s essential to accurately record purchases and sales of investments in QuickBooks. This allows you to maintain an up-to-date record of your investment transactions and track the performance of your portfolio. Follow these steps to record purchases and sales:
- Create a Purchase Transaction: To record the purchase of an investment, navigate to the appropriate investment account in QuickBooks. Click on “Record Deposits” or “Write Checks,” depending on the type of transaction.
- Enter the Purchase Details: Provide the relevant information, including the date of the purchase, the investment name or symbol, the quantity purchased, and the purchase price per share.
- Assign the Purchase Account: Select the appropriate expense account to allocate the purchase cost. This could be a general investment account or a specific sub-account related to the type of investment.
- Save the Transaction: Review the entered information for accuracy and save the transaction. This will record the purchase of the investment in your QuickBooks account.
- Create a Sales Transaction: For recording the sale of an investment, follow similar steps. Click on “Create Sales Receipt” or “Create Invoice” to initiate the transaction.
- Enter the Sales Details: Provide the necessary information, such as the date of the sale, the investment name or symbol, the quantity sold, and the sale price per share.
- Allocate the Sale Proceeds: Assign the appropriate income account to allocate the proceeds from the sale. This could be a specific income account for investment gains or a general income account for cash inflow.
- Save the Transaction: Review the details and save the sales transaction to record the sale of the investment in QuickBooks.
Recording purchases and sales accurately allows you to track the performance of your investments, calculate gains and losses, and generate detailed investment reports. By maintaining a comprehensive record of your investment transactions, you can make informed decisions and effectively manage your investment portfolio.
Next, we will explore how to record dividend and interest income from your investments in QuickBooks.
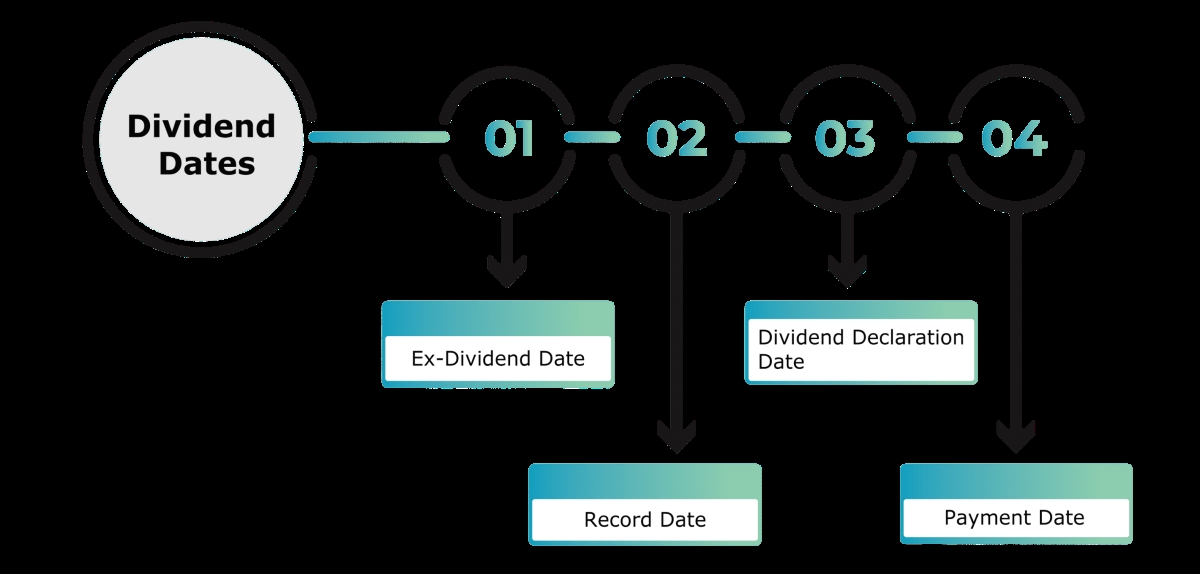
Step 4: Recording Dividend and Interest Income
Dividends and interest income are common sources of revenue from investments. It’s important to accurately record these income transactions in QuickBooks to keep track of your investment earnings. Follow these steps to record dividend and interest income:
- Create a Deposit: In QuickBooks, go to the appropriate investment account and click on “Record Deposit” to initiate the transaction.
- Enter the Income Details: Provide the relevant information, including the date of the income, the source of the income (company or institution), the amount received, and any additional details.
- Assign the Income Account: Select the appropriate income account to allocate the dividend or interest income. You can create specific income accounts for dividends and interest or use a general income account.
- Save the Transaction: Review the entered details and save the deposit transaction, resulting in the recording of dividend or interest income in QuickBooks.
By accurately recording dividend and interest income, you can track the earnings generated by your investments over time. This helps you analyze the performance of individual investments and evaluate the overall returns on your investment portfolio.
Additionally, you can generate income reports in QuickBooks that provide a comprehensive overview of your investment earnings, helping you make informed financial decisions and plan for future investments.
Next, we will explore how to handle investment expenses in QuickBooks.
Step 5: Handling Investment Expenses
Tracking investment expenses is crucial for accurately assessing the profitability of your investments. QuickBooks provides effective tools to record and categorize investment-related expenses. Follow these steps to handle investment expenses:
- Create Expense Transactions: In QuickBooks, navigate to the investment account and click on “Enter Expense” or “Write Checks” to initiate the transaction.
- Enter Expense Details: Provide the necessary information, such as the date of the expense, the payee (recipient of the payment), the expense amount, and a description of the expense.
- Categorize the Expense: Assign the appropriate expense account to categorize the investment expense. This could be a general investment expense account or a specific sub-account for different types of expenses.
- Save the Transaction: Review the entered details and save the expense transaction to record the investment expense in QuickBooks.
By accurately tracking investment expenses, you gain a clear understanding of the costs associated with your investment activities. This allows you to assess the impact of expenses on your investment returns and make informed decisions when evaluating the profitability of your investments.
In addition, QuickBooks provides reporting features that enable you to generate expense reports, helping you analyze and monitor your investment expenses over time. This information is valuable for budgeting purposes, tax reporting, and overall financial planning.
Now that we have covered handling investment expenses, let’s move on to the next step: reconciling investment accounts in QuickBooks.
Step 6: Reconciling Investment Accounts
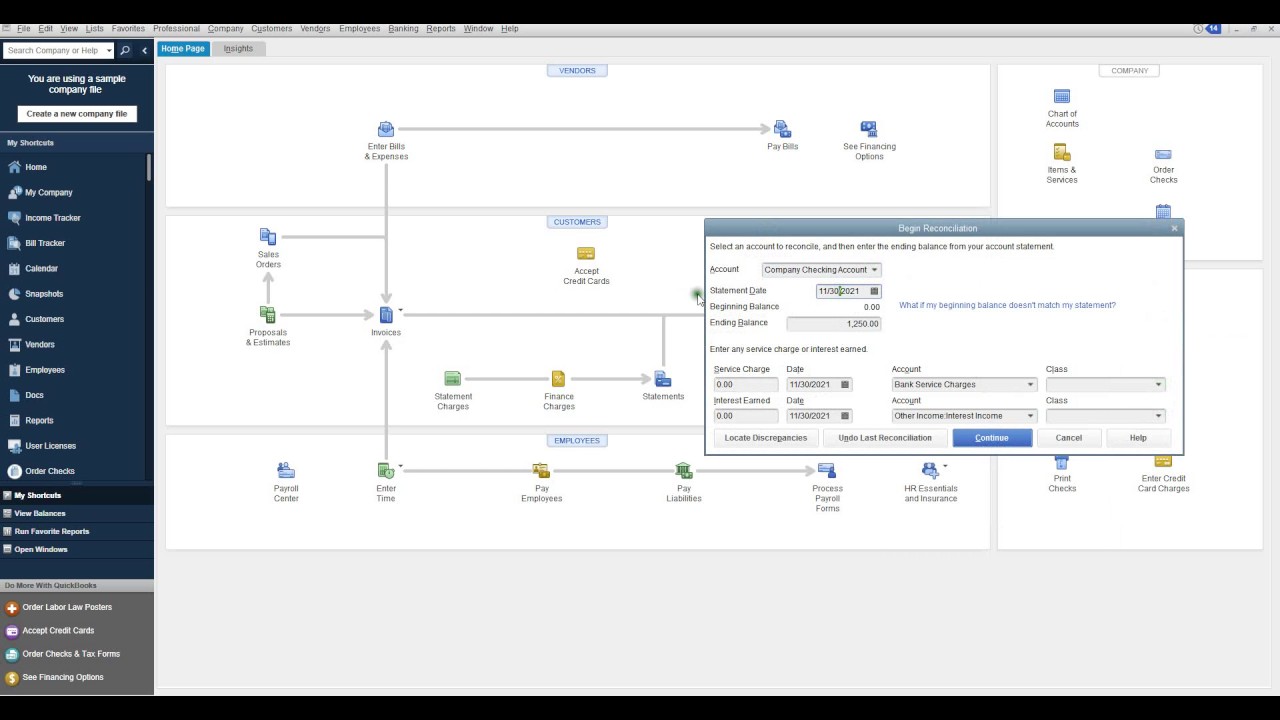
Reconciling your investment accounts in QuickBooks is essential to ensure that your recorded transactions align with the actual activity in your investment accounts. It helps identify discrepancies and maintain accurate records. Follow these steps to reconcile your investment accounts:
- Gather Statements: Obtain the latest statements from your investment accounts, such as brokerage statements or online summaries.
- Start Reconciliation: In QuickBooks, go to the appropriate investment account and click on “Reconcile” to initiate the reconciliation process.
- Enter Statement Date and Ending Balance: Enter the statement date from your investment account statement and the ending balance shown on the statement.
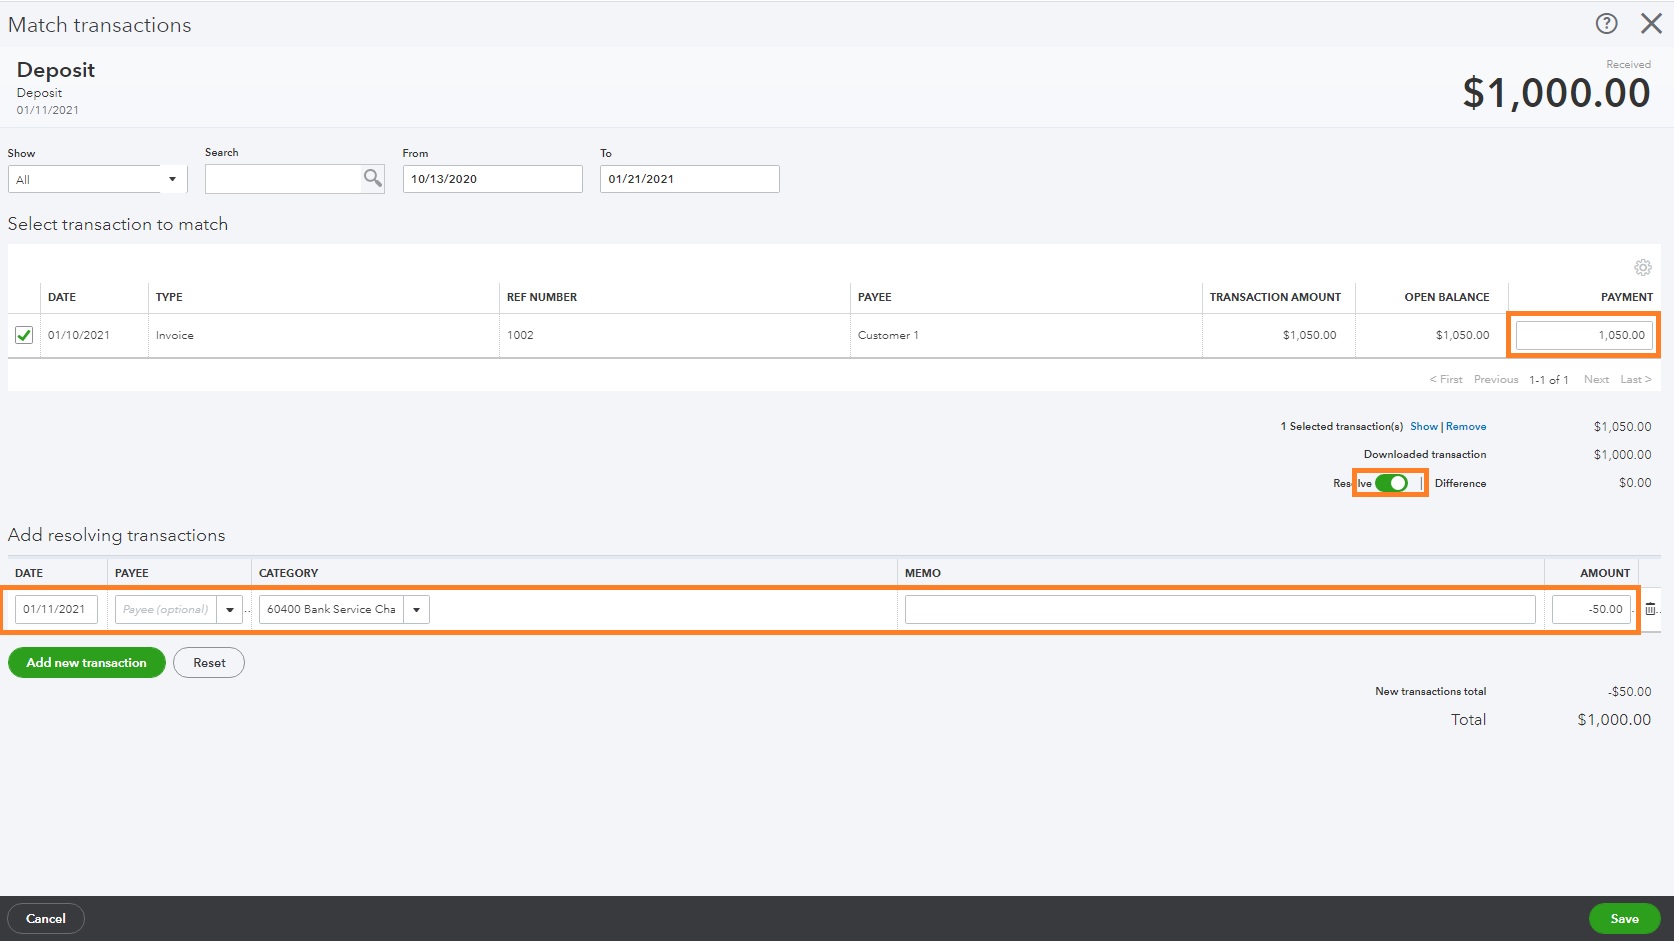
- Mark Cleared Transactions: Compare the transactions on the statement with those recorded in QuickBooks. Mark each transaction as cleared if it matches the statement.
- Investigate and Resolve Discrepancies: If you encounter any discrepancies between QuickBooks and the statement, investigate and resolve them. It may involve reviewing transaction details, contacting your financial institution, or amending incorrect entries.
- Finish Reconciliation: Once all discrepancies are resolved, QuickBooks will display the reconciliation summary. Review the information, ensure everything is accurate, and complete the reconciliation process.
Reconciling investment accounts on a regular basis helps ensure the accuracy of your investment records. It allows you to identify any errors or missing transactions, which can affect the overall integrity of your investment data in QuickBooks. By staying on top of reconciliations, you maintain a reliable and up-to-date view of your investments.
Now that we have covered reconciling investment accounts, let’s proceed to the final step: generating investment reports in QuickBooks.
Step 7: Generating Investment Reports
Generating investment reports in QuickBooks allows you to gain valuable insights into the performance of your investment portfolio. These reports provide a comprehensive overview of your investments, including asset allocation, returns, and historical performance. Follow these steps to generate investment reports:
- Access Reports: In QuickBooks, navigate to the Reports section and select the “Investment Reports” category.
- Select the Desired Report: Choose the specific report that aligns with your investment needs. Popular investment reports include Portfolio Summary, Asset Allocation, Investment Performance, and Transaction List by Account.
- Customize the Report: Tailor the report parameters to fit your requirements. You can select the date range, specific investment accounts, and additional criteria to narrow down the report results.
- Review and Analyze the Report: Once the report is generated, review the information presented. Pay attention to key metrics such as investment performance, asset allocation percentages, and transaction details.
- Export or Print the Report: If needed, export the report to a file or print a physical copy for further analysis, sharing with your financial advisor, or record-keeping purposes.
Investment reports provide valuable insights into the performance, composition, and growth of your investment portfolio. They help you evaluate the success of individual investments, monitor overall portfolio performance, and make informed decisions for future investment strategies.
When generated regularly, these reports provide a historical perspective, allowing you to track the progress of your investments over time. By regularly reviewing investment reports in QuickBooks, you can stay informed about your financial standing and make adjustments as needed.
Congratulations! You have completed the steps to record and manage your investments in QuickBooks. By following these guidelines and utilizing the relevant tools in QuickBooks, you can effectively track, monitor, and analyze your investment portfolio.
Remember to regularly update your investment data in QuickBooks to keep your records accurate and up-to-date. This will enable you to make timely financial decisions and effectively manage your investments.
If you have any questions or need further assistance, consult the QuickBooks help documentation or seek guidance from a financial professional.
Conclusion
Managing and tracking your investments in QuickBooks is crucial for maintaining accurate financial records and making informed investment decisions. Through the step-by-step process outlined in this guide, you have learned how to set up accounts for investments, record initial investments, track purchases and sales, handle dividend and interest income, manage investment expenses, reconcile investment accounts, and generate investment reports.
By following these steps, you can maintain a clear and organized record of your investment activities, enabling you to monitor the performance of your investment portfolio. QuickBooks provides powerful tools and features that simplify the process of tracking, analyzing, and reporting on your investments.
By regularly examining investment reports, such as portfolio summaries and performance analyses, you gain insights into the growth, allocation, and profitability of your investments. These reports help you evaluate your investment strategies, make informed decisions, and adapt as needed to achieve your financial goals.
Remember, accurate and up-to-date investment records are not only essential for your personal finance management but also for tax reporting, financial planning, and collaborating with financial advisors or professionals.
Utilize the functionalities and capabilities of QuickBooks to your advantage, taking advantage of features such as account reconciliation, expense tracking, and custom reports. Regularly review and update your investment records to maintain accuracy and ensure the relevance of the information.
Now that you have a comprehensive understanding of how to record investments in QuickBooks, take the time to implement these steps and optimize your investment tracking and reporting. With proper record-keeping and analysis, you can confidently manage your investments and work towards achieving your financial goals.
Remember, should you encounter any challenges or have specific inquiries, consult QuickBooks help documentation or consider seeking guidance from a financial professional. Embrace the power of QuickBooks to effectively manage your investments and take control of your financial future.
What's Hot
Latest Articles
Related Post


By: • Finance
By: • Finance


By: • Finance

By: • Finance
By: • Finance

By: • Finance

By: • Finance
By: • Finance

By: • Finance

By: • Finance

By: • Finance