Home>Finance>How To Record Merchant Fees In QuickBooks Online
Finance
How To Record Merchant Fees In QuickBooks Online
Published: February 24, 2024
Learn how to accurately record merchant fees in QuickBooks Online to keep your finance records organized and up-to-date. Simplify your financial management with our step-by-step guide.
(Many of the links in this article redirect to a specific reviewed product. Your purchase of these products through affiliate links helps to generate commission for LiveWell, at no extra cost. Learn more)
Table of Contents
Introduction
Navigating the realm of finance can be a complex and intricate endeavor, especially when it comes to managing merchant fees within the framework of QuickBooks Online. As a business owner or financial professional, understanding the nuances of recording and reconciling merchant fees is paramount to maintaining accurate financial records and gaining insights into your business's performance. In this comprehensive guide, we will delve into the essential steps for recording merchant fees in QuickBooks Online, empowering you to streamline your financial processes and gain a clearer understanding of your business's financial health.
Merchant fees, often associated with credit card transactions and other forms of electronic payments, play a pivotal role in modern business operations. These fees are incurred as a cost of accepting electronic payments and are typically charged as a percentage of the transaction amount, along with a flat fee for each transaction. Effectively managing and recording these fees in your accounting system is crucial for maintaining accurate financial records and understanding the true cost of processing electronic payments.
Throughout this guide, we will explore the fundamental aspects of setting up merchant accounts in QuickBooks Online, recording merchant fees accurately, and reconciling these fees to ensure that your financial records align with your actual transactions. By following the steps outlined in this guide, you will be better equipped to navigate the intricacies of managing merchant fees within the QuickBooks Online platform, ultimately contributing to a more robust and insightful financial management process for your business.
Setting Up Merchant Accounts in QuickBooks Online
Before delving into the process of recording merchant fees in QuickBooks Online, it is essential to ensure that your merchant accounts are accurately set up within the platform. QuickBooks Online offers seamless integration with various merchant account providers, allowing you to efficiently manage electronic payments and associated fees. Here’s a step-by-step guide to setting up merchant accounts in QuickBooks Online:
- Accessing the Merchant Services Settings: To begin, navigate to the “Settings” menu in your QuickBooks Online account and select “Account and Settings.” From there, choose “Payments” and then “Company Preferences” to access the merchant services settings.
- Connecting Merchant Accounts: Within the merchant services settings, you can connect your preferred merchant account provider to QuickBooks Online. QuickBooks offers integration with popular providers such as PayPal, Stripe, and Square, among others. Follow the on-screen prompts to securely link your merchant account to QuickBooks Online.
- Configuring Payment Preferences: Once your merchant account is connected, you can configure payment preferences to align with your business’s needs. This includes setting default bank accounts for depositing payments, specifying invoice payment options, and defining default payment methods for your customers.
- Enabling Online Payment Options: QuickBooks Online allows you to enable online payment options for your customers, providing them with convenient ways to settle invoices electronically. You can customize payment links and add them to your invoices, streamlining the payment process for your clients and enhancing your business’s cash flow.
By meticulously setting up your merchant accounts in QuickBooks Online, you establish a solid foundation for efficiently managing electronic payments and associated fees. This seamless integration empowers you to seamlessly record and reconcile merchant fees within the QuickBooks Online ecosystem, facilitating a more streamlined and accurate financial management process for your business.
Recording Merchant Fees in QuickBooks Online
Once your merchant accounts are configured within QuickBooks Online, the next crucial step is accurately recording the associated merchant fees. These fees, incurred as a cost of accepting electronic payments, must be meticulously documented to ensure that your financial records align with your business’s actual transactions. Here’s a comprehensive guide to recording merchant fees in QuickBooks Online:
- Accessing the Banking Tab: To begin recording merchant fees, navigate to the “Banking” tab in QuickBooks Online. This section allows you to manage all aspects of your business’s financial transactions, including recording fees associated with electronic payments.
- Locating Electronic Payment Transactions: Within the Banking tab, identify the electronic payment transactions for which you have incurred merchant fees. This may include credit card transactions, online payments, or other forms of electronic fund transfers.
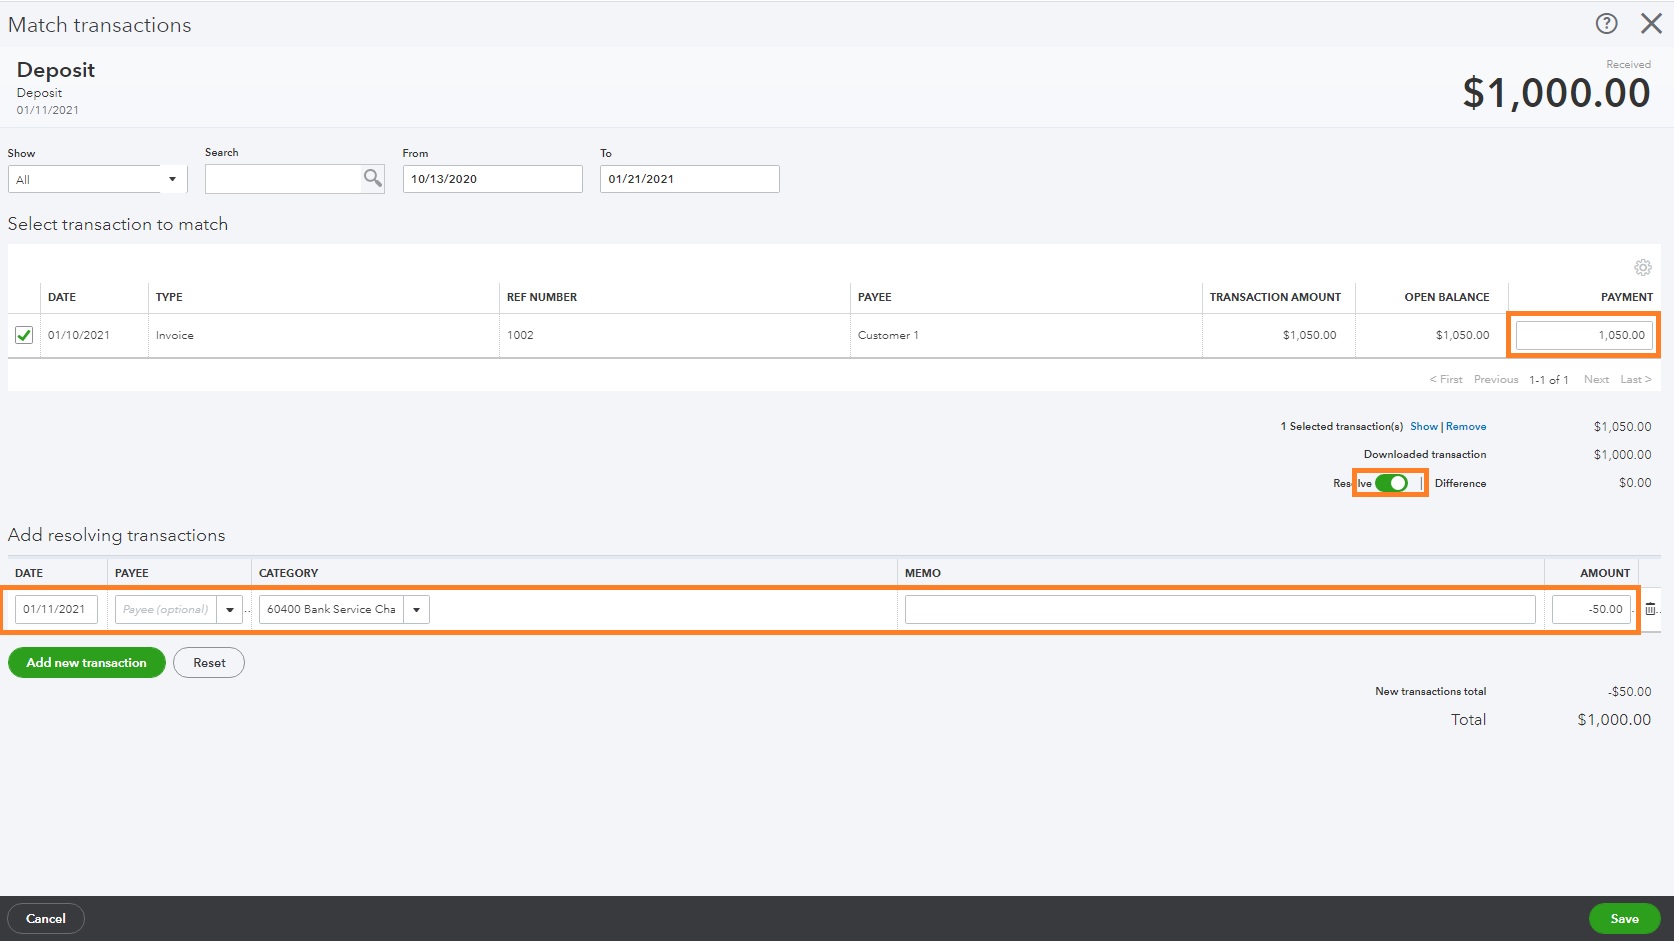
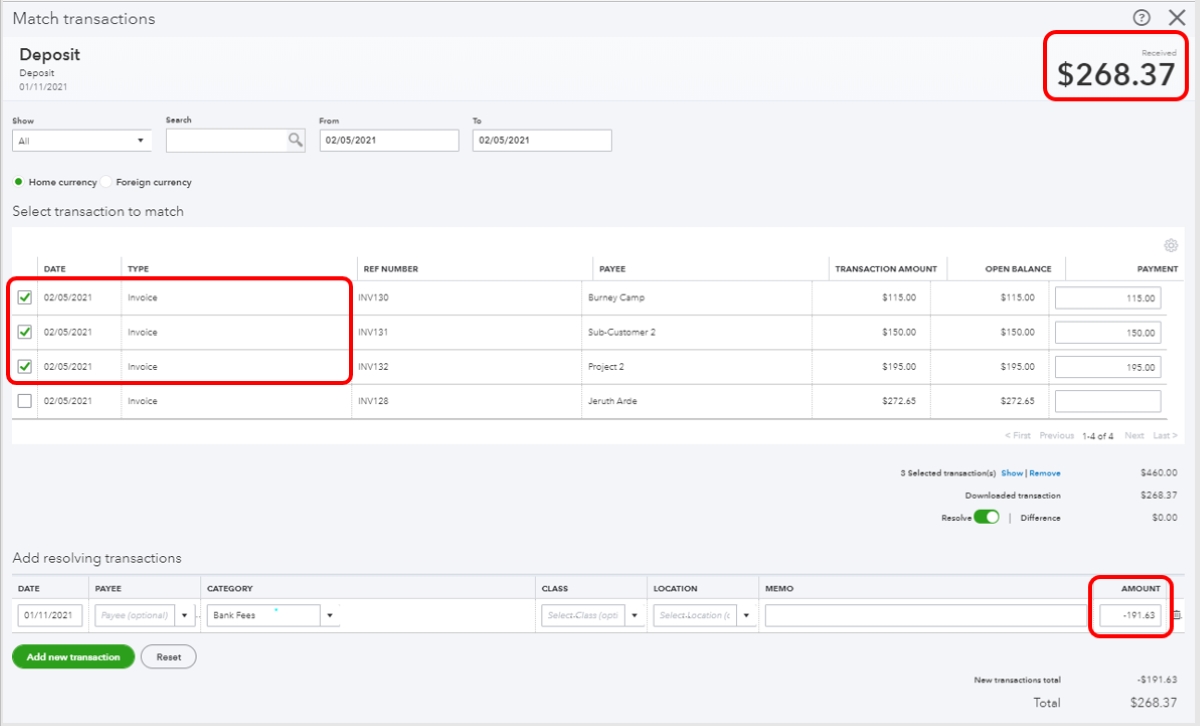
- Creating Expense Transactions: For each electronic payment transaction, create an expense transaction to account for the associated merchant fees. Specify the appropriate expense account, such as “Merchant Fees” or “Credit Card Processing Fees,” to accurately categorize these costs within your accounting records.
- Entering Fee Details: When creating the expense transaction, enter the specific details of the merchant fees, including the fee amount, transaction date, and any relevant memos or notes. This level of detail ensures that your financial records provide a comprehensive overview of your business’s expenses.
- Linking to Corresponding Transactions: Link the expense transactions for merchant fees to the corresponding electronic payment transactions within QuickBooks Online. This linkage establishes a clear relationship between the fees incurred and the associated revenue-generating transactions, facilitating a holistic view of your business’s financial activities.
By meticulously recording merchant fees in QuickBooks Online, you gain a nuanced understanding of the costs associated with accepting electronic payments, enabling you to make informed financial decisions and accurately assess your business’s profitability. These recorded fees also contribute to comprehensive financial reports, providing valuable insights into your business’s operational expenses and revenue streams.
Reconciling Merchant Fees in QuickBooks Online
Reconciling merchant fees within QuickBooks Online is a critical aspect of maintaining accurate financial records and gaining a comprehensive understanding of your business’s financial performance. This process involves verifying that the recorded merchant fees align with the actual fees charged by your merchant account provider, ensuring that your financial statements accurately reflect your business’s expenses. Here’s a detailed guide to reconciling merchant fees in QuickBooks Online:
- Reviewing Merchant Account Statements: Obtain detailed statements from your merchant account provider, outlining the fees charged for processing electronic payments. These statements typically include a breakdown of transaction fees, percentage-based fees, and any other charges associated with electronic payment processing.
- Comparing Statements with Recorded Fees: Within QuickBooks Online, compare the fees recorded for electronic payment transactions with the corresponding fees outlined in your merchant account statements. This comparison ensures that all incurred fees are accurately reflected in your accounting records.
- Identifying Discrepancies: Carefully identify any discrepancies between the recorded merchant fees in QuickBooks Online and the fees outlined in your merchant account statements. Discrepancies may arise due to timing differences in transaction processing or variations in fee structures.
- Adjusting Recorded Fees: If discrepancies are identified, make necessary adjustments to the recorded merchant fees in QuickBooks Online to align them with the actual fees outlined in your merchant account statements. This may involve editing expense transactions or creating additional entries to accurately reflect the reconciled fees.
- Documenting Reconciliation: Maintain detailed documentation of the reconciliation process, including any adjustments made to the recorded merchant fees. This documentation serves as a crucial reference for auditing purposes and ensures transparency in your financial reporting.
By diligently reconciling merchant fees in QuickBooks Online, you uphold the accuracy and integrity of your financial records, providing a clear and transparent overview of your business’s expenses. This process also enables you to identify any discrepancies or irregularities in your recorded fees, allowing for timely corrections and ensuring that your financial statements faithfully represent your business’s financial activities.
Conclusion
Effectively managing merchant fees within QuickBooks Online is a fundamental aspect of maintaining precise financial records and gaining valuable insights into your business’s financial landscape. By following the essential steps outlined in this guide, you can navigate the intricate process of setting up merchant accounts, recording merchant fees, and reconciling these fees within the QuickBooks Online platform. Through meticulous attention to detail and a comprehensive understanding of your business’s electronic payment processes, you can streamline your financial management practices and make informed decisions based on accurate financial data.
Setting up merchant accounts in QuickBooks Online lays the groundwork for seamlessly managing electronic payments and associated fees. By integrating your preferred merchant account provider with QuickBooks Online, you establish a robust framework for efficiently recording and reconciling merchant fees, contributing to a more streamlined financial management process for your business.
Recording merchant fees with precision is essential for gaining a comprehensive view of your business’s expenses. By accurately documenting these fees within QuickBooks Online, you create a detailed record of the costs associated with accepting electronic payments, enabling you to assess your business’s profitability and make informed financial decisions.
Reconciling merchant fees within QuickBooks Online ensures that your financial records align with the actual fees charged by your merchant account provider. This critical process safeguards the accuracy of your financial statements and provides transparency in your business’s financial reporting, ultimately contributing to a clear and comprehensive overview of your business’s financial performance.
By mastering the intricacies of managing merchant fees within QuickBooks Online, you empower your business with the tools and insights necessary to thrive in today’s dynamic financial landscape. With accurate and meticulously maintained financial records, you can confidently navigate financial challenges, capitalize on opportunities, and drive the sustained growth and success of your business.
What's Hot
Latest Articles
Related Post

By: • Finance
By: • Finance
By: • Finance
By: • Finance
By: • Finance
By: • Finance


By: • Finance

By: • Finance


By: • Finance


By: • Finance

By: • Finance