Home>Finance>How To Record Credit Card Payments In Quickbooks Online

Finance
How To Record Credit Card Payments In Quickbooks Online
Modified: February 21, 2024
Learn how to properly record credit card payments in QuickBooks Online to effectively manage your finances. Discover step-by-step instructions and optimize your financial tracking.
(Many of the links in this article redirect to a specific reviewed product. Your purchase of these products through affiliate links helps to generate commission for LiveWell, at no extra cost. Learn more)
Table of Contents
Introduction
Welcome to the world of QuickBooks Online, where managing your finances has never been easier. If you’re a business owner or an individual looking to streamline your credit card payment recording process, you’ve come to the right place. In this article, we will guide you step-by-step on how to record credit card payments in QuickBooks Online, ensuring accurate financial tracking and effortless bookkeeping.
As a powerful cloud-based accounting software, QuickBooks Online offers a wide range of features to simplify financial management. By properly recording credit card payments, you can keep track of your expenses, maintain accurate records, and easily reconcile your credit card statements.
Whether you’re new to QuickBooks Online or a seasoned user, this guide will walk you through the necessary steps to record credit card payments effectively. We’ll cover topics such as setting up your credit card account, linking it to your bank account, recording payments, creating expense or vendor credit entries, and reconciling your credit card statement.
By the end of this article, you’ll have a comprehensive understanding of how to manage credit card payments in QuickBooks Online, saving you time and ensuring your financial records are up to date and accurate. So, let’s dive in and get started with step one.
Step 1: Set up the Credit Card Account in QuickBooks Online
The first step in recording credit card payments in QuickBooks Online is to set up the credit card account. Here’s how you can do it:
- Log in to your QuickBooks Online account and navigate to the Dashboard.
- Click on the “Accounting” tab in the left-hand menu and select “Chart of Accounts.”
- Click on the “New” button located in the upper right corner of the page.
- Choose “Credit Card” as the account type.
- Provide a name for the credit card account and enter any additional details you may need.
- Click “Save and Close” to create the credit card account.
Once you’ve set up the credit card account, you’ll be able to record transactions related to your credit card, such as payments and charges. QuickBooks Online will automatically track and categorize these transactions, making it easier for you to manage your finances.
It’s important to note that you should set up a separate credit card account for each credit card you use for business purposes. This allows for better organization and ensures accurate tracking of transactions.
With step one complete, you’re ready to move on to the next step: linking your credit card account to your bank account in QuickBooks Online. This will enable you to easily reconcile your credit card statements and keep your financial records in sync.
Step 2: Link the Credit Card Account to your Bank Account
Linking your credit card account to your bank account in QuickBooks Online allows for seamless synchronization and simplifies the reconciliation process. Here’s how you can link the two accounts:
- Go to the QuickBooks Online Dashboard and select the “Banking” tab in the left-hand menu.
- Click on the “Add Account” button located in the upper right corner of the page.
- Search for your credit card provider by entering the name in the search box.
- Select your credit card provider from the list of options provided.
- Enter the username and password associated with your credit card account and click “Continue.”
- Follow any additional prompts to complete the linking process.
- Once the credit card account is successfully linked, QuickBooks Online will automatically start importing your credit card transactions.
By linking your credit card account to your bank account in QuickBooks Online, you can save time on manually entering transactions and ensure accurate and up-to-date financial records. Any transactions made on your credit card will be automatically imported into QuickBooks Online, making it easier to reconcile your statements and categorize your expenses.
It’s important to regularly review and categorize the transactions imported from your credit card account to ensure accurate financial reporting. By doing so, you can easily track your expenses, analyze spending patterns, and make informed financial decisions.
With step two complete, you’re now ready to move on to the next step: recording your credit card payments in QuickBooks Online.
Step 3: Record Credit Card Payments
Recording credit card payments accurately is crucial for maintaining your financial records and tracking your expenses. QuickBooks Online provides a user-friendly interface to make this process simple and efficient. Here’s how you can record credit card payments:
- From the QuickBooks Online Dashboard, navigate to the “Accounting” tab in the left-hand menu and select “Chart of Accounts.”
- Find the credit card account you want to record a payment for and click on the drop-down arrow next to the “View Register” option.
- Select “Make Payment” from the drop-down menu.
- Enter the payment date, payment method, and payment amount. You can also input any memo or note related to the payment for future reference.
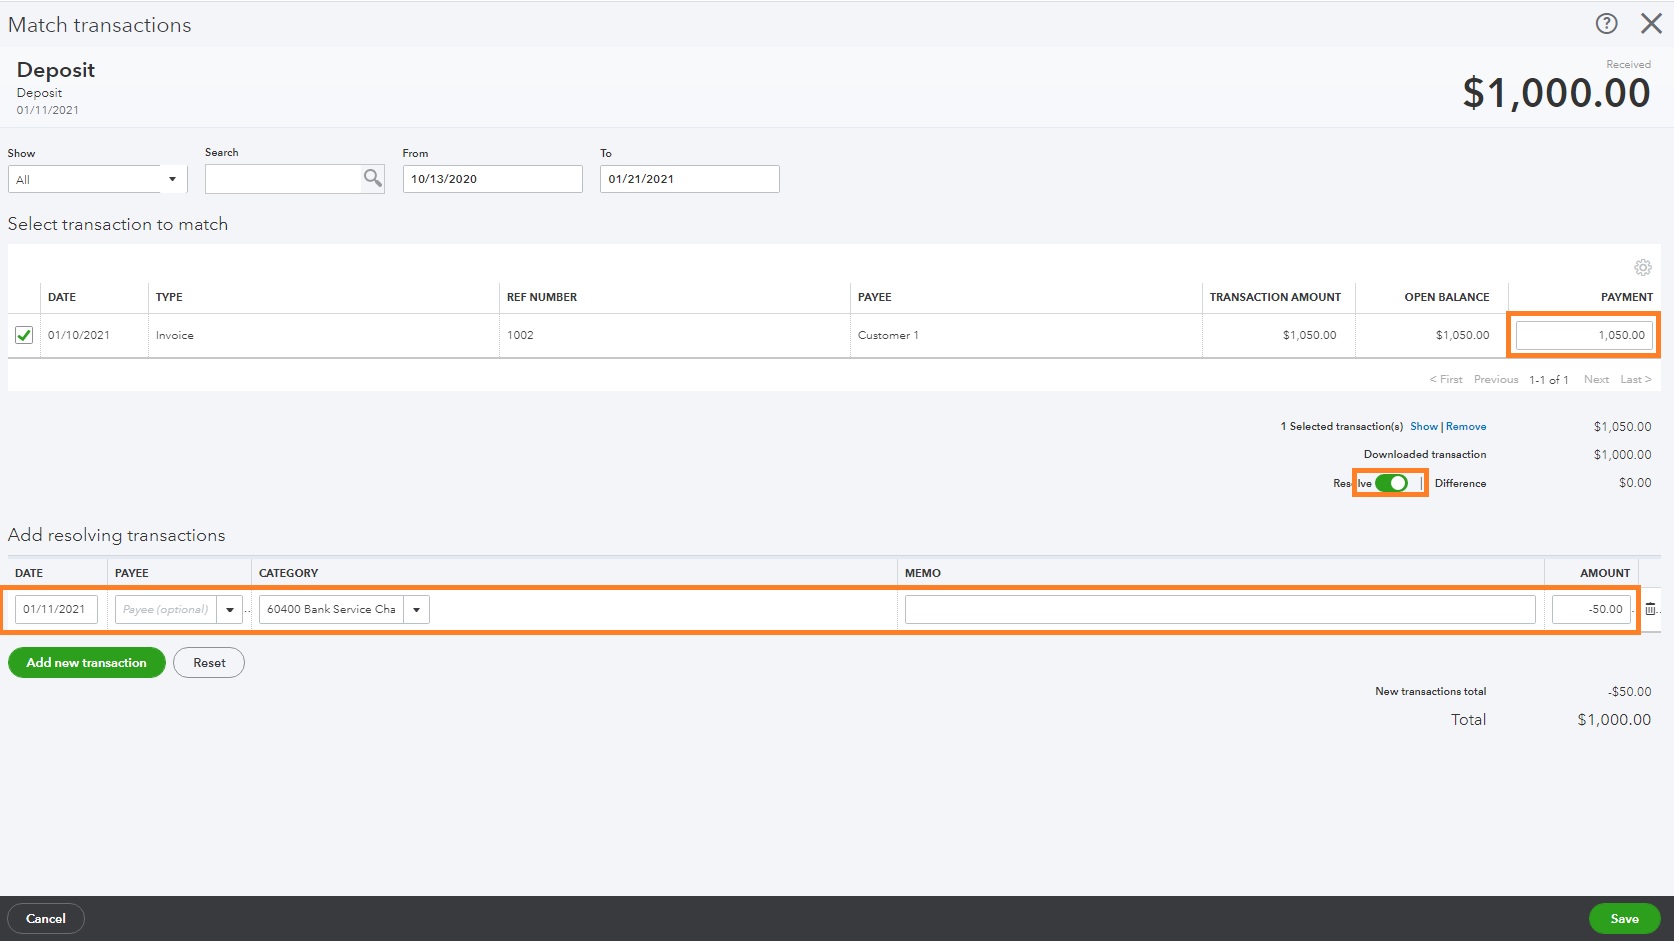
- In the “Outstanding Transactions” section, select the checkbox next to the transactions you want to apply the payment to.
- If you’re paying the full balance, the amount will automatically be allocated to the selected transactions. If you’re making a partial payment, you can manually enter the amount to be applied to each transaction.
- Verify that the total payment amount matches the amount you’re actually making, and click on “Save and Close” to record the payment.
It’s important to note that when recording credit card payments, QuickBooks Online will automatically reduce the outstanding balance of the selected transactions and update the credit card account balance accordingly. This ensures accurate tracking of payments and balances in your credit card account.
By recording credit card payments in QuickBooks Online, you can keep your financial records up to date and easily monitor your credit card expenses. This makes it simpler to analyze your spending, prepare accurate financial statements, and make informed business decisions.
With step three completed, you’re now ready to move on to the next step: creating expense or vendor credit entries for credit card charges.
Step 4: Create Expense or Vendor Credit for Credit Card Charges
Once you’ve recorded credit card payments in QuickBooks Online, the next step is to create expense or vendor credit entries for the credit card charges you’ve incurred. This helps you accurately track and categorize your expenses. Follow these steps to create expense or vendor credit entries:
- From the QuickBooks Online Dashboard, go to the “+(Plus)” icon located in the upper right corner, and choose “Expense” or “Vendor Credit” from the drop-down menu.
- For an expense entry, select the appropriate expense account, such as “Office Supplies” or “Travel Expenses.” Enter the necessary details, including the date, payee, and amount. If applicable, add a memo to provide additional information.
- For a vendor credit entry, select the vendor from the drop-down menu. Enter the credit amount, date, and any relevant memo.
- In both cases, select the credit card account you want to associate the expense or vendor credit with.
- Click on “Save and Close” to create the expense or vendor credit entry.
By creating expense or vendor credit entries for your credit card charges, you ensure that your expenses are accurately tracked and categorized in QuickBooks Online. This allows for easy expense reporting and analysis, helping you monitor your spending habits and make informed financial decisions.
It’s essential to review and reconcile your credit card statements regularly to ensure that all credit card charges are properly recorded. By doing so, you can identify any discrepancies, resolve issues promptly, and maintain accurate financial records.
With step four completed, you’re now ready to move on to the final step: reconciling your credit card statement in QuickBooks Online.
Step 5: Reconcile your Credit Card Statement
The final step in effectively managing your credit card payments in QuickBooks Online is to reconcile your credit card statement. Reconciliation ensures that your records accurately reflect the transactions on your credit card statement, and helps identify any discrepancies or errors. Here’s how you can reconcile your credit card statement:
- From the QuickBooks Online Dashboard, navigate to the “Accounting” tab in the left-hand menu and select “Reconcile.”
- Select the credit card account you want to reconcile from the drop-down menu.
- Enter the ending balance and statement date as shown on your credit card statement.
- QuickBooks Online will list all the transactions within the statement period. Match each transaction in QuickBooks Online with the corresponding transaction on your credit card statement.
- Check the “Mark As Reconciled” box next to each transaction that matches your credit card statement.
- If there are transactions that are not listed on your credit card statement or vice versa, carefully review the details and investigate any discrepancies.
- Once all transactions are reconciled, the difference between the ending balance in QuickBooks Online and the ending balance on your credit card statement should be zero.
- Click on the “Finish Now” button to complete the reconciliation process.
By reconciling your credit card statement in QuickBooks Online, you ensure that your financial records are accurate and up to date. This helps you identify any errors or fraudulent transactions and maintain the integrity of your business finances.
Remember to reconcile your credit card statement regularly, ideally on a monthly basis, to stay on top of your financial transactions and ensure that your balances are in sync. This practice not only keeps your records accurate but also provides valuable insights into your spending habits and cash flow.
Congratulations! You’ve now completed all five steps to successfully record credit card payments in QuickBooks Online. By following these steps, you can effectively manage your credit card expenses, streamline your financial tracking, and make informed business decisions.
If you have any further questions or need additional assistance, don’t hesitate to reach out to QuickBooks Online support or consult with a financial professional.
Conclusion
Congratulations! You’ve reached the end of our comprehensive guide on how to record credit card payments in QuickBooks Online. By following the step-by-step instructions provided, you can streamline your financial management process and ensure accurate tracking of your credit card transactions.
QuickBooks Online offers robust features and a user-friendly interface to simplify the recording of credit card payments. From setting up your credit card account to reconciling your statements, each step plays a crucial role in maintaining accurate financial records for your business or personal finances.
With QuickBooks Online, you can easily link your credit card account to your bank account, record payments, create expense or vendor credit entries, and reconcile your credit card statements. This enables you to track your expenses, analyze spending patterns, and make informed financial decisions.
Remember to perform regular reviews and reconciliations of your credit card statements to identify any discrepancies and maintain the accuracy of your financial records. Consistency is key in effective financial management.
If you encounter any challenges along the way, don’t hesitate to consult the QuickBooks Online support resources or reach out to a financial professional for guidance. They can provide invaluable assistance to ensure that you’re maximizing the potential of QuickBooks Online for your credit card payment recording needs.
By leveraging the power of QuickBooks Online and following the steps outlined in this guide, you can streamline your credit card payment recording process, save time, and focus on growing your business or managing your personal finances. Start implementing these steps today and experience the convenience and efficiency of managing credit card payments with QuickBooks Online!
What's Hot
Latest Articles
Related Post
By: • Finance

By: • Finance
By: • Finance

By: • Finance
By: • Finance

By: • Finance


By: • Finance

By: • Finance

By: • Finance

By: • Finance

By: • Finance

By: • Finance