Finance
How Do I Unapply A Credit In QuickBooks?
Modified: February 21, 2024
Learn how to unapply a credit in QuickBooks to manage your finances more effectively. Find step-by-step instructions and guidance for removing credits from transactions.
(Many of the links in this article redirect to a specific reviewed product. Your purchase of these products through affiliate links helps to generate commission for LiveWell, at no extra cost. Learn more)
Table of Contents
- Introduction
- Understanding Credit Applications in QuickBooks
- Steps to Unapply a Credit in QuickBooks
- Option 1: Unapplying a Credit on an Invoice
- Option 2: Unapplying a Credit on a Customer’s Account
- Option 3: Unapplying a Credit on a Vendor’s Account
- Option 4: Undoing a Credit Application in QuickBooks Online
- Conclusion
Introduction
Welcome to the world of QuickBooks, a powerful accounting software that helps individuals and businesses manage their finances efficiently. In QuickBooks, you can easily apply credits to invoices to keep track of outstanding payments or credits. However, there may be scenarios where you need to unapply a credit for various reasons, such as customer returns, changes in payment agreements, or vendor credit adjustments.
In this article, we will explore the process of unapplying a credit in QuickBooks. We will dive into the different options available for unapplying credits on invoices, customer accounts, and vendor accounts in both QuickBooks Desktop and QuickBooks Online. Whether you are new to QuickBooks or a seasoned user, understanding how to unapply credits will give you greater control over your financial data and ensure accurate reporting.
By unapplying credits, you can reverse any erroneous credit applications and bring your accounts back to the correct state. Unapplying credits in QuickBooks is not a complicated process, but it is important to follow the right steps to avoid any discrepancies in your financial records.
Now, let’s delve into the world of unapplying credits in QuickBooks and explore the different options available to you!
Understanding Credit Applications in QuickBooks
Before we dive into the process of unapplying a credit in QuickBooks, it’s essential to understand how credit applications work in the software. In QuickBooks, credits can be applied to invoices to offset outstanding balances. This allows you to keep track of customer payments and vendor credits effectively.
When a credit is applied to an invoice, QuickBooks automatically adjusts the accounts receivable or accounts payable balance to reflect the reduced amount owed. This simplifies the process of tracking payments and ensures accurate financial reporting.
For example, let’s say a customer has a credit of $100 on their account due to a returned item. When they make a payment of $200 for an invoice, you can apply the $100 credit to offset a portion of the amount due. QuickBooks will adjust the accounts receivable balance accordingly, reflecting a remaining balance of $100 instead of $200.
Credit applications are not limited to customers; they can also be applied to vendor accounts. If you have received a credit from a vendor, you can apply it to future vendor bills or use it to offset existing balances, effectively reducing the amount owed.
Understanding how credit applications work in QuickBooks is crucial, as it provides the foundation for unapplying credits and maintaining accurate financial records. With this knowledge, let’s explore the steps to unapply credits in QuickBooks Desktop and QuickBooks Online to rectify any credit application errors or changes in financial agreements.
Steps to Unapply a Credit in QuickBooks
Unapplying a credit in QuickBooks is a straightforward process, but the steps may vary depending on whether you are using QuickBooks Desktop or QuickBooks Online. In this section, we will outline the general steps to unapply a credit in QuickBooks, and in the following sections, we will explore specific options for unapplying credits in different scenarios.
- Open QuickBooks and navigate to the appropriate section where the credit is applied, such as an invoice, customer’s account, or vendor’s account.
- Locate the transaction or invoice where the credit is applied. Depending on the version of QuickBooks you are using, this may vary.
- Select the transaction or invoice and navigate to the payment or credits section.
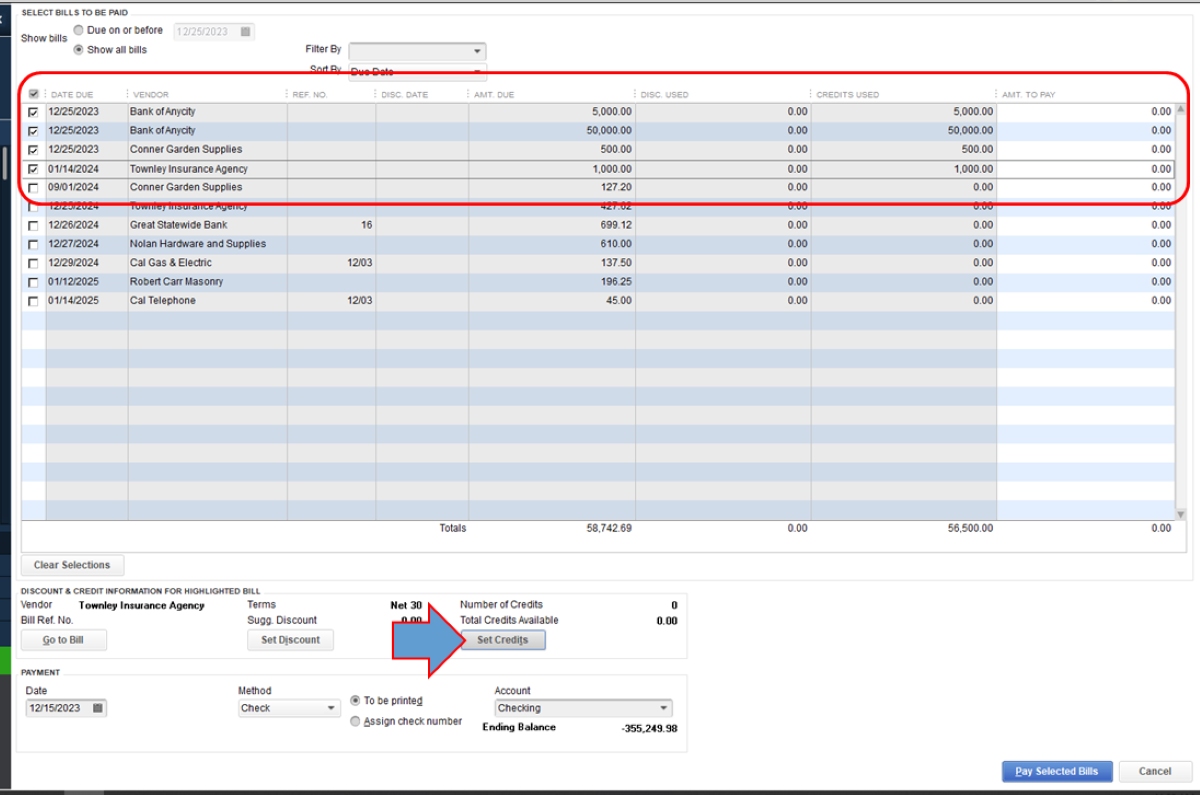
- Review the applied credits and identify the specific credit you want to unapply.
- Select the “Unapply” or “Remove” option to remove the credit from the transaction.
- Confirm your action and save the changes.
Following these general steps, you will be able to unapply a credit in QuickBooks. However, for more specific instructions tailored to different scenarios, such as unapplying a credit on an invoice, customer’s account, or vendor’s account, continue reading the respective sections below.
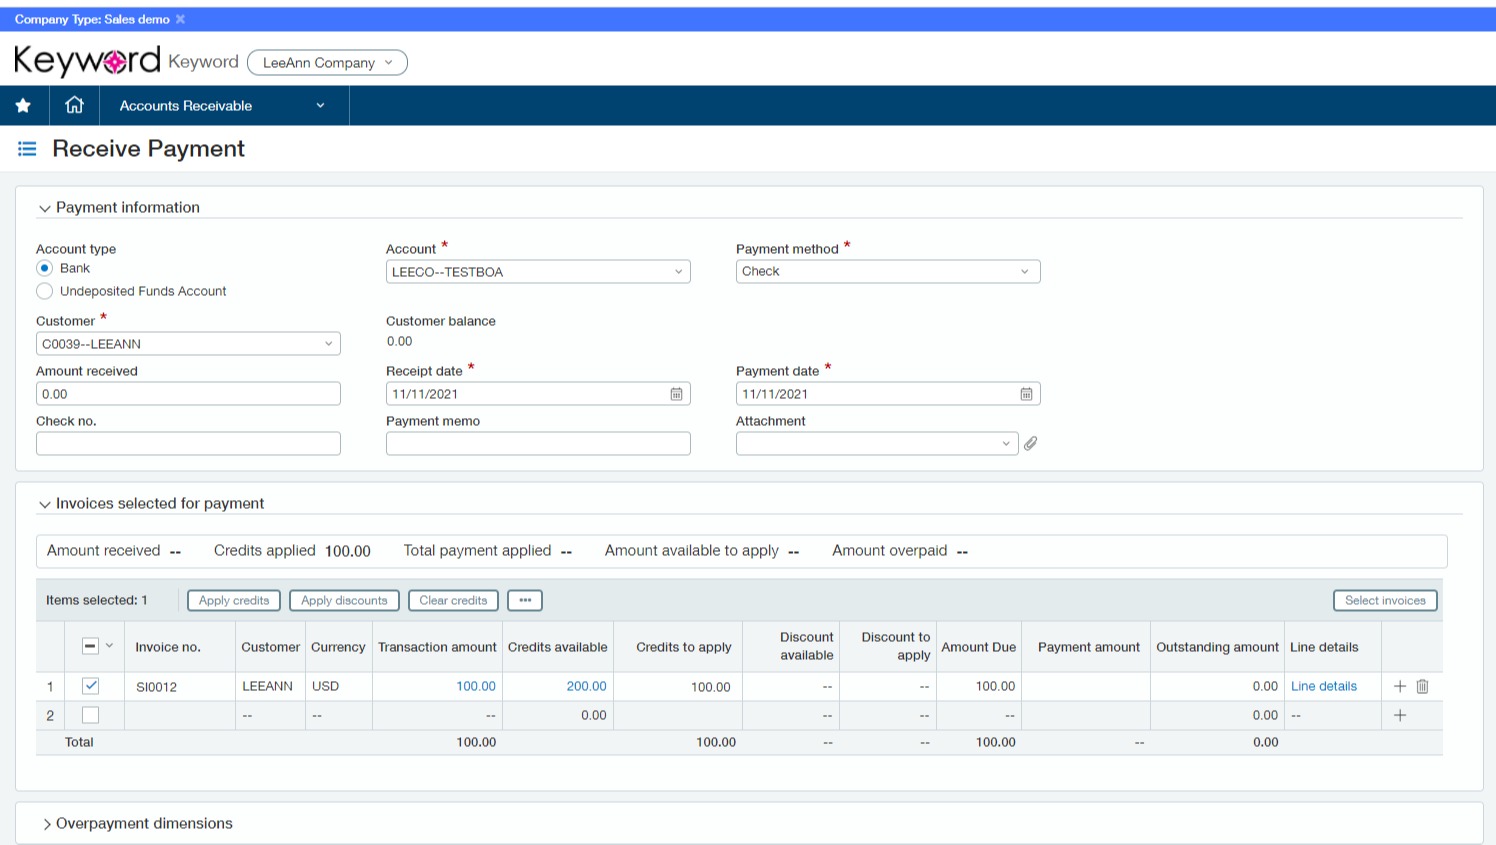
Option 1: Unapplying a Credit on an Invoice
If you have applied a credit to an invoice in QuickBooks and need to unapply it, follow these steps:
- Open QuickBooks and navigate to the “Customers” or “Sales” section.
- Locate the invoice to which the credit is applied.
- Open the invoice and look for the “Payment” section.
- Review the applied credits and identify the specific credit you want to unapply.
- Click on the applied credit and select the option to “Unapply” or “Remove” the credit.
- Confirm the action and save the changes to unapply the credit from the invoice.
By following these steps, the credit will be unapplied from the invoice, and the accounts receivable balance will be adjusted accordingly.
It’s worth noting that unapplying a credit from an invoice does not delete the credit itself. The credit will still be available in QuickBooks and can be re-applied to another invoice or used for future transactions.
Now that you know how to unapply a credit from an invoice in QuickBooks, let’s explore more options for unapplying credits in different scenarios.
Option 2: Unapplying a Credit on a Customer’s Account
In some cases, you may need to unapply a credit from a customer’s account in QuickBooks. This could be due to a change in payment arrangements, customer returns, or any other reason that requires adjusting the customer’s account balance. Follow these steps to unapply a credit on a customer’s account:
- Open QuickBooks and navigate to the “Customers” or “Sales” section.
- Locate and open the customer’s account for whom you want to unapply the credit.
- Look for the “Transactions” or “Payments” section within the customer’s account.
- Review the applied credits and identify the specific credit you want to unapply.
- Select the applied credit and choose the option to “Unapply” or “Remove” the credit from the customer’s account.
- Confirm the action and save the changes to unapply the credit from the customer’s account.
By following these steps, the credit will be unapplied from the customer’s account, and the accounts receivable balance will be adjusted accordingly.
Unapplying a credit from a customer’s account allows you to maintain accurate records and ensure that outstanding balances are correctly reflected. Remember that unapplying a credit does not delete it from QuickBooks; it will still be available for reapplication or for use in future transactions.
Now that you know how to unapply a credit on a customer’s account, let’s explore another option for unapplying credits in QuickBooks.
Option 3: Unapplying a Credit on a Vendor’s Account
Unapplying a credit on a vendor’s account in QuickBooks is necessary when you need to adjust the outstanding balances or resolve any discrepancies. Whether it’s a vendor credit adjustment or a change in payment terms, you can easily unapply a credit on a vendor’s account by following these steps:
- Open QuickBooks and navigate to the “Vendors” or “Expenses” section.
- Locate and open the vendor’s account for whom you want to unapply the credit.
- Look for the “Transactions” or “Payments” section within the vendor’s account.
- Review the applied credits and identify the specific credit you want to unapply.
- Select the applied credit and choose the option to “Unapply” or “Remove” the credit from the vendor’s account.
- Confirm the action and save the changes to unapply the credit from the vendor’s account.
By following these steps, the credit will be unapplied from the vendor’s account, and the accounts payable balance will be adjusted accordingly.
Unapplying a credit on a vendor’s account allows you to maintain accurate records and ensure that outstanding balances are correctly reflected. It provides clarity and transparency in your financial reporting, whether it’s for vendor bill payments or reconciling vendor account statements.
Remember that unapplying a credit does not delete it from QuickBooks; the credit will still be available for reapplication or for use in future transactions with the vendor.
Now that you know how to unapply a credit on a vendor’s account, let’s explore another option for unapplying credits in QuickBooks.
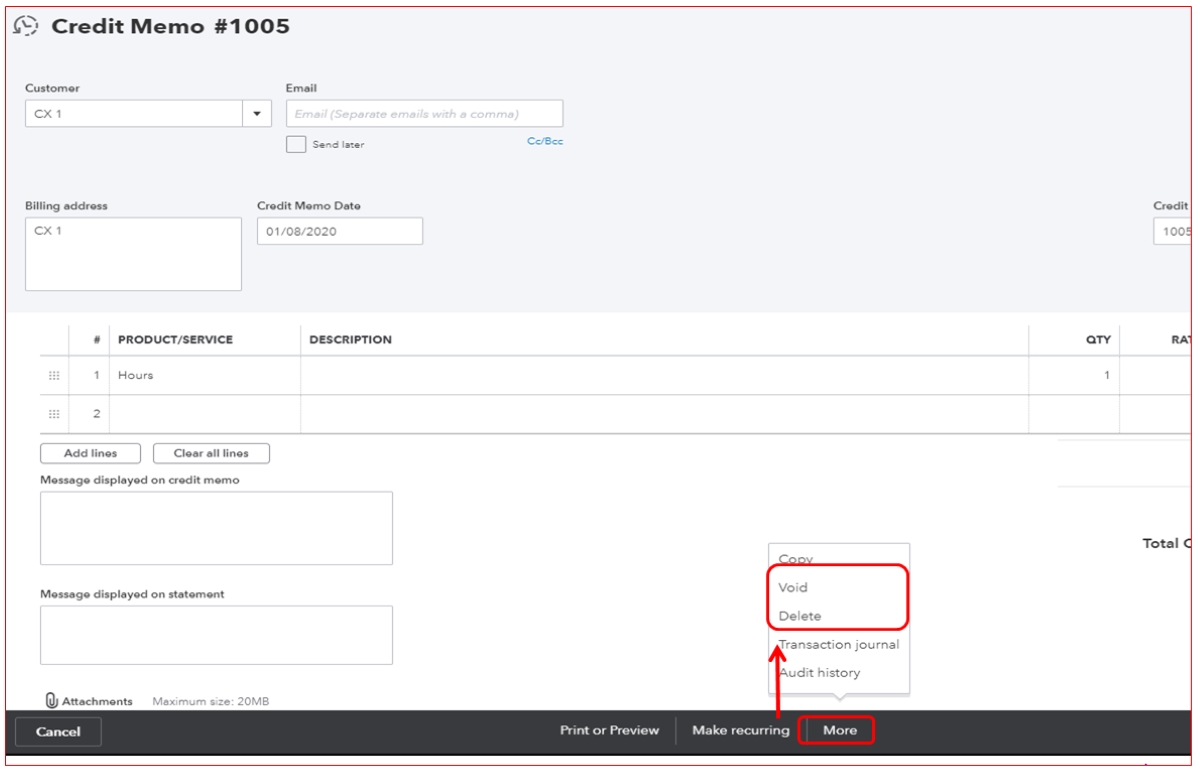
Option 4: Undoing a Credit Application in QuickBooks Online
If you are using QuickBooks Online, you can easily undo a credit application by following these steps:
- Open QuickBooks Online and navigate to the “Sales” or “Invoicing” section.
- Click on the “Customers” tab and select the customer whose credit application you want to undo.
- Locate the invoice that has the applied credit.
- Open the invoice and look for the “Payment” section.
- Review the applied credits and identify the specific credit you want to undo.
- Click on the applied credit and select the option to “Unapply” or “Remove” the credit.
- Confirm the action and save the changes to undo the credit application.
By following these steps, the credit will be unapplied from the invoice, and the accounts receivable balance will be adjusted accordingly in QuickBooks Online.
Undoing a credit application in QuickBooks Online helps ensure accurate financial records and allows you to reconcile customer account balances more effectively. It provides flexibility in adjusting credit applications in case of changes or errors.
Remember that undoing a credit application does not delete the credit from QuickBooks Online; it simply removes its application from the specific transaction. The credit will still be available for reapplication or use in other transactions.
Now that you know how to undo a credit application in QuickBooks Online, let’s summarize what we have learned.
Conclusion
Unapplying credits in QuickBooks is a crucial step in maintaining accurate financial records and resolving any discrepancies that may arise. Whether you need to unapply a credit on an invoice, customer’s account, vendor’s account, or in QuickBooks Online, the process is relatively straightforward.
By following the steps outlined in this article, you can easily unapply credits and adjust outstanding balances in your QuickBooks software. It’s important to remember that unapplying a credit does not delete it from QuickBooks; rather, it removes its application from a specific transaction, allowing you to reapply the credit in the future if needed.
Regularly reviewing and unapplying credits is essential for maintaining accurate financial reporting and preventing any potential errors. It gives you greater control over your financial data and ensures that your accounts receivable and accounts payable balances are correct.
We hope this article has provided you with a comprehensive understanding of how to unapply credits in QuickBooks. By following the appropriate steps, you can rectify any credit application errors or changes in payment arrangements, keeping your financial records accurate and up to date.
Remember, if you have any specific questions or need further assistance, it’s always a good idea to consult the QuickBooks help center or seek guidance from a qualified accounting professional.
Thank you for reading, and we wish you success in managing your finances using QuickBooks!
What's Hot
Latest Articles
Related Post
By: • Finance

By: • Finance

By: • Finance
By: • Finance
By: • Finance

By: • Finance

By: • Finance
By: • Finance

By: • Finance


By: • Finance

By: • Finance

By: • Finance