Finance
How To Unapply A Credit Memo In QuickBooks
Modified: February 21, 2024
Learn how to unapply a credit memo in QuickBooks and manage your finances more efficiently. Follow our step-by-step guide to easily reverse credit memos and keep your books accurate.
(Many of the links in this article redirect to a specific reviewed product. Your purchase of these products through affiliate links helps to generate commission for LiveWell, at no extra cost. Learn more)
Table of Contents
Introduction
Welcome to our comprehensive guide on how to unapply a credit memo in QuickBooks. Managing credit memos is an essential part of the accounting process for businesses that offer refunds, apply credits to customer accounts, or issue adjustments. QuickBooks, the popular accounting software, provides a convenient way to create and track credit memos.
However, there may be instances where you need to reverse or cancel a credit memo due to various reasons such as a customer returning a product or a mistake in the initial transaction. In such cases, knowing how to unapply a credit memo can help you accurately reflect the changes in your financial records.
In this article, we will walk you through the step-by-step process of unapplying a credit memo in QuickBooks, ensuring that you have a clear understanding of every action required. Whether you’re a small business owner, an accounting professional, or someone trying to navigate the intricacies of QuickBooks, our guide will provide you with a comprehensive explanation.
Before we get started, it’s important to note that unapplying a credit memo should be done with caution. Make sure you have a backup of your financial data and consult with a qualified accountant or bookkeeper if you’re unsure about any specific transactions.
Now, let’s dive into the details of how to unapply a credit memo in QuickBooks.
Step 1: Open QuickBooks
The first step in unapplying a credit memo in QuickBooks is to open the software on your computer. Launch the QuickBooks application from your desktop or start menu. If you have multiple company files, select the appropriate file that contains the credit memo you want to unapply.
Once QuickBooks is open, you’ll be presented with the main dashboard, which displays an overview of your company’s financial information. This dashboard provides quick access to essential tasks and features, making it convenient to navigate through the software.
If you are not automatically logged in, enter your username and password to access your company’s data. Ensure that you have the necessary permissions to edit or delete credit memos.
If you are new to QuickBooks or need assistance with the software’s functionality, QuickBooks provides a comprehensive help guide that you can access by clicking on the “Help” option in the top menu bar.
Once you’ve successfully opened QuickBooks and are logged in to the desired company file, you are ready to move on to the next step.
Step 2: Access the Customer Center
After opening QuickBooks and logging in to your company file, the next step in unapplying a credit memo is to access the Customer Center. The Customer Center serves as a hub for managing customer-related transactions and information.
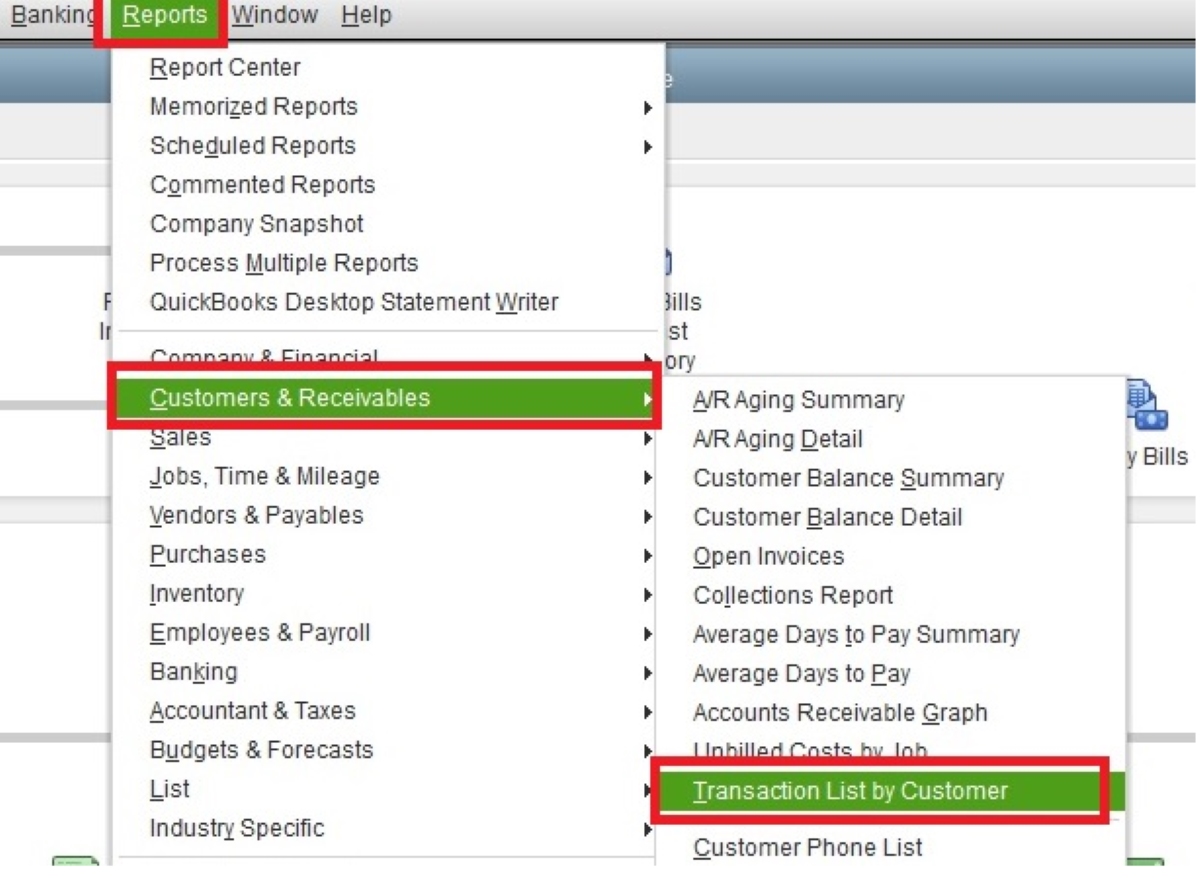
To access the Customer Center, navigate to the top menu bar and click on the “Customers” option. A drop-down menu will appear with various customer-related options. From this menu, select “Customer Center.”
Upon clicking on the Customer Center, a new window will open, displaying the list of customers or clients associated with your business. This window provides a centralized location where you can view, edit, and manage customer information.
Within the Customer Center, you can search for specific customers, view their details, and access their transaction history. It allows you to have a comprehensive overview of your customer interactions, including credit memos, invoices, payments, and more.
If you have a large number of customers, you may need to use the search bar or scroll through the list to locate the customer associated with the credit memo you want to unapply.
Once you have accessed the Customer Center and identified the customer, you can proceed to the next step in unapplying a credit memo.
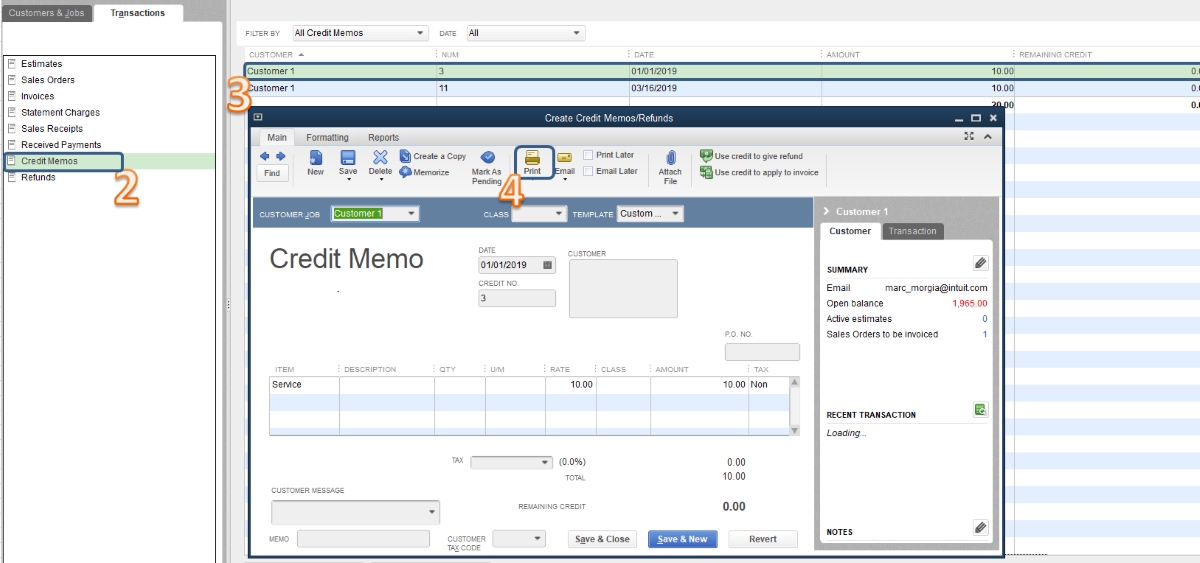
Step 3: Locate the Credit Memo
Once you have accessed the Customer Center in QuickBooks, the next step is to locate the specific credit memo that you want to unapply. The credit memo may have been applied to an invoice, reducing the customer’s outstanding balance.
To locate the credit memo, you can either select the customer from the list in the Customer Center or use the search bar within the Customer Center to find the customer’s name. Once you have found the customer, you can view their transaction history by clicking on their name.
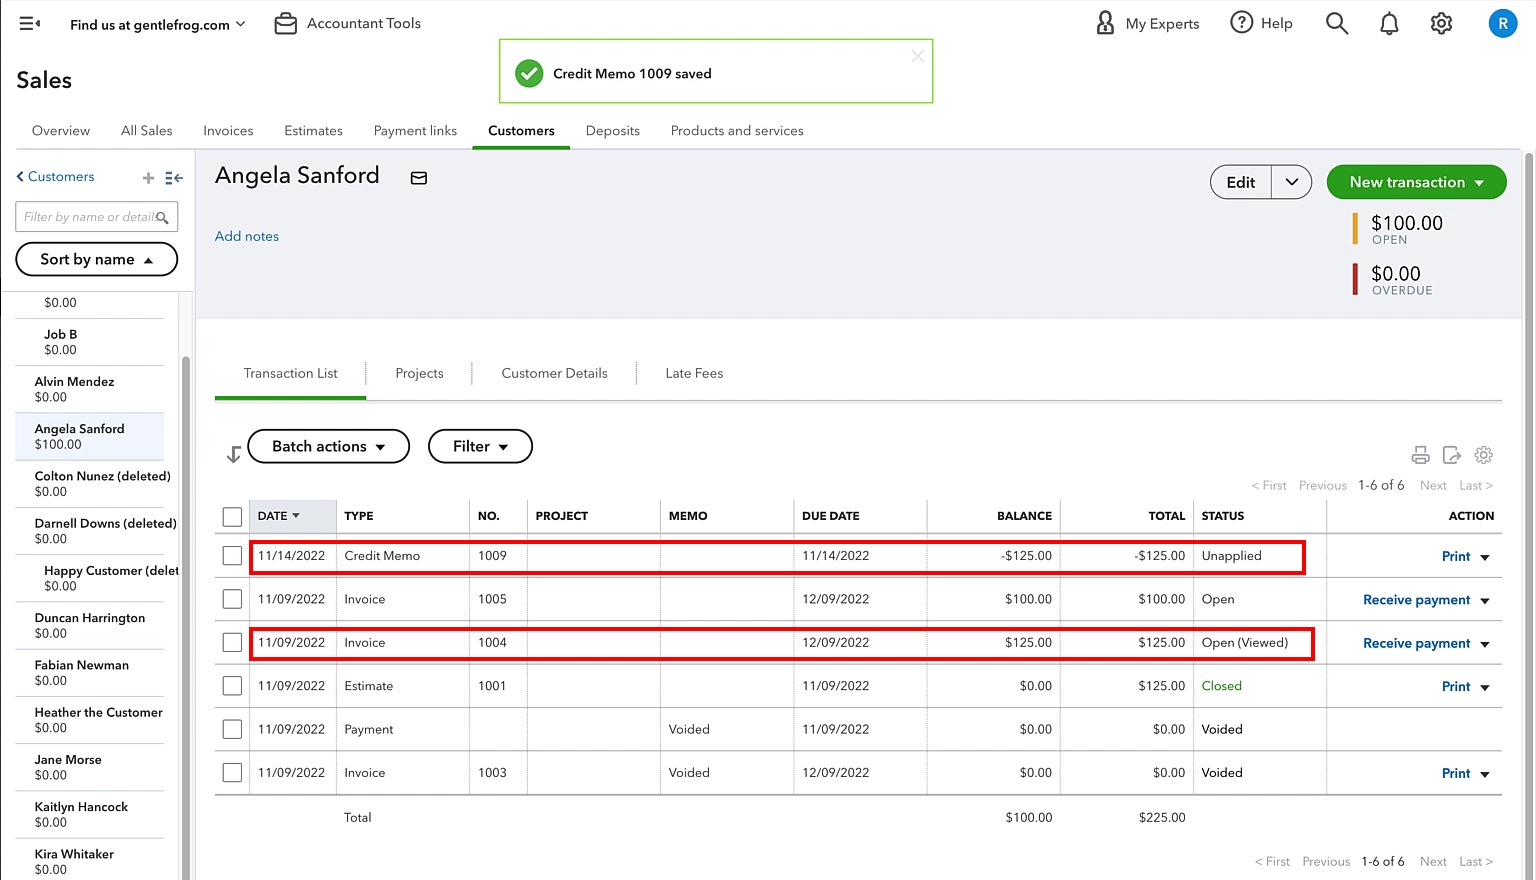
Within the customer’s transaction history, you will be able to see a list of all the transactions associated with that customer, including invoices, payments, and credit memos. Look for the credit memo that you want to unapply.
If you have a large number of transactions, you can utilize the search function within the transaction history window. This will allow you to search by specific transaction type, date, or amount to narrow down the results and find the credit memo more quickly.
Once you have located the credit memo, take note of the amount and any other relevant details that will help you during the unapplying process.
By successfully locating the credit memo in QuickBooks, you can now proceed to the next step of unapplying the credit memo.
Step 4: Select the Credit Memo
After you have located the credit memo that you want to unapply in QuickBooks, the next step is to select the credit memo for further action. By selecting the credit memo, you can access the options and settings necessary to unapply it from the associated invoice.
To select the credit memo, simply click on it within the customer’s transaction history. This action will highlight the credit memo, indicating that it is the currently selected transaction. You may also see the details of the credit memo displayed on the screen.
Double-check the information displayed to ensure that you have selected the correct credit memo. It’s important to review the details such as the customer’s name, date, and amount to confirm that it matches your intended transaction.
In some cases, you may need to scroll through the transaction history or use the search function again if there are multiple credit memos associated with the customer. Locate the specific credit memo that you want to unapply and ensure that it is selected.
Once you have confirmed that the correct credit memo is selected, you are ready to proceed to the next step and initiate the unapplying process.
Step 5: Click on the “Edit” Menu
After selecting the credit memo that you want to unapply in QuickBooks, the next step is to click on the “Edit” menu. This menu contains various options and functions that allow you to make changes and modifications to the selected transaction.
To access the “Edit” menu, navigate to the top menu bar in QuickBooks. Look for the word “Edit” and click on it. This will open a drop-down menu with a list of options related to editing transactions.
Within the “Edit” menu, you will find options like “Delete,” “Void,” or “Modify.” These options vary depending on the type of transaction you have selected. Since you want to unapply the credit memo, you will need to look for the appropriate option within the “Edit” menu.
Take note that the label or position of the unapplying option may differ slightly based on your version of QuickBooks. In most cases, you will find it under the “Edit” or “Modify” options.
Click on the specific option that allows you to unapply or remove the credit memo from the associated invoice. This action will trigger the unapplying process and prompt QuickBooks to proceed with the necessary adjustments to the transaction.
Once you have clicked on the appropriate option in the “Edit” menu, you are ready to move on to the next step and confirm the deletion of the credit memo.
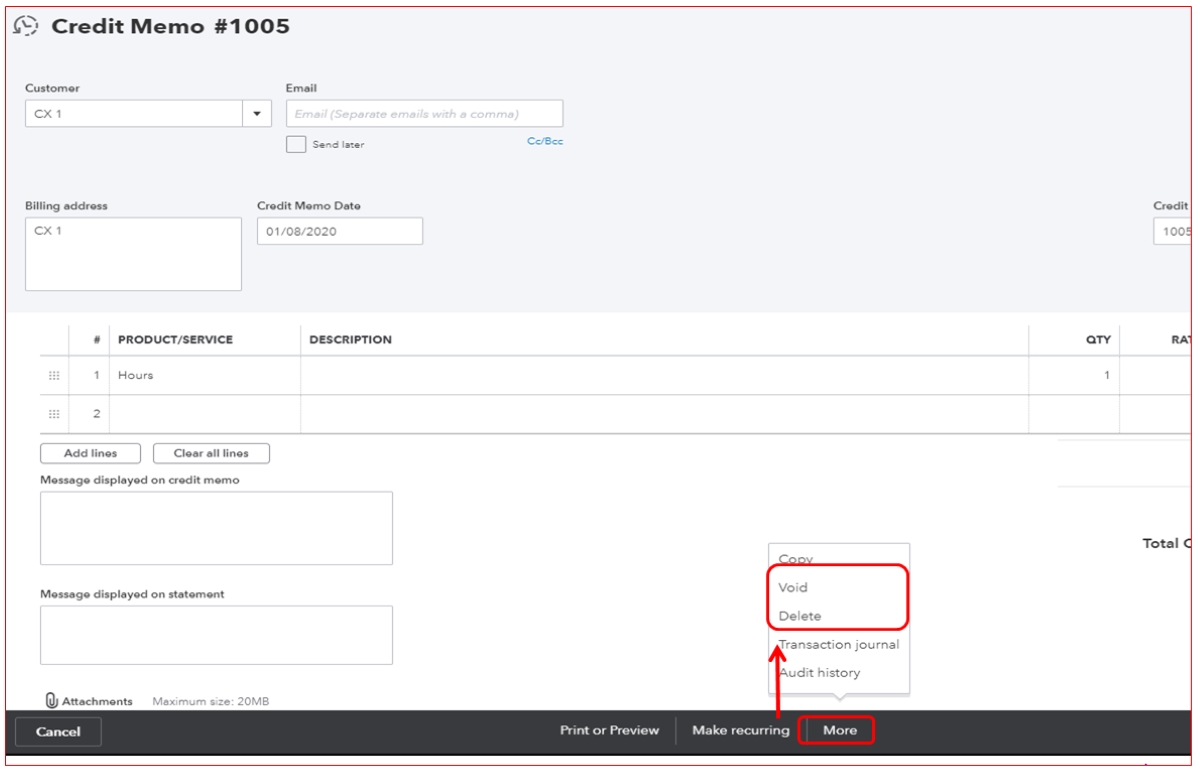
Step 6: Choose “Delete Credit Memo”
After accessing the “Edit” menu in QuickBooks and selecting the appropriate unapplying option, the next step is to choose the “Delete Credit Memo” option. This action will initiate the process of removing the credit memo from the associated invoice.
Within the “Edit” menu, look for the specific option labeled as “Delete Credit Memo.” This option may be located under a sub-menu, such as “Delete” or “Remove Credit Memo,” depending on your version of QuickBooks.
Click on the “Delete Credit Memo” option. QuickBooks will prompt you with a confirmation message to confirm that you want to delete the credit memo. It’s important to carefully review the details and make sure that you have selected the correct credit memo for deletion.
Remember that once the credit memo is deleted, it cannot be undone. Before proceeding, ensure that you have backup copies of your financial data and confirm with relevant stakeholders if necessary.
If you are certain about deleting the credit memo, click on the confirmation option provided in the prompt. QuickBooks will then remove the credit memo and make the necessary adjustments to the associated invoice, restoring the original balance.
With the credit memo successfully deleted, you have completed the process of unapplying the credit memo in QuickBooks. However, before concluding, it’s important to confirm the deletion and ensure that the changes have been accurately reflected.
Step 7: Confirm Deletion
After choosing the “Delete Credit Memo” option in QuickBooks, the final step in unapplying a credit memo is to confirm the deletion. QuickBooks will present you with a confirmation prompt to ensure that you want to proceed with deleting the credit memo.
Take a moment to carefully review the details provided in the confirmation prompt. Double-check that you have selected the correct credit memo for deletion. It’s crucial to verify that you are deleting the intended credit memo, as this action cannot be reversed.
Once you have confirmed that the credit memo selected for deletion is accurate, click on the confirmation button provided in the prompt. QuickBooks will then permanently delete the credit memo from the system.
Upon successful deletion, QuickBooks will adjust the associated invoice to remove the applied credit. The original balance will be restored, and the unapplied credit memo will no longer be listed in the customer’s transaction history.
It’s important to note that deleting a credit memo will not impact the customer’s balance. If there are any outstanding payments or invoices, those will remain unaffected by the deletion of the credit memo.
After confirming the deletion and ensuring the removal of the credit memo, take a moment to review the customer’s transaction history and verify that the changes have been accurately reflected.
With the credit memo successfully unapplied and deleted, you have completed the process in QuickBooks. It is always good practice to make a backup of your data regularly and consult with a qualified accountant or bookkeeper for any specific accounting concerns.
Congratulations! You have now learned how to unapply a credit memo in QuickBooks.
Conclusion
Unapplying a credit memo in QuickBooks is a straightforward process that allows you to reverse the application of a previously issued credit. Whether you need to correct an error, adjust a customer’s account, or handle a refund, QuickBooks provides the necessary tools to manage credit memos efficiently.
In this comprehensive guide, we have walked you through the step-by-step process of unapplying a credit memo in QuickBooks. From opening the software to accessing the Customer Center, locating the credit memo, selecting it, and choosing the “Delete Credit Memo” option, we have covered each essential step in detail.
It’s crucial to exercise caution when unapplying credit memos and make sure that you are deleting the correct transaction. Always double-check the details and consult with qualified professionals if needed to avoid any financial discrepancies.
Remember, unapplying a credit memo in QuickBooks will restore the original balance of the associated invoice but will not impact the customer’s overall balance or any outstanding payments or invoices.
By following this guide, you can confidently navigate QuickBooks and efficiently manage credit memos, maintaining accurate financial records for your business.
We hope this article has provided you with the knowledge and guidance to effectively unapply credit memos in QuickBooks. If you have any further questions or need additional support, don’t hesitate to refer to QuickBooks’ official documentation or reach out to their customer support team.
Thank you for reading, and best of luck in your accounting endeavors!
What's Hot
Latest Articles
Related Post
By: • Finance

By: • Finance
By: • Finance
By: • Finance

By: • Finance
By: • Finance
By: • Finance

By: • Finance
By: • Finance


By: • Finance

By: • Finance

By: • Finance
