Home>Finance>How To Submit Credit Inquiry Request On Confirmations.Com
Finance
How To Submit Credit Inquiry Request On Confirmations.Com
Published: March 5, 2024
Learn how to submit a credit inquiry request on Confirmations.com for your finance needs. Streamline the process and get quick results.
(Many of the links in this article redirect to a specific reviewed product. Your purchase of these products through affiliate links helps to generate commission for LiveWell, at no extra cost. Learn more)
Table of Contents
Introduction
Are you looking to submit a credit inquiry request on Confirmations.com but unsure of the process? You've come to the right place! In this guide, we'll walk you through the step-by-step process of submitting a credit inquiry request on Confirmations.com, a leading platform for financial professionals to exchange electronic confirmations.
Whether you're a financial institution, a credit manager, or a lending professional, the ability to submit credit inquiry requests efficiently is crucial in today's fast-paced financial landscape. By leveraging Confirmations.com, you can streamline the credit inquiry process, saving time and ensuring accuracy.
In the following sections, we'll delve into the specifics of creating an account on Confirmations.com, accessing the credit inquiry request form, filling out the necessary details, and submitting your request. Additionally, we'll cover how to check the status of your credit inquiry request, providing you with a comprehensive understanding of the entire process.
By the end of this guide, you'll be equipped with the knowledge and confidence to navigate the credit inquiry request submission process on Confirmations.com seamlessly. So, let's dive in and explore the essential steps to successfully submit a credit inquiry request on this platform.
Creating an Account on Confirmations.com
Before submitting a credit inquiry request on Confirmations.com, you’ll need to create an account on the platform. The process is designed to be straightforward, allowing you to set up your account efficiently.
To get started, visit the Confirmations.com website and look for the option to create a new account. You’ll typically find a prominent “Sign Up” or “Create Account” button on the homepage. Click on this button to initiate the account creation process.
Upon clicking the “Sign Up” button, you’ll be prompted to provide essential details such as your name, email address, and a secure password. It’s crucial to ensure that the password you choose is strong and unique to protect your account from unauthorized access.
After entering your personal information, you may need to verify your email address by clicking on a confirmation link sent to the email you provided. This step is essential for account security and helps Confirmations.com maintain the integrity of its user base.
Once your email address is verified, you can proceed to complete your account setup by providing any additional required information, such as your organization’s details and your role within the organization. This information helps Confirmations.com tailor the platform’s features to your specific needs, ensuring a personalized user experience.
After successfully creating your account, you’ll have access to the full suite of features offered by Confirmations.com, including the ability to submit credit inquiry requests seamlessly. With your account in place, you’re now ready to move on to the next step: accessing the credit inquiry request form.
Accessing the Credit Inquiry Request Form
Once your account is set up on Confirmations.com, accessing the credit inquiry request form is a straightforward process. The platform is designed to provide users with intuitive navigation, ensuring that you can easily locate the required form to initiate the credit inquiry process.
To access the credit inquiry request form, log in to your Confirmations.com account using your credentials. Upon logging in, you’ll typically land on your account dashboard, which serves as the central hub for accessing various features and tools offered by the platform.
Within your account dashboard, look for a section or menu specifically related to credit inquiries or requests. This section may be labeled as “Submit Credit Inquiry” or something similar, depending on the platform’s interface and layout.
Once you’ve located the section for credit inquiries, you should find a prominently displayed option to “Create New Inquiry” or “Submit New Request.” Click on this option to access the credit inquiry request form.
If the platform offers a search functionality, you can also use it to directly look for the credit inquiry request form. Simply enter relevant keywords such as “credit inquiry” or “request form” in the search bar to quickly locate the required form.
Upon accessing the credit inquiry request form, take a moment to familiarize yourself with the fields and information required to complete the form accurately. This preparation will streamline the process of filling out the form, ensuring that you provide all necessary details for a comprehensive credit inquiry request.
With the credit inquiry request form now within reach, you’re ready to proceed to the next step: filling out the form with the required information. This pivotal stage sets the groundwork for initiating the credit inquiry process effectively.
Filling Out the Credit Inquiry Request Form
As you access the credit inquiry request form on Confirmations.com, you’ll encounter fields and sections that require specific information to facilitate the credit inquiry process. It’s essential to approach this step meticulously, ensuring that you provide accurate and comprehensive details to support your request effectively.
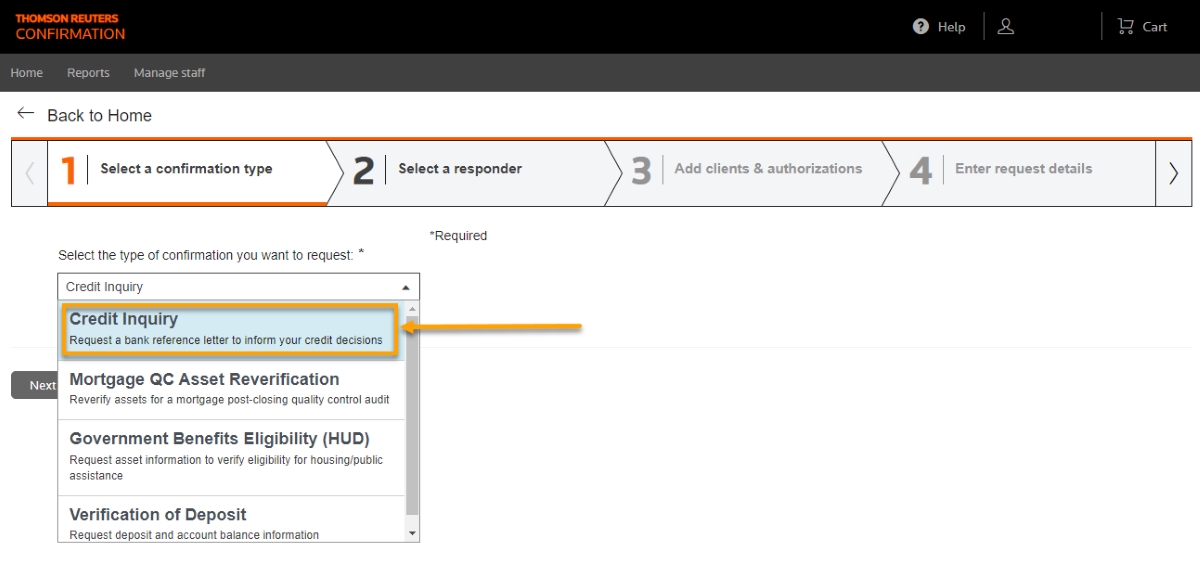
The credit inquiry request form typically comprises various fields that capture essential information about the subject of the inquiry, the requesting party, and other pertinent details. Some of the key fields you can expect to encounter include:
- Subject’s Information: This section may require details such as the subject’s name, contact information, and any unique identifiers associated with the credit inquiry.
- Requesting Party’s Information: You’ll need to provide your organization’s details, your role or title, and your contact information to establish the requesting party’s identity.
- Reason for Credit Inquiry: This field allows you to elucidate the specific purpose or rationale behind the credit inquiry, providing context for the requested information.
- Additional Comments or Attachments: Depending on the platform’s features, you may have the option to include supplementary comments or relevant attachments to support your credit inquiry request.
When filling out the form, it’s crucial to double-check the accuracy of the information provided. Ensure that the subject’s details are entered correctly, the requesting party’s information is up to date, and any additional comments or attachments are included where necessary. This attention to detail enhances the quality and effectiveness of your credit inquiry request.
Moreover, if there are specific guidelines or best practices outlined by Confirmations.com for completing the credit inquiry request form, be sure to adhere to these recommendations. Following platform-specific guidelines can help expedite the processing of your request and minimize the likelihood of any discrepancies or delays.
Once you’ve meticulously filled out the credit inquiry request form and reviewed the information for accuracy, you’re ready to proceed to the final step: submitting the credit inquiry request. This pivotal action sets the process in motion, initiating the review and verification of your request by the relevant parties.
Submitting the Credit Inquiry Request
After meticulously filling out the credit inquiry request form on Confirmations.com, the next crucial step is to submit the request efficiently. The submission process is designed to be seamless, allowing you to initiate the review and processing of your credit inquiry with ease.
Upon completing the credit inquiry request form, carefully review all the information you’ve provided to ensure its accuracy and completeness. This step is vital in guaranteeing that the submitted request contains all the necessary details to facilitate a comprehensive credit inquiry.
Once you’ve confirmed the accuracy of the information, look for a prominently displayed “Submit” or “Send” button at the bottom of the credit inquiry request form. Click on this button to initiate the submission process. Some platforms may also offer a final review stage before submission, allowing you to verify the details one last time.
Upon clicking “Submit,” the platform will typically prompt you with a confirmation message, acknowledging the successful submission of your credit inquiry request. This confirmation serves as a reassurance that your request has been received and will undergo processing by the relevant entities.
It’s important to note that after submitting the credit inquiry request, the platform may provide you with a unique reference number or confirmation identifier for tracking purposes. This reference number can be valuable for monitoring the status of your request and communicating with the platform’s support team, if necessary.
With the credit inquiry request successfully submitted, you’ve taken a significant step towards initiating the review and verification of the requested information. The platform will now proceed with processing your request, leveraging its resources to facilitate a seamless credit inquiry process.
As your credit inquiry request progresses through the platform’s workflows, you may find it beneficial to periodically check the status of your request. This proactive approach allows you to stay informed about the progress and any updates related to your credit inquiry, ensuring transparency and clarity throughout the process.
With the credit inquiry request now submitted, you’re well-positioned to monitor its status and await the outcome, confident in the knowledge that you’ve navigated the submission process effectively on Confirmations.com.
Checking the Status of Your Credit Inquiry Request
Once you’ve submitted your credit inquiry request on Confirmations.com, it’s essential to stay informed about its progress by regularly checking the status. Keeping track of your request allows you to stay updated on any developments and ensures that you can take appropriate actions based on the status updates provided by the platform.
To check the status of your credit inquiry request, log in to your Confirmations.com account using your credentials. Upon accessing your account dashboard, look for a dedicated section or menu option related to “Inquiry Status” or “Request Tracking.” This section is specifically designed to provide users with insights into the progress of their submitted inquiries.
Within the “Inquiry Status” section, you can typically find a list of your submitted credit inquiry requests, along with pertinent details such as the submission date, current status, and any relevant notes or updates provided by the platform. This comprehensive view enables you to track the lifecycle of each request efficiently.
When reviewing the status of your credit inquiry request, pay close attention to any updates or notifications provided by Confirmations.com. These updates may include information about the request’s review stage, verification processes, and the anticipated timeline for the completion of the credit inquiry.
If the platform offers status-specific labels or indicators, such as “Under Review,” “Processing,” or “Completed,” these labels can offer valuable insights into the current stage of your credit inquiry request. Understanding the status labels empowers you to gauge the progress and anticipate the next steps in the credit inquiry process.
In some cases, the platform may provide the option to receive email notifications or alerts regarding status changes for your credit inquiry requests. Enabling these notifications can ensure that you receive timely updates, allowing you to stay informed without the need for manual checks within the platform.
Should you encounter any uncertainties or require further clarification about the status of your credit inquiry request, don’t hesitate to reach out to the platform’s support team for assistance. Utilizing the platform’s support resources can provide you with additional insights and address any queries related to your submitted inquiries.
By actively monitoring the status of your credit inquiry request, you demonstrate a proactive approach to managing the credit inquiry process. This vigilance allows you to stay informed, anticipate outcomes, and engage with the platform effectively to facilitate a successful credit inquiry experience on Confirmations.com.
What's Hot
Latest Articles
Related Post

By: • Finance

By: • Finance

By: • Finance


By: • Finance

By: • Finance


By: • Finance

By: • Finance


By: • Finance

By: • Finance

By: • Finance

By: • Finance

By: • Finance