Home>Finance>How To Add A Late Fee To An Invoice In QuickBooks
Finance
How To Add A Late Fee To An Invoice In QuickBooks
Published: February 22, 2024
Learn how to easily add a late fee to your QuickBooks invoice and manage your finance efficiently. Streamline your invoicing process with this step-by-step guide.
(Many of the links in this article redirect to a specific reviewed product. Your purchase of these products through affiliate links helps to generate commission for LiveWell, at no extra cost. Learn more)
Table of Contents
Introduction
Late payments can be a common challenge for businesses, leading to disruptions in cash flow and potential strain on financial resources. To encourage timely payments and account for the inconvenience caused by late remittances, adding a late fee to an invoice can be an effective strategy. QuickBooks, a popular accounting software, offers a straightforward process for incorporating late fees into invoices, helping businesses streamline their financial management.
In this comprehensive guide, we will walk through the step-by-step process of adding a late fee to an invoice in QuickBooks. By following these instructions, you can implement a systematic approach to managing late payments and ensure that your invoicing process remains efficient and transparent. Whether you are a seasoned QuickBooks user or just getting started with the platform, this tutorial will equip you with the knowledge and skills to navigate the process with ease.
Let's delve into the details of how to seamlessly integrate late fees into your QuickBooks invoices, empowering you to maintain a healthy cash flow and cultivate strong financial practices within your business.
Step 1: Open QuickBooks
The first step in adding a late fee to an invoice in QuickBooks is to open the QuickBooks application on your computer. If you haven’t already installed QuickBooks, you can download it from the official Intuit website and follow the installation instructions to set it up on your system. Once the software is installed, launch the QuickBooks application by double-clicking on the desktop icon or accessing it from your programs list.
Upon opening QuickBooks, you will be prompted to log in to your account. Enter your credentials to access the QuickBooks dashboard. If you are using QuickBooks Online, simply navigate to the QuickBooks website and log in using your account details to gain access to the platform.
Once logged in, you will be greeted by the QuickBooks dashboard, which serves as the central hub for managing your financial data, including invoicing, expenses, and reporting. Familiarize yourself with the layout of the dashboard to ensure you can efficiently navigate to the invoicing section, where you will proceed to add a late fee to an existing invoice.
Now that you have successfully opened QuickBooks and accessed the dashboard, you are ready to move on to the next step of adding a late fee to your invoice. This sets the stage for seamlessly integrating late fees into your invoicing process, promoting financial stability and reinforcing timely payment practices within your business.
Step 2: Open the Invoice
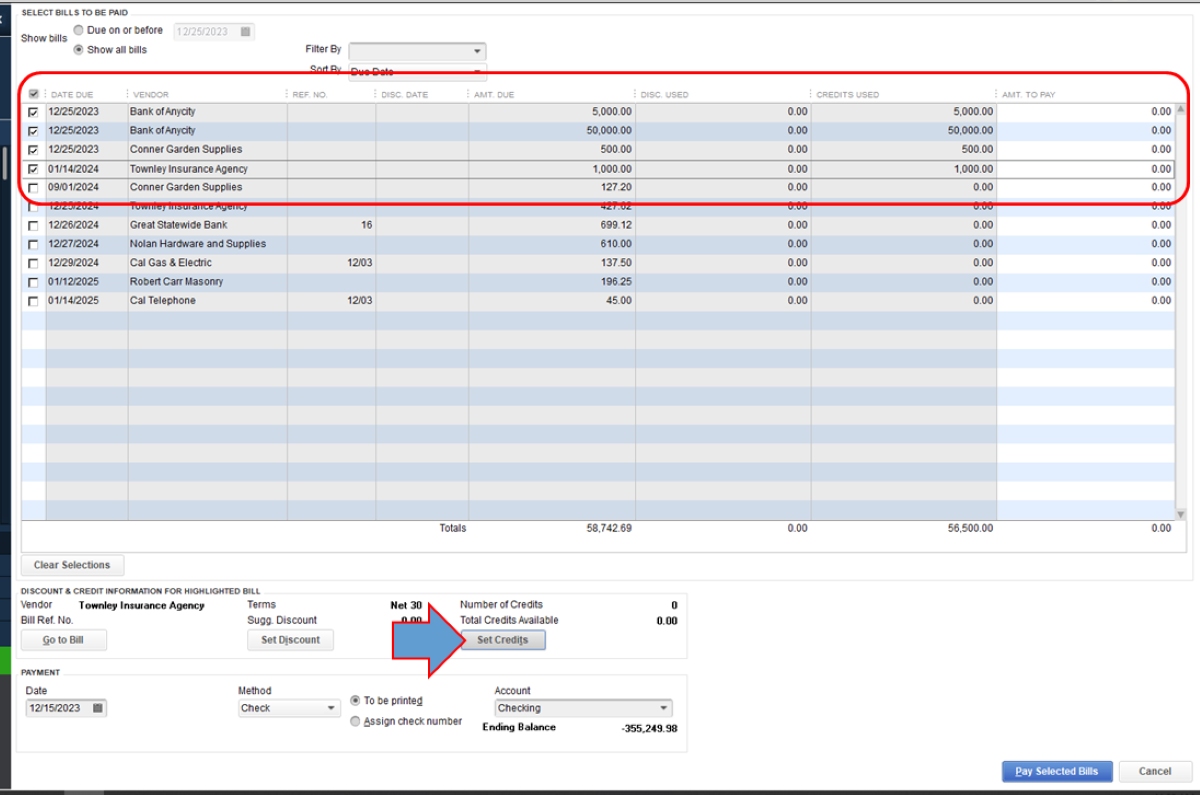
After logging in to QuickBooks and accessing the dashboard, the next step is to locate and open the invoice to which you want to add a late fee. In the dashboard, navigate to the “Invoicing” or “Sales” tab, depending on the version of QuickBooks you are using. Once there, you will be able to view a list of your existing invoices.
Scan through the list or use the search function to locate the specific invoice for which you want to apply the late fee. Click on the invoice to open it and proceed to the next step of incorporating the late fee into the billing details. If the invoice is not yet created, you can generate a new one by selecting the “Create Invoice” option and filling in the relevant details, such as the customer’s name, products or services provided, and the invoiced amount.
Upon opening the invoice, carefully review the billing information to ensure accuracy and completeness. Verify that all relevant details, including the customer’s information, invoice date, and billed items, are correctly documented. This step is crucial in guaranteeing that the late fee is accurately added to the invoice and that the overall billing reflects the agreed-upon terms between you and your customer.
By opening the invoice within the QuickBooks interface, you are poised to seamlessly proceed with the process of incorporating a late fee, reinforcing your financial policies and promoting accountability in the invoicing cycle. This prepares the groundwork for the subsequent steps, where you will effectively apply the late fee and finalize the invoicing process.
Step 3: Add Late Fee
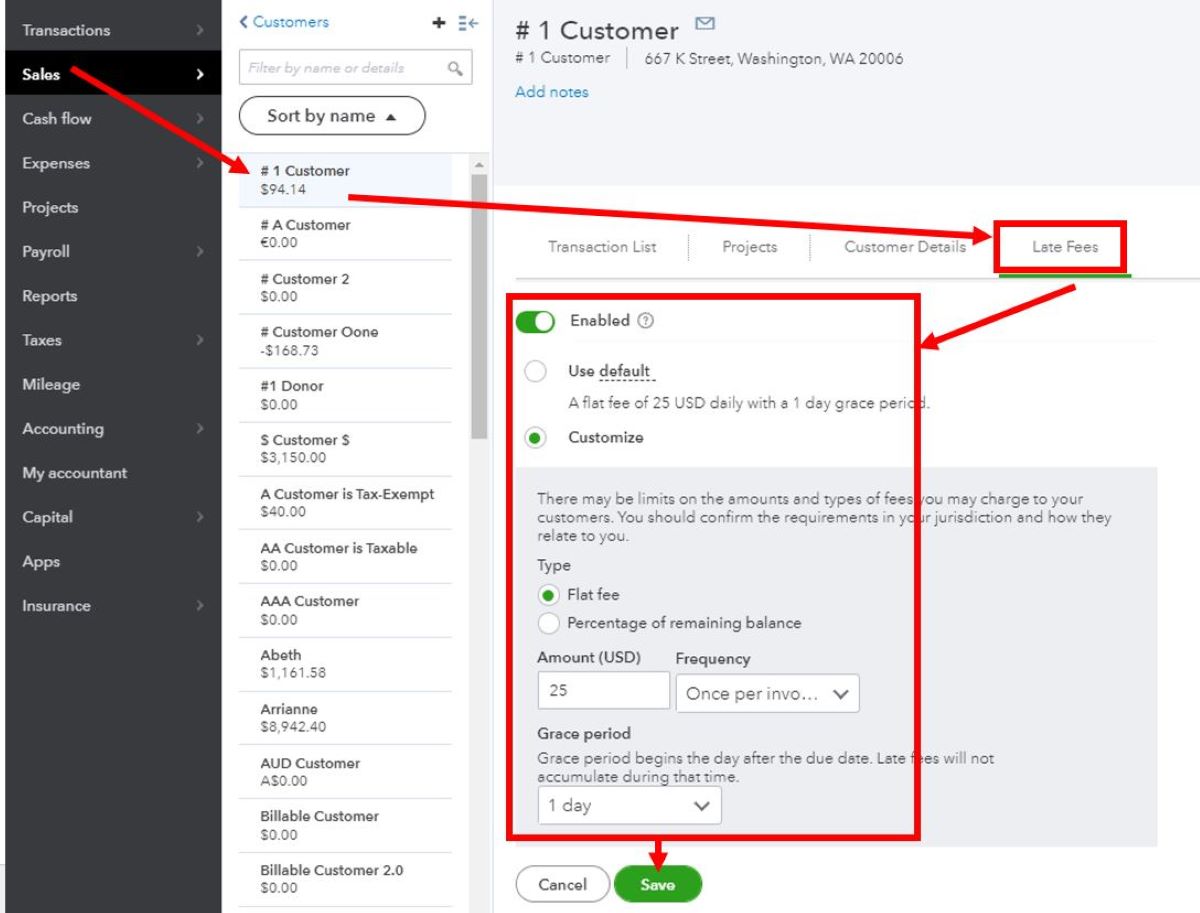
With the invoice open in QuickBooks, you are now ready to add a late fee to the billing details. QuickBooks provides a user-friendly interface for incorporating late fees, allowing you to seamlessly enforce your payment terms and encourage timely settlements. To add a late fee, locate the appropriate section within the invoice where additional charges can be included. This may vary based on the specific template or customization of your invoice, but it is typically labeled as “Add Late Fee” or “Additional Charges.”
Click on the designated section to input the late fee amount. QuickBooks enables you to specify the late fee as either a flat amount or a percentage of the total invoice value, providing flexibility to align with your business’s late payment policies. Enter the late fee amount in the respective field and ensure that it is clearly labeled as a late fee to avoid any confusion for your customer.
Furthermore, you can define the conditions for the application of the late fee, such as the number of days past the due date before the fee is incurred. QuickBooks allows you to customize these parameters, empowering you to tailor the late fee calculation to align with your specific payment terms and policies.
After inputting the late fee details, review the entire invoice to confirm that the late fee has been accurately included and that the total amount reflects the addition of the late fee. This step is crucial in ensuring transparency and clarity in your invoicing process, promoting trust and accountability in your financial transactions.
By incorporating the late fee into the invoice using QuickBooks’ intuitive features, you are reinforcing the importance of timely payments and establishing clear expectations for your customers. This proactive approach to managing late payments can contribute to a more robust cash flow and foster positive financial practices within your business.
Step 4: Save and Send the Invoice
Once you have added the late fee to the invoice in QuickBooks, it is essential to save the updated billing details to ensure that the late fee is accurately recorded and reflected in your financial records. To save the invoice, locate the “Save” or “Save and Close” button within the invoice interface. Click on this option to preserve the changes and update the invoice with the newly added late fee.
After saving the invoice, take a moment to review the entire document to verify that the late fee is correctly incorporated and that the total amount reflects the addition of the late fee. This meticulous review process helps maintain accuracy and professionalism in your invoicing practices, reducing the likelihood of discrepancies or misunderstandings with your customers.
Once you have confirmed the accuracy of the invoice, proceed to send it to your customer. In QuickBooks, you can easily send the invoice via email directly from the platform. Locate the “Send” or “Email” option within the invoice interface and click on it to initiate the email delivery process. Ensure that the recipient’s email address is entered correctly to guarantee the prompt delivery of the invoice.
When sending the invoice, consider including a brief, polite message reminding your customer about the late fee and emphasizing the importance of timely payment. This proactive communication can serve as a gentle nudge to encourage adherence to the payment terms and promote a respectful, professional relationship with your customers.
By saving and sending the invoice with the added late fee, you are effectively communicating your financial policies and expectations to your customers. This proactive approach can contribute to improved cash flow management and foster a culture of accountability and mutual respect in your business relationships.
Conclusion
Integrating late fees into your invoicing process is a strategic approach to managing late payments and promoting responsible financial behavior within your business relationships. QuickBooks simplifies the task of adding late fees to invoices, empowering you to enforce your payment terms with clarity and efficiency.
By following the step-by-step guide outlined in this tutorial, you have gained valuable insights into the seamless process of incorporating late fees into your QuickBooks invoices. From opening QuickBooks and accessing the invoice to adding the late fee and sending the updated billing details, each step plays a pivotal role in fostering transparent and professional financial practices within your business.
Effectively communicating your late payment policies and expectations through the inclusion of late fees can encourage timely settlements and reinforce the value of prompt remittances. This proactive approach not only contributes to a healthier cash flow but also cultivates a culture of mutual respect and accountability in your business transactions.
As you navigate the invoicing process in QuickBooks, remember that the incorporation of late fees serves as a mechanism to uphold your financial policies while maintaining open and respectful communication with your customers. By leveraging the capabilities of QuickBooks to seamlessly integrate late fees, you are poised to enhance your financial management practices and promote sustainable business growth.
Embrace the opportunity to leverage QuickBooks’ intuitive features to reinforce your financial policies and encourage responsible payment behaviors, ultimately contributing to the long-term success and stability of your business.
What's Hot
Latest Articles
Related Post

By: • Finance
By: • Finance

By: • Finance

By: • Finance
By: • Finance
By: • Finance


By: • Finance

By: • Finance


By: • Finance

By: • Finance

By: • Finance