
Finance
How To Set Up A Late Fee In QuickBooks
Published: February 23, 2024
Learn how to set up a late fee in QuickBooks to streamline your finance process and ensure timely payments. Take control of your finances with this simple guide.
(Many of the links in this article redirect to a specific reviewed product. Your purchase of these products through affiliate links helps to generate commission for LiveWell, at no extra cost. Learn more)
Table of Contents
Introduction
Late fees are an essential aspect of managing finances for any business. They serve as a crucial tool for encouraging clients to pay their invoices on time, thereby ensuring a healthy cash flow. In QuickBooks, the accounting software developed by Intuit, setting up late fees is a straightforward process that can help streamline your financial operations.
In this comprehensive guide, we will walk you through the process of setting up a late fee in QuickBooks, from accessing the late fee feature to applying and adjusting late fees on invoices. By following these steps, you can effectively implement late fees, thereby incentivizing timely payments from your clients and maintaining a robust financial system for your business.
Late fees not only serve as a means of encouraging prompt payments but also help compensate for the additional costs incurred due to delayed payments. By incorporating late fees into your financial policies, you can establish clear expectations for your clients regarding payment timelines, ultimately fostering better financial discipline and accountability.
Understanding the nuances of setting up late fees in QuickBooks can significantly streamline your financial processes, allowing you to automate late fee calculations and application. This, in turn, can save you valuable time and effort while ensuring that your financial records are accurate and up to date.
Now, let's delve into the step-by-step process of setting up late fees in QuickBooks, empowering you to take control of your financial management and optimize your invoicing procedures.
Step 1: Accessing the Late Fee Feature
Before you can begin setting up late fees in QuickBooks, it’s essential to ensure that the late fee feature is enabled within the software. To access this feature, start by logging into your QuickBooks account and navigating to the “Settings” or “Gear” icon, typically located in the top right corner of the screen. From the dropdown menu, select “Account and Settings” to proceed to the account settings page.
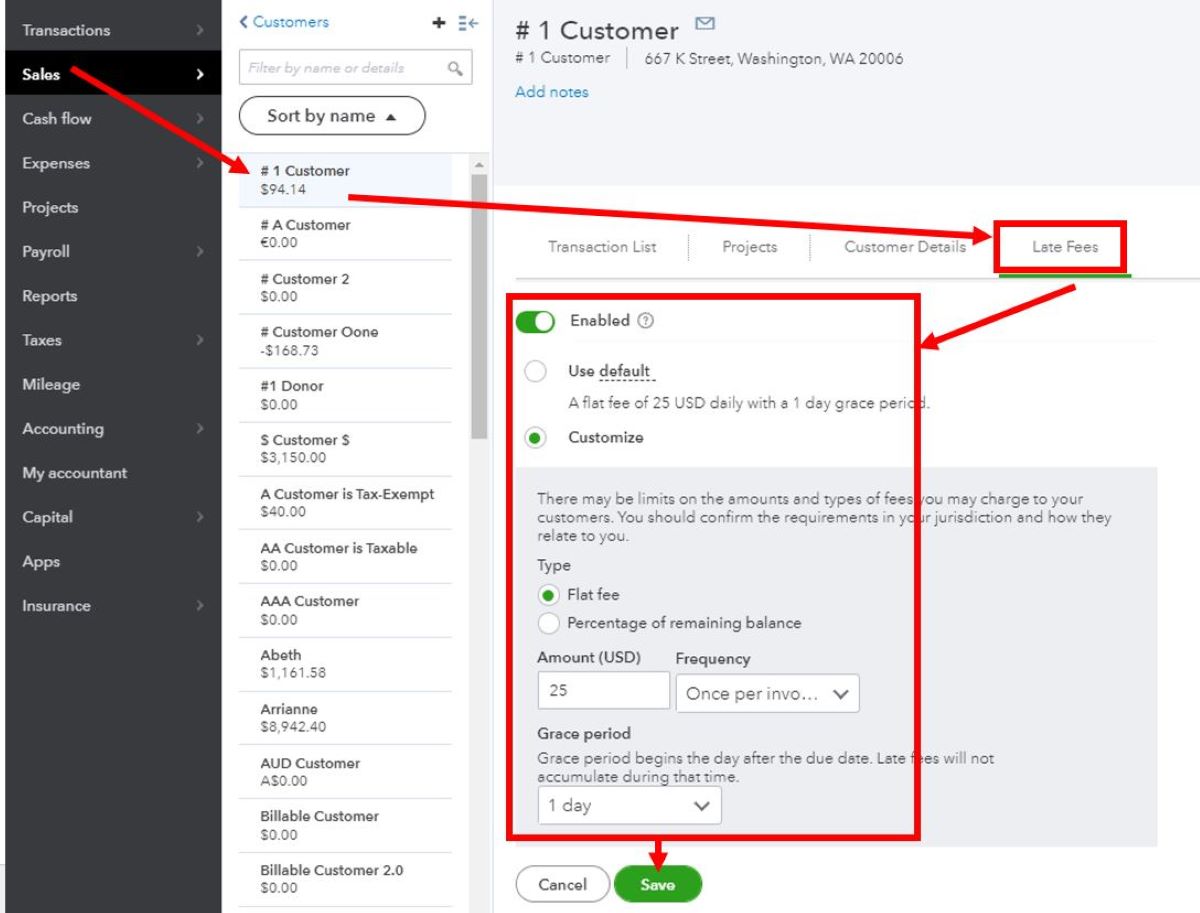
Within the account settings, locate and click on the “Sales” tab, which will direct you to the sales settings section. Here, you will find the “Late fees” option, which needs to be activated to enable the late fee feature in QuickBooks. Click on “Late fees” to access the settings related to late fee implementation and management.
Upon accessing the late fee settings, you will have the opportunity to customize various aspects of your late fee policy, including the grace period for late payments, the type of late fee calculation method, and the maximum amount of late fees that can be applied. These settings allow you to tailor the late fee policy to align with your business requirements and invoicing practices, ensuring that late fees are applied fairly and consistently.
By accessing the late fee feature in QuickBooks, you are taking the first crucial step towards implementing an effective late fee policy that can help optimize your accounts receivable process. Enabling this feature empowers you to streamline the application of late fees, automate calculations, and maintain clear and transparent late fee policies for your clients.
With the late fee feature accessed and activated, you are now ready to proceed to the next step of setting up your late fee policy in QuickBooks, laying the groundwork for efficient late fee management within your financial operations.
Step 2: Setting the Late Fee Policy
Once you have accessed the late fee feature in QuickBooks, the next step involves configuring the specific parameters of your late fee policy to align with your business requirements. Within the late fee settings, you will find options to define the grace period for late payments, select the calculation method for late fees, and establish the maximum amount of late fees that can be applied.
Firstly, you will have the opportunity to set a grace period, which represents the additional time given to clients for making payments beyond the due date without incurring late fees. This grace period can be customized to reflect the payment terms and expectations specific to your business, providing a reasonable buffer before late fees come into effect.
Next, you will need to determine the calculation method for late fees. QuickBooks offers the flexibility to choose between a percentage-based late fee or a flat fee, allowing you to select the most suitable approach for your business. The percentage-based method calculates late fees as a percentage of the outstanding invoice amount, while the flat fee method applies a fixed amount as the late fee, irrespective of the invoice total.
Furthermore, it is important to establish the maximum late fee amount that can be applied to an invoice. By defining this limit, you can ensure that late fees remain reasonable and proportionate, preventing excessively high late fee charges that could strain client relationships.
Configuring these parameters effectively sets the foundation for your late fee policy, providing clarity and consistency in the application of late fees. By customizing these settings to suit your business needs, you can establish a fair and transparent late fee policy that encourages timely payments while maintaining positive client relationships.
With the late fee policy configured to your specifications, you are now equipped to seamlessly apply late fees to invoices in QuickBooks, promoting financial discipline and efficiency within your accounts receivable processes.
Step 3: Applying Late Fees to Invoices
Once you have set up the late fee feature and configured your late fee policy in QuickBooks, the next step involves applying late fees to invoices as and when they become overdue. When an invoice surpasses the specified grace period without payment, QuickBooks automatically applies the late fee according to the parameters defined in your late fee policy.
As part of the invoicing process, QuickBooks monitors the due dates of invoices and identifies those that have exceeded the grace period, triggering the application of late fees. This automation streamlines the late fee application, eliminating the need for manual calculations and interventions, and ensuring consistent enforcement of your late fee policy across all invoices.
When a late fee is applied to an invoice, QuickBooks accurately calculates the late fee amount based on the configured method, whether percentage-based or flat fee, and adds it to the total amount due. This transparent and automated process provides clarity to your clients regarding the consequences of late payments, reinforcing the importance of adhering to the agreed-upon payment terms.
Furthermore, QuickBooks generates detailed records of late fee applications, allowing you to track and review the late fees imposed on specific invoices. This visibility enables you to maintain accurate financial records and facilitates communication with clients regarding any late fees incurred, promoting transparency and accountability in your financial dealings.
By seamlessly applying late fees to overdue invoices, QuickBooks empowers you to uphold your late fee policy consistently and efficiently, encouraging timely payments from your clients while minimizing the administrative burden associated with late fee management.
With late fees being automatically applied to overdue invoices, you can maintain a proactive approach to managing accounts receivable, fostering financial discipline, and optimizing your cash flow management within QuickBooks.
Step 4: Reviewing and Adjusting Late Fees
After the automated application of late fees to invoices in QuickBooks, it is essential to periodically review and, if necessary, adjust the late fees to ensure that they align with your business objectives and client relationships. QuickBooks provides the tools to facilitate this review process, enabling you to monitor and modify late fees as needed.
Within QuickBooks, you can generate reports that specifically detail the late fees applied to invoices over a defined period. These reports offer valuable insights into the overall impact of late fees on your accounts receivable, allowing you to assess the effectiveness of your late fee policy and identify any trends or patterns related to late payments.
By reviewing these reports, you can gain a comprehensive understanding of the frequency and magnitude of late fees, enabling you to evaluate their impact on your business’s financial health. This analysis can inform strategic decisions regarding late fee adjustments, such as revising the grace period, modifying the late fee calculation method, or updating the maximum late fee amount to better align with your business needs.
QuickBooks also empowers you to make targeted adjustments to late fees on individual invoices, providing the flexibility to accommodate specific client situations. In cases where client relationships or extenuating circumstances warrant a review of late fees, QuickBooks allows you to make tailored adjustments, ensuring fairness and responsiveness in late fee management.
Furthermore, effective communication with clients regarding late fees is crucial for maintaining positive relationships. QuickBooks facilitates this by enabling you to generate clear and detailed statements that include late fee information, allowing you to transparently communicate the impact of late payments to your clients and address any inquiries or concerns they may have.
By regularly reviewing and, if necessary, adjusting late fees in QuickBooks, you can refine your late fee policy to better align with your business goals, enhance client satisfaction, and optimize your accounts receivable processes, ultimately contributing to a healthier financial ecosystem for your business.
Conclusion
Setting up late fees in QuickBooks is a pivotal step in optimizing your accounts receivable processes and fostering financial discipline within your business. By following the comprehensive steps outlined in this guide, you can effectively implement and manage late fees, encouraging timely payments from your clients while maintaining transparency and fairness in your financial dealings.
Accessing the late fee feature in QuickBooks serves as the initial gateway to incorporating late fees into your invoicing practices, enabling you to streamline the application and management of late fees within the software. Once the late fee feature is activated, configuring the specific parameters of your late fee policy, such as the grace period, calculation method, and maximum late fee amount, empowers you to tailor the late fee policy to suit your business requirements.
With the late fee policy in place, QuickBooks automates the application of late fees to overdue invoices, simplifying the enforcement of your late fee policy and promoting accountability among your clients. This automation not only reduces administrative burdens but also ensures consistency and accuracy in late fee calculations, contributing to a more efficient accounts receivable process.
Furthermore, the ability to review and adjust late fees within QuickBooks provides you with the flexibility to refine your late fee policy over time, aligning it with your evolving business needs and client relationships. By leveraging the reporting capabilities and adjustment tools offered by QuickBooks, you can make informed decisions regarding late fee management, ultimately optimizing your financial operations.
In conclusion, the implementation of late fees in QuickBooks empowers you to uphold payment timelines, enhance cash flow management, and nurture positive client relationships through transparent and fair late fee practices. By integrating late fees into your financial policies and leveraging the capabilities of QuickBooks, you can establish a robust framework for managing late payments and promoting financial stability within your business.
Embracing the strategic utilization of late fees in QuickBooks not only contributes to improved financial health but also reinforces the professionalism and efficiency of your business operations, positioning you for sustained success in a dynamic and competitive business landscape.
What's Hot
Latest Articles
Related Post

By: • Finance


By: • Finance
By: • Finance
By: • Finance
By: • Finance

By: • Finance
By: • Finance
By: • Finance

By: • Finance


By: • Finance

By: • Finance

By: • Finance

By: • Finance