Home>Finance>How To Add Merchant Fee Account In QuickBooks Desktop
Finance
How To Add Merchant Fee Account In QuickBooks Desktop
Published: February 23, 2024
Learn how to efficiently add a merchant fee account in QuickBooks Desktop to track and manage your finance expenses. Simplify your financial management today!
(Many of the links in this article redirect to a specific reviewed product. Your purchase of these products through affiliate links helps to generate commission for LiveWell, at no extra cost. Learn more)
Table of Contents
Introduction
Understanding the Importance of Merchant Fee Accounts in QuickBooks Desktop
QuickBooks Desktop is a powerful tool for managing finances, and for businesses that accept credit card payments, understanding and properly accounting for merchant fees is essential. Merchant fees, also known as credit card processing fees, are charges incurred when a business accepts credit or debit card payments. These fees typically include a percentage of the transaction amount along with a flat fee per transaction.
Properly accounting for merchant fees is crucial for maintaining accurate financial records and understanding the true cost of accepting card payments. By setting up a merchant fee account in QuickBooks Desktop and linking it to the associated bank account, businesses can ensure that these fees are accurately recorded and reflected in their financial reports.
This article will guide you through the process of adding a merchant fee account in QuickBooks Desktop, linking it to the bank account, and recording merchant fees to maintain precise financial records.
Understanding and effectively managing merchant fees in QuickBooks Desktop is essential for businesses to gain a comprehensive view of their financial transactions and make informed decisions to optimize their operations and profitability.
Understanding Merchant Fees
Merchant fees, also referred to as credit card processing fees, are charges incurred by businesses when they accept credit or debit card payments. These fees are typically composed of a percentage of the transaction amount, in addition to a flat fee per transaction. The percentage fee can range from 1.5% to 3.5%, while the flat fee is usually around $0.15 to $0.30 per transaction. It’s important for businesses to comprehend these fees, as they directly impact the overall cost of processing card payments and can significantly affect the bottom line.
Merchant fees are imposed by payment processors or merchant service providers, who facilitate the electronic transfer of funds between the customer’s card issuer and the business’s bank account. These fees cover the expenses associated with processing the transactions, including network fees, interchange fees, and the service provided by the payment processor.
Understanding the breakdown of merchant fees is crucial for businesses to accurately assess the cost of accepting card payments and incorporate these expenses into their pricing and financial projections. By comprehending the components of these fees, businesses can make informed decisions regarding their payment processing methods and optimize their profitability.
Moreover, by properly accounting for merchant fees in financial records, businesses can gain a clear understanding of their true revenue and expenses, enabling them to make strategic financial decisions and accurately assess their financial performance.
Setting Up Merchant Fee Account in QuickBooks Desktop
Setting up a merchant fee account in QuickBooks Desktop is essential for accurately tracking and managing the fees incurred from credit card transactions. To create a merchant fee account, follow these steps:
- Accessing the Chart of Accounts: Open QuickBooks Desktop and navigate to the “Lists” menu. Select “Chart of Accounts” to view the existing accounts.
- Adding a New Account: Click on the “Account” button at the bottom of the Chart of Accounts window and choose “New” to create a new account.
- Selecting Account Type: Choose “Expense” as the account type, as merchant fees are considered an expense to the business.
- Entering Account Details: Provide a name for the account, such as “Merchant Fees,” and input a description if necessary. Assign an appropriate account number and select the option to track the account in the company’s financial reports.
- Completing the Setup: Once the details are entered, click “Save and Close” to finalize the creation of the merchant fee account.
After setting up the merchant fee account, it will be readily available for recording the fees incurred from credit card transactions. This dedicated account ensures that merchant fees are accurately captured and reflected in the company’s financial records, allowing for precise financial reporting and analysis.
By establishing a specific account for merchant fees, businesses can effectively monitor these expenses and gain insights into the true cost of processing card payments. This visibility enables informed decision-making and strategic planning to optimize the overall financial performance of the business.
Linking Merchant Fee Account to Bank Account
Linking the merchant fee account to the associated bank account in QuickBooks Desktop is a crucial step in accurately reflecting the impact of credit card transactions on the company’s finances. By establishing this connection, businesses can ensure that the merchant fees deducted from the bank deposits are accurately recorded. Here’s how to link the merchant fee account to the bank account:
- Accessing the Chart of Accounts: Open QuickBooks Desktop and navigate to the “Lists” menu. Select “Chart of Accounts” to view the accounts.
- Locating the Bank Account: Identify the bank account to which the merchant fees are debited and note the account name and number.
- Editing the Bank Account: Right-click on the bank account from the Chart of Accounts and choose “Edit Account.”
- Mapping the Merchant Fee Account: In the “Edit Account” window, select the “Expenses” tab and choose the merchant fee account created earlier from the drop-down menu under “Account.” This links the merchant fee account to the bank account.
- Confirming the Link: Once the merchant fee account is selected, click “OK” to save the changes and link the accounts.
After linking the merchant fee account to the bank account, QuickBooks Desktop will automatically deduct the merchant fees from the bank deposits and allocate them to the designated merchant fee account. This seamless integration ensures that the impact of the fees on the bank transactions is accurately reflected in the financial records.
By linking the merchant fee account to the bank account, businesses can maintain precise financial records and gain a comprehensive understanding of the true net amount deposited into the bank after accounting for the merchant fees. This transparency facilitates informed decision-making and financial analysis, empowering businesses to optimize their financial performance.
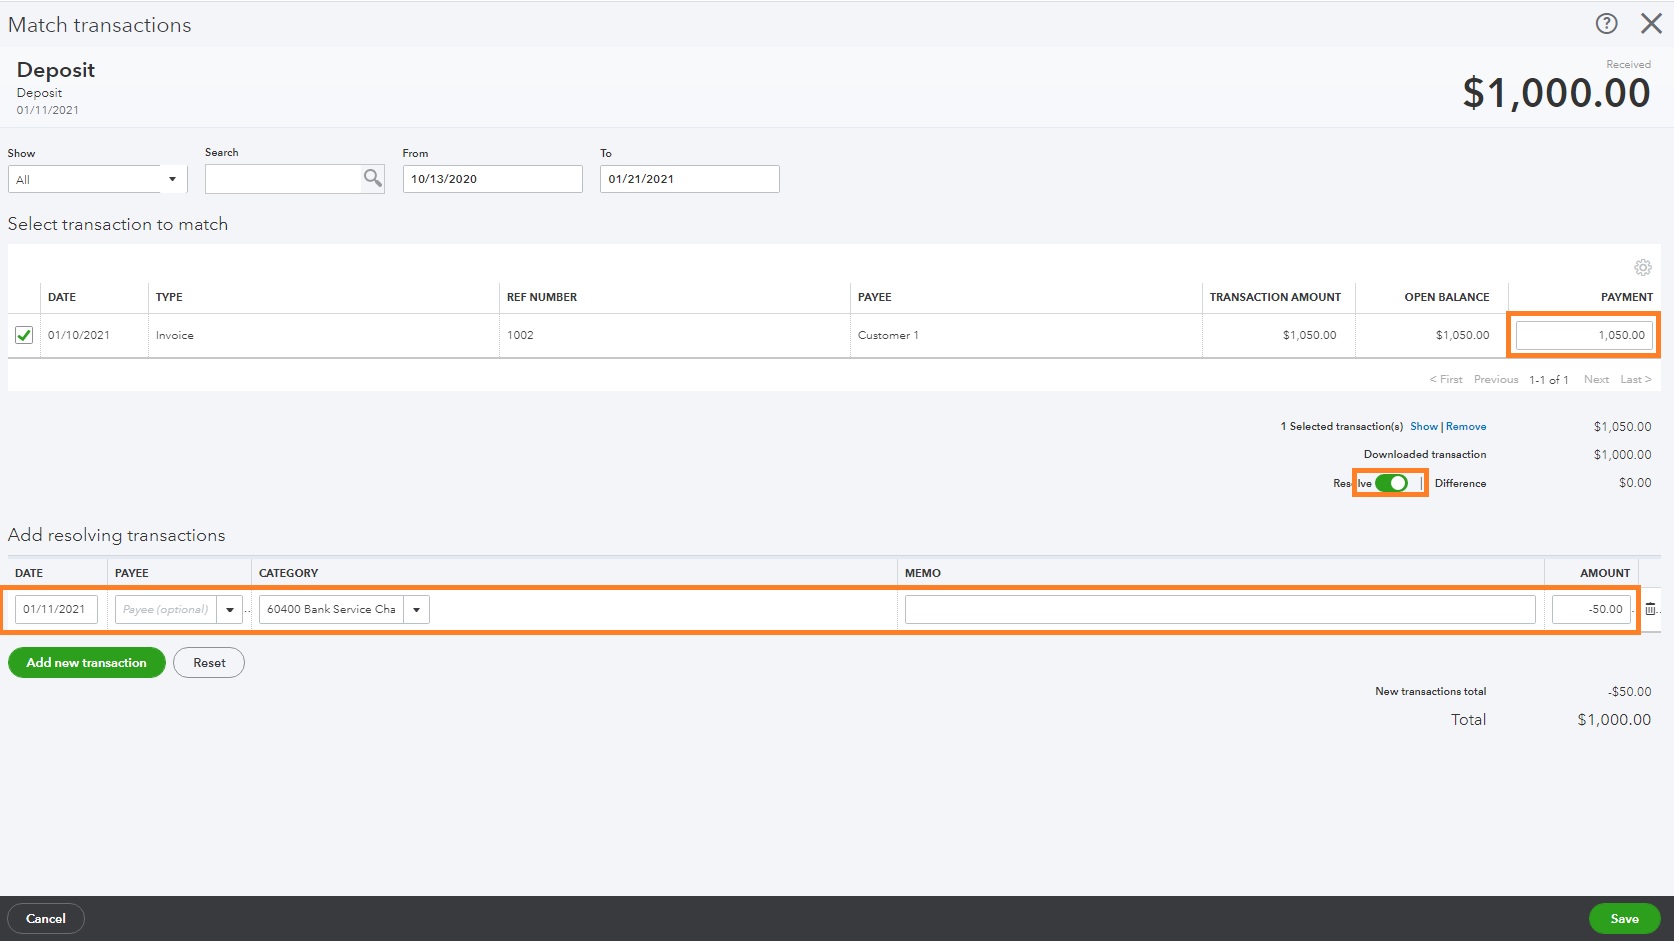
Recording Merchant Fees in QuickBooks Desktop
Recording merchant fees in QuickBooks Desktop is essential for accurately reflecting the impact of credit card transactions on the company’s financial records. By properly documenting these fees, businesses can gain insights into their true cost of processing card payments and make informed financial decisions. Here’s how to record merchant fees in QuickBooks Desktop:
- Accessing the Merchant Fee Account: Navigate to the “Banking” menu and select “Write Checks” or “Enter Credit Card Charges,” depending on the type of bank account used for processing credit card transactions.
- Selecting the Merchant Fee Account: In the transaction form, choose the merchant fee account created in the Chart of Accounts as the account to which the fee will be allocated.
- Entering the Fee Details: Input the date of the transaction, the payee (such as the payment processor or merchant service provider), and the amount of the merchant fee incurred.
- Completing the Transaction: Once the details are entered, save the transaction to record the merchant fee in the designated account.
After recording the merchant fees in QuickBooks Desktop, businesses can view a clear breakdown of these expenses in their financial reports. This visibility enables businesses to assess the impact of merchant fees on their financial performance and make informed decisions to optimize their payment processing methods and overall profitability.
By accurately documenting merchant fees, businesses can maintain precise financial records and gain insights into the true cost of accepting card payments. This understanding empowers businesses to strategically manage their expenses, set competitive pricing, and maximize their profitability.
Conclusion
In conclusion, understanding and effectively managing merchant fees in QuickBooks Desktop is vital for businesses that accept credit card payments. By setting up a dedicated merchant fee account, linking it to the associated bank account, and recording the fees accurately, businesses can gain valuable insights into the true cost of processing card payments and make informed financial decisions to optimize their operations and profitability.
Properly accounting for merchant fees allows businesses to maintain precise financial records, gain a comprehensive view of their expenses, and accurately assess their financial performance. This transparency empowers businesses to strategically manage their payment processing methods, set competitive pricing, and maximize their profitability.
Furthermore, by leveraging the capabilities of QuickBooks Desktop to track and manage merchant fees, businesses can streamline their financial processes, enhance their reporting accuracy, and make informed decisions based on reliable financial data.
Ultimately, the integration of merchant fee accounts in QuickBooks Desktop equips businesses with the tools to comprehensively understand and manage the costs associated with accepting card payments, thereby facilitating strategic financial planning and fostering sustainable growth in today’s competitive business landscape.
What's Hot
Latest Articles
Related Post
By: • Finance


By: • Finance
By: • Finance
By: • Finance

By: • Finance
By: • Finance

By: • Finance
By: • Finance
By: • Finance

By: • Finance

By: • Finance

By: • Finance


By: • Finance