Finance
How To Add Credit On Google Voice
Modified: February 21, 2024
Learn how to add credit to your Google Voice account and manage your finances efficiently. Discover step-by-step instructions to enhance your communication experience with Google Voice.
(Many of the links in this article redirect to a specific reviewed product. Your purchase of these products through affiliate links helps to generate commission for LiveWell, at no extra cost. Learn more)
Table of Contents
Introduction
Google Voice is a powerful communication tool that allows users to make calls, send text messages, and manage voicemail. While many of its features are free, there are certain services that require credits, such as international calls or purchasing a new phone number. Adding credit to your Google Voice account is a simple process that can be done in just a few steps.
In this article, we will guide you through the process of adding credit to your Google Voice account, ensuring that you can take advantage of all the features and services it has to offer. Whether you need to make international calls for business or personal reasons, or if you’re looking to customize your Google Voice number, adding credit is the key to unlocking these options.
Before we dive into the steps of adding credit, it’s important to note that you’ll need a valid Google account in order to access Google Voice. If you don’t have an account, you can easily create one by visiting the Google account creation page.
Once you have your Google account, you’re ready to begin adding credit to your Google Voice account. Follow the steps below to successfully add credit and start enjoying the full range of features available.
Step 1: Sign in to your Google account
To add credit to your Google Voice account, the first step is to sign in to your Google account. This is the same account that you use for other Google services such as Gmail, Google Drive, or YouTube.
Open a web browser and go to the Google homepage. Click on the “Sign In” button located at the top right corner of the page. Enter your email address and password associated with your Google account.
If you have enabled two-factor authentication for your account, you might need to enter the verification code sent to your registered mobile device or email address.
Once you have successfully signed in to your Google account, you will have access to all the Google services, including Google Voice.
Make sure that you are signed in to the correct Google account that is linked to your Google Voice number. If you have multiple Google accounts, double-check to ensure you’re signing in to the right one.
Once you are signed in, we can proceed to the next step of adding credit to your Google Voice account.
Step 2: Go to Google Voice
After signing in to your Google account, the next step is to navigate to Google Voice. To do this, open a new tab in your web browser and enter “Google Voice” in the search bar or directly type “voice.google.com” in the URL field.
Press Enter or click on the search result for Google Voice to access the Google Voice homepage.
Once you are on the Google Voice homepage, you will see a clean and user-friendly interface that displays your current phone number, recent calls, and voicemail options.
If you haven’t set up your Google Voice number yet, you will be prompted to choose a Google Voice number or link an existing mobile number. Follow the on-screen instructions to set up your Google Voice number before proceeding with adding credit.
If you already have a Google Voice number, you can skip this step and proceed to the next step.
Ensure that you are on the official Google Voice website to avoid any potential security risks. Double-check the URL to make sure it starts with “https://” and has “voice.google.com” in it.
Once you have successfully reached the Google Voice homepage, you are ready to move on to the next step of adding credit.
Step 3: Access the “Billing” tab
Now that you are on the Google Voice homepage, you need to access the “Billing” tab to begin the process of adding credit to your account.
To do this, look for the menu icon, usually represented by three horizontal lines, located in the top left corner of the page. Click on this icon to open the side menu.
In the side menu, you will see various options such as “Calls,” “Messages,” “Voicemail,” and more. Look for the option labeled “Billing” and click on it.
By selecting “Billing,” you will be taken to the billing settings page where you can manage your payment options and view your account balance.
If you don’t see the “Billing” option in the side menu, it’s possible that you may have signed in with a Google account that is not associated with Google Voice. Double-check that you are signed in with the correct account or try signing out and signing back in again.
Once you have successfully accessed the “Billing” tab, you are now ready to proceed with adding credit to your Google Voice account. Move on to the next step to continue the process.
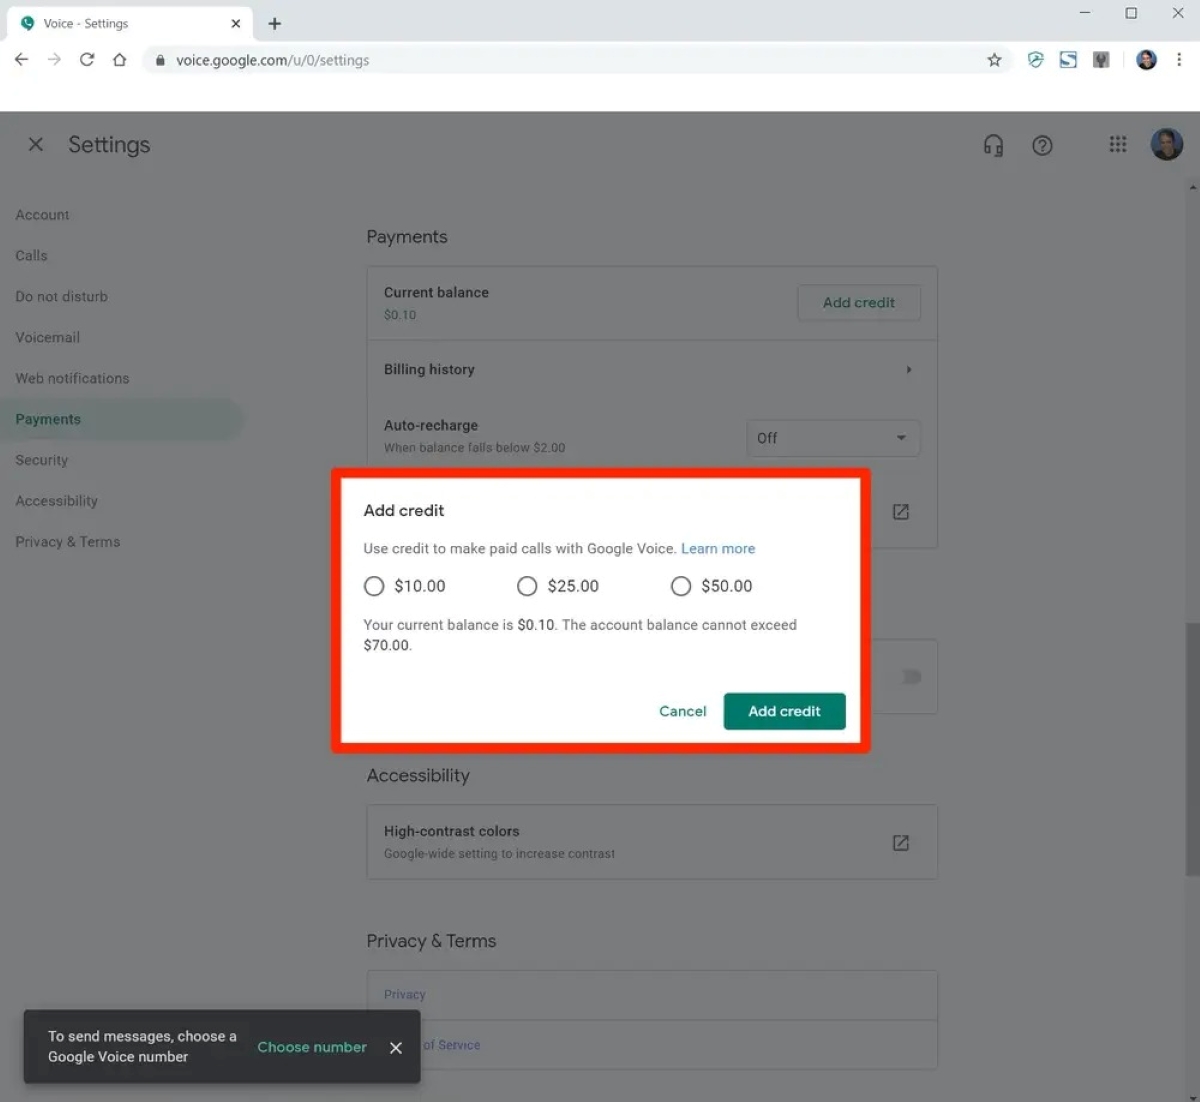
Step 4: Select “Add credit”
Now that you have accessed the “Billing” tab, it’s time to select the option to “Add credit” to your Google Voice account. This will allow you to purchase credits that can be used for various services within Google Voice, such as making international calls or purchasing a new phone number.
On the billing settings page, you will see different sections related to managing your payment options and viewing your account balance. Look for the section labeled “Account balance” or “Credits” and locate the option to “Add credit”. It may be represented as a button or a link.
Click on the “Add credit” option to proceed.
This will take you to the page where you can choose the desired amount of credits you would like to add to your Google Voice account.
If you don’t see the “Add credit” option on the billing settings page, ensure that you are signed in with the correct Google account associated with your Google Voice number.
It’s important to note that the available options for adding credit may vary depending on your region and the currency you are using. Google Voice supports various currencies, and the available amounts may be displayed accordingly.
Once you have selected the “Add credit” option, you’re now ready to move on to the next step: choosing the desired amount of credits to purchase.
Step 5: Choose the desired amount
After selecting the “Add credit” option, you will be prompted to choose the desired amount of credits you want to add to your Google Voice account. This allows you to customize your purchase based on your specific needs and usage.
On the “Add credit” page, you will typically see a list of predefined credit amounts to choose from. These amounts may range from a few dollars to larger denominations, depending on your region and currency.
Take a moment to consider how much credit you will need. Consider factors such as the frequency of your international calls, the duration of the calls, and any additional services you may want to use that require credits.
Once you have determined the amount, click on the corresponding option or button to select it.
Keep in mind that you can always add more credit to your account in the future if needed. It’s recommended to start with a conservative amount and monitor your usage to make sure you have enough credits for your intended purposes.
If you don’t see the desired amount listed, double-check that you are signed in with the correct Google account and that you have accessed the “Add credit” page from the Google Voice billing settings.
After choosing the desired amount, you’re now ready to proceed to the next step: entering your payment information to complete the transaction.
Step 6: Enter payment information
Now that you have selected the desired amount of credit to add to your Google Voice account, it’s time to enter your payment information to complete the transaction. This ensures that your account is funded and ready to use the available Google Voice services.
On the payment information page, you will be asked to provide the necessary details to process the payment. This typically includes your credit card or debit card information.
Start by entering the card number in the designated field. Make sure to double-check the accuracy of the card number to avoid any payment errors.
Next, enter the expiration date of the card and the security code (CVV/CVC), which is usually located on the back of the card.
In addition to the card details, you may also need to provide your billing address. This is necessary for verification purposes and to ensure that the payment is associated with the correct account.
Some payment options, such as Google Pay or PayPal, may also be available depending on your region and currency. If you prefer to use one of these alternative payment methods, select the corresponding option and follow the on-screen instructions to complete the transaction.
It’s important to note that Google takes the privacy and security of your payment information seriously. They employ advanced encryption technology and follow strict security protocols to protect your data.
Once you have entered your payment information, review the details to confirm their accuracy. Check the amount of credit you are purchasing and ensure that the payment details are correct.
If everything looks correct, click on the “Submit” or “Continue” button to proceed with the transaction.
Congratulations! You have successfully entered your payment information and are one step closer to adding credit to your Google Voice account. The final steps involve confirming and completing the transaction, which we will discuss in the next section.
Step 7: Confirm and complete the transaction
After entering your payment information, the next step is to confirm and complete the transaction to add credit to your Google Voice account. This ensures that your account is funded and ready to use the available services.
On the confirmation page, carefully review the details of your purchase. This includes the amount of credit you are adding, the payment method you used, and any associated fees or charges.
Take a moment to double-check all the information to ensure its accuracy. If everything looks correct, click on the “Confirm” or “Complete Transaction” button to finalize the process.
Depending on the payment method you used, you may be redirected to a payment gateway or asked to authenticate the transaction through your bank or third-party payment provider.
Follow the prompts and provide any additional information or verification codes as required. This step is necessary to secure your payment and protect against unauthorized transactions.
Once the transaction is successfully completed, you will receive a confirmation message or email indicating that the credit has been added to your Google Voice account.
You should also see an updated account balance or credits displayed on the billing settings page. This reflects the amount of credit you have available to use for calls, messaging, and other Google Voice services.
It’s recommended to take a screenshot or make a note of the confirmation details for future reference. This is especially useful if you encounter any issues or discrepancies with your credit balance or payment history.
Congratulations! You have now successfully confirmed and completed the transaction to add credit to your Google Voice account. You can now start using your credit to enjoy the various features and services offered by Google Voice.
Step 8: Verify your credits
Once you have completed the transaction and added credit to your Google Voice account, it’s important to verify that the credits have been successfully applied. This ensures that your account balance accurately reflects the amount of credit you have available for usage.
To verify your credits, go to the billing settings page in your Google Voice account. Here, you will see the updated account balance displayed, indicating the amount of credit you currently have.
If the updated credits are not reflected immediately, give it a few moments and refresh the page. Sometimes, there can be a slight delay in processing the transaction and updating the account balance.
If you still don’t see the correct amount of credits after refreshing the page, double-check your payment confirmation and make sure that the transaction was completed successfully. If necessary, contact Google Support for further assistance.
Once you have verified your credits and confirmed that the correct amount is displayed, you can proceed to use them for various Google Voice services. This may include making international calls, sending text messages, or purchasing additional features or phone numbers.
It’s important to monitor your credit balance as you use Google Voice services to ensure that you have sufficient credits for your needs. If your balance runs low, you can always repeat the process of adding credit to your account to top it up.
Remember that some services within Google Voice may have specific credit requirements. Be aware of any applicable charges or rates for calls to certain countries or premium numbers. This will help you manage your credits effectively and avoid any unexpected charges.
By regularly verifying your credits and monitoring your usage, you can take full advantage of the features and services available through Google Voice.
Conclusion
Adding credit to your Google Voice account is a straightforward process that allows you to unlock a range of features and services. Whether you need to make international calls, send text messages, or customize your Google Voice number, adding credit ensures that you have the necessary funds to use these services.
In this article, we have outlined the step-by-step process for adding credit to your Google Voice account. We started by signing in to your Google account, accessing the Google Voice homepage, and navigating to the “Billing” tab. From there, we selected the option to “Add credit” and chose the desired amount to purchase. We then entered the payment information and completed the transaction. Lastly, we verified the credits to ensure that they were successfully applied to our account balance.
It’s important to monitor your credit balance as you use Google Voice services to ensure that you have sufficient funds for your needs. If your balance runs low, simply repeat the process of adding credit to your account to top it up.
Remember to double-check the accuracy of your payment information and be cautious when entering sensitive details. Google maintains a high level of security to protect your payment information, but it’s always wise to exercise caution when conducting online transactions.
By following the steps outlined in this article, you can easily add credit to your Google Voice account and enjoy all the benefits and convenience that Google Voice has to offer. Whether you use it for personal or business purposes, Google Voice provides a seamless and cost-effective way to stay connected with others.
So, go ahead and add credit to your Google Voice account today and explore the world of seamless communication at your fingertips!
What's Hot
Latest Articles
Related Post

By: • Finance

By: • Finance
By: • Finance

By: • Finance
By: • Finance
By: • Finance

By: • Finance

By: • Finance

By: • Finance

By: • Finance

By: • Finance

By: • Finance


By: • Finance

By: • Finance