Finance
How To Print Balance Sheet In Quickbooks
Modified: December 30, 2023
Learn how to print your balance sheet in Quickbooks and manage your finances efficiently. Enhance your financial reporting skills with our step-by-step guide.
(Many of the links in this article redirect to a specific reviewed product. Your purchase of these products through affiliate links helps to generate commission for LiveWell, at no extra cost. Learn more)
Table of Contents
Introduction
Printing a balance sheet is an essential task for any business owner or finance professional. The balance sheet provides a snapshot of a company’s financial position, showing its assets, liabilities, and shareholders’ equity at a specific point in time.
In the world of accounting and finance, QuickBooks is a widely-used software that simplifies and streamlines financial management processes. QuickBooks allows users to generate various financial reports, including the balance sheet, with just a few clicks.
In this article, we will guide you through the process of printing a balance sheet in QuickBooks. Whether you need a hard copy for internal use, to share with stakeholders, or for compliance purposes, these steps will help you generate and print your balance sheet in a few simple steps.
Keep in mind that the specific steps may vary slightly depending on the version and edition of QuickBooks you are using. However, the general process remains the same. Let’s dive in and discover how to print a balance sheet in QuickBooks.
Step 1: Open QuickBooks
The first step in printing a balance sheet in QuickBooks is to open the software on your computer. Locate the QuickBooks application icon on your desktop or in your program files, and double-click to launch the program.
If you don’t have QuickBooks installed on your computer, you will need to download and install it before proceeding. QuickBooks offers various versions and editions tailored to different business needs, so make sure you have the appropriate version for your company.
Once QuickBooks is open, you will be prompted to log in to your account. Enter your username and password to access the software. If you are logging in for the first time, you may be asked to complete the initial setup process, including setting up your company’s information and chart of accounts.
After logging in, you will be directed to the main dashboard of QuickBooks, where you can access various features and functions to manage your finances. Take a moment to familiarize yourself with the dashboard and navigation options.
Now that QuickBooks is open and you’re ready to print your balance sheet, let’s move on to the next step.
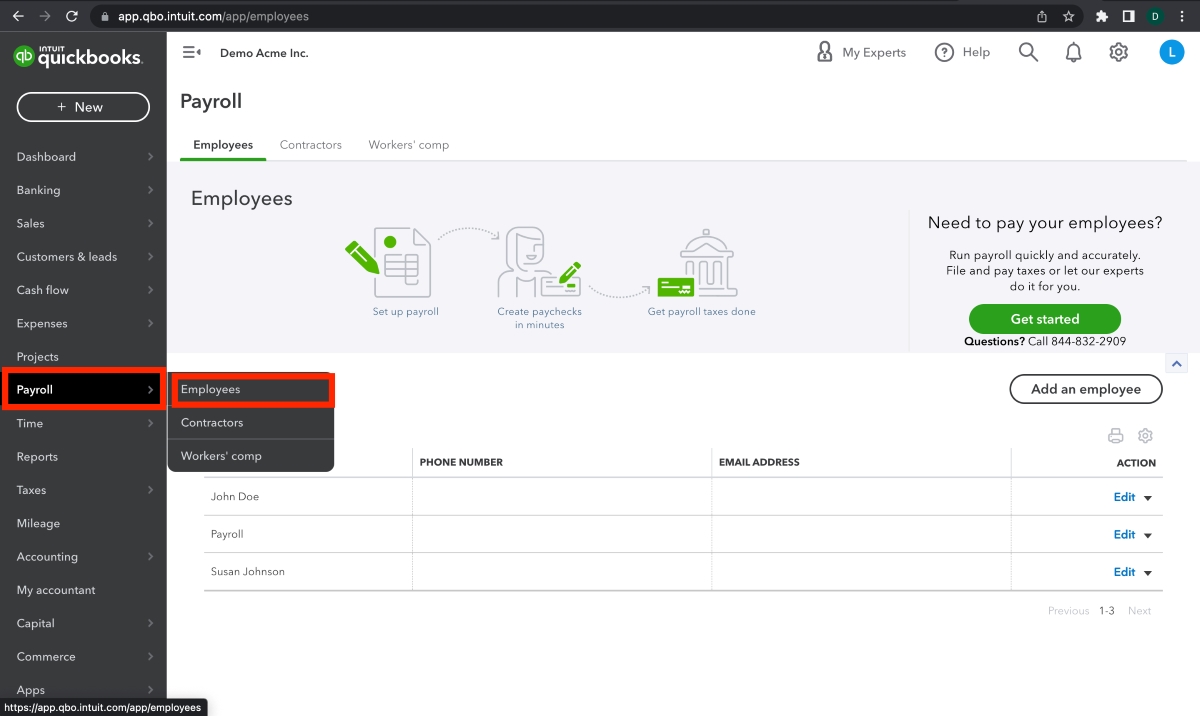
Step 2: Go to Reports
Once you have opened QuickBooks and logged in to your account, the next step is to navigate to the Reports section. QuickBooks provides a wide range of pre-built reports that can be customized to meet your specific needs.
To access the reports, look for the “Reports” tab or menu option at the top of the QuickBooks window. Click on it, and a drop-down menu will appear, displaying various categories and types of reports.
From the list of report categories, locate and select the “Balance Sheets” category. This will display a selection of balance sheet reports that are available in QuickBooks.
QuickBooks offers different types of balance sheet reports, such as standard balance sheet, comparative balance sheet, and condensed balance sheet. Choose the appropriate option based on your requirements.
It’s worth noting that QuickBooks allows you to customize the reports further, including modifying the columns, adding or removing accounts, and applying filters. This allows you to generate a balance sheet that is tailored to your specific needs and preferences.
Once you have selected the desired balance sheet report, proceed to the next step to customize it before printing.
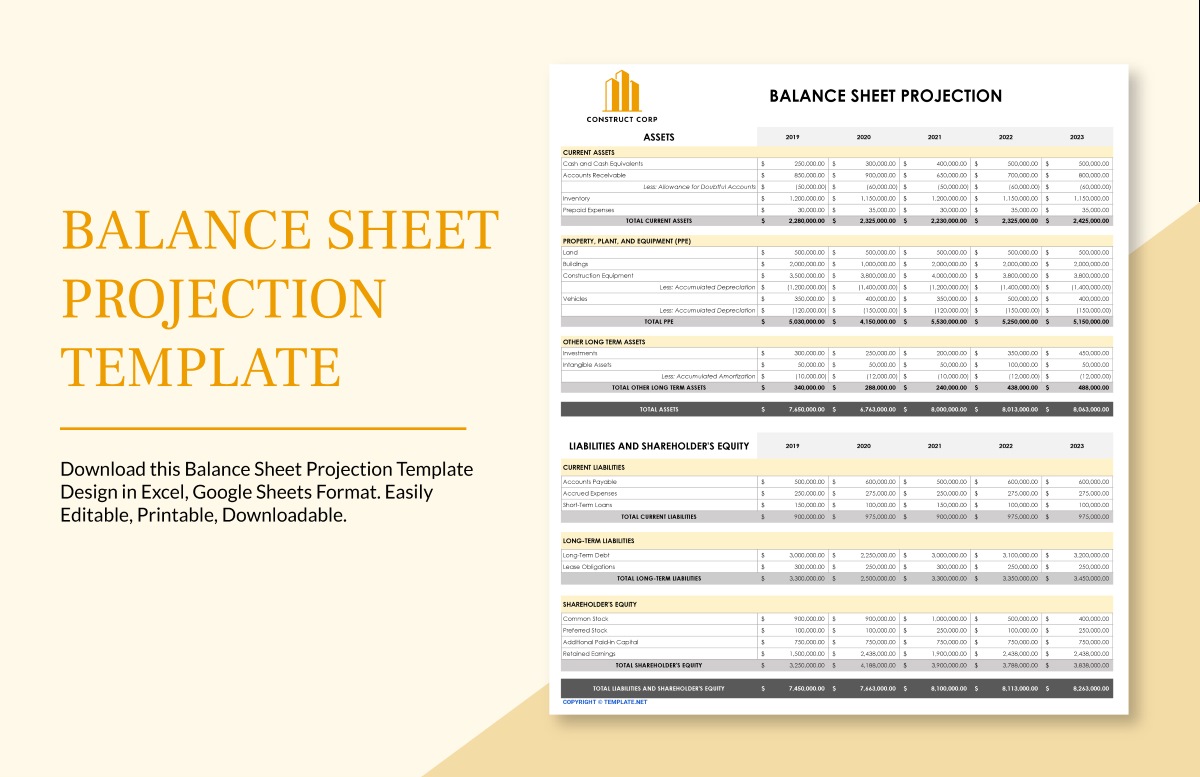
Step 3: Select Balance Sheet
After navigating to the Reports section in QuickBooks, you will need to select the specific balance sheet report that you want to print. QuickBooks provides different options for balance sheets, allowing you to choose the one that best suits your needs.
In the Balance Sheets category, you will see a list of available balance sheet reports. These reports are designed to provide different levels of detail and presentation formats.
To select a balance sheet report, simply click on the report name that best aligns with what you are looking for. QuickBooks will then generate the report based on your selection.
It’s important to note that QuickBooks allows you to customize the report further if needed. You can modify the columns, add or remove accounts, and apply filters to include or exclude specific data.
Take the time to review the different balance sheet options and choose the one that meets your requirements. Consider factors such as the level of detail you need, the time frame you want to cover, and any specific data you want to include or exclude.
Once you have selected the appropriate balance sheet report, move on to the next step to customize it before printing.
Step 4: Customize the Balance Sheet
Once you have selected the balance sheet report in QuickBooks, you have the option to customize it to meet your specific needs and preferences. Customization allows you to tailor the report’s format, layout, and content to focus on the information that is most relevant to your business.
To customize the balance sheet, look for the customization options or settings provided by QuickBooks. These settings are typically located near the top of the report window or in a sidebar on the left-hand side.
Here are some common customization options you can consider:
- Columns: Choose the columns you want to include in your balance sheet, such as account names, amounts, subtotals, or percentages.
- Date Range: Specify the date range for the balance sheet, allowing you to focus on a specific period of time, such as a month, quarter, or year.
- Compare Previous Period: Enable this option if you want to compare the current balance sheet with the previous period, providing insights into changes over time.
- Filters: Apply filters to include or exclude specific accounts, classes, customers, or other criteria in your balance sheet.
- Headers and Footers: Customize the headers and footers of your balance sheet report by adding your company name, logo, or additional text.
By customizing these options, you can create a balance sheet that meets your specific reporting requirements or follows the formatting guidelines of your organization.
Once you have customized the balance sheet to your liking, proceed to the next step to set the date range.
Step 5: Set the Date Range
Setting the date range is an important step in printing a balance sheet in QuickBooks. The date range determines the period of time for which the financial data will be included in the balance sheet report.
To set the date range, locate the options or settings related to date in the report customization window or sidebar. QuickBooks typically provides a date range selector that allows you to choose the start and end dates.
Consider the following when setting the date range for your balance sheet:
- Specific Period: If you want to generate a balance sheet for a specific time period, such as a month or a year, select the start and end dates accordingly.
- Current Date: Choosing the current date as the end date will provide you with the most up-to-date balance sheet. This is useful if you need real-time financial information.
- Comparative Analysis: If you want to compare the current balance sheet with the previous period, select the appropriate date range to include the desired comparative data.
Make sure the date range you set aligns with the reporting needs or specific analysis you are conducting. It’s important to choose a date range that captures the relevant financial data without including unnecessary or outdated information.
Once you have set the date range, you are ready to move on to the next step to preview the balance sheet before printing.
Step 6: Preview the Balance Sheet
Before printing the balance sheet in QuickBooks, it is advisable to preview the report to ensure that it appears as desired and includes all the necessary information. Previewing allows you to review the layout, formatting, and data before finalizing the printing process.
To preview the balance sheet, look for the preview option typically provided in the report customization window or sidebar. Click on the preview button or link to generate a preview of the balance sheet report.
Once the balance sheet preview is generated, take a few moments to review it. Pay attention to the following aspects:
- Data Accuracy: Ensure that the financial data displayed on the balance sheet is accurate and matches your expectations. Double-check the account balances, subtotals, and totals.
- Formatting and Layout: Verify that the formatting and layout of the balance sheet are clean, organized, and easy to read. Check the alignment of columns, font styles, and any header or footer information.
- Included Accounts: Make sure that all the relevant accounts you want to include in the balance sheet are present and correctly displayed. If any accounts are missing or need adjustment, you can revisit the customization settings to make the necessary changes.
If you notice any issues or discrepancies during the preview, you can go back and modify the customization settings accordingly. Once you are satisfied with the balance sheet’s appearance and accuracy, you are ready to print it.
In the next step, we will guide you through the process of printing the balance sheet in QuickBooks.
Step 7: Print the Balance Sheet
After previewing the balance sheet and ensuring its accuracy and formatting, it’s time to move forward and print the final version. QuickBooks provides an easy and straightforward process for printing the balance sheet.
To print the balance sheet in QuickBooks, follow these steps:
- Ensure that your printer is properly set up and connected to your computer.
- Locate the print option in the report preview window or toolbar. It is typically represented by a printer icon or a “Print” button.
- Click on the print option, and a print dialog box will appear.
- Review the print settings, such as the printer selection, paper size, orientation, and number of copies. Adjust these settings as needed.
- Click on the “Print” button to proceed with printing the balance sheet.
- Wait for the printer to generate the printed copy of the balance sheet. Depending on the complexity and length of the report, it may take a few moments to complete.
- Retrieve the printed balance sheet from the printer tray and review it for accuracy and quality.
It’s important to ensure that the printed balance sheet matches the previewed version and includes all relevant details and formatting. If you encounter any issues or discrepancies, you can repeat the process and make any necessary adjustments before printing again.
Once you have successfully printed the balance sheet, you can store it for your records, distribute it to stakeholders, or use it for compliance purposes.
Remember, it’s always a good practice to keep digital copies of your financial reports for future reference. QuickBooks also allows you to save and export reports in various file formats, such as PDF or Excel, for easy digital storage and sharing.
By following these simple steps, you can effectively print your balance sheet in QuickBooks and ensure that you have a tangible record of your company’s financial position.
Conclusion
Printing a balance sheet in QuickBooks is a crucial task for businesses and finance professionals to assess their financial health and provide valuable information to stakeholders. By following the step-by-step guide outlined in this article, you can easily generate and print accurate and customized balance sheets in QuickBooks.
First, ensure that QuickBooks is properly installed on your computer and logged into your account. Then, navigate to the Reports section and select the Balance Sheet report that best suits your needs. Customize the balance sheet by selecting the desired columns, setting the appropriate date range, and applying any necessary filters or formatting options.
Preview the balance sheet to verify its accuracy, formatting, and inclusion of relevant accounts. If any adjustments are needed, you can modify the customization settings before proceeding. Once satisfied with the previewed balance sheet, you can then print it using the print dialog box and appropriate printer settings.
Remember, it’s important to double-check the printed balance sheet for accuracy and quality before storing, distributing, or using it for any purpose. Additionally, consider saving digital copies of your financial reports for easy reference and future use.
With QuickBooks’ powerful reporting capabilities and the step-by-step instructions provided in this article, you can confidently print balance sheets that showcase the financial position of your business. By regularly reviewing and analyzing your balance sheet, you can make informed decisions, identify trends, and communicate essential financial information to stakeholders.
By mastering QuickBooks’ reporting features, you can effectively manage your financial data and streamline your business’s financial management processes. Now, you are equipped with the knowledge to print balance sheets in QuickBooks and leverage this valuable tool for financial analysis and reporting.
What's Hot
Latest Articles
Related Post

By: • Finance
By: • Finance

By: • Finance


By: • Finance

By: • Finance
By: • Finance
By: • Finance

By: • Finance
By: • Finance


By: • Finance

By: • Finance

By: • Finance