
Finance
How To Make Balance Sheet In Excel
Published: December 27, 2023
Learn how to create a comprehensive balance sheet in Excel with this step-by-step guide. Perfect for individuals seeking to enhance their finance skills.
(Many of the links in this article redirect to a specific reviewed product. Your purchase of these products through affiliate links helps to generate commission for LiveWell, at no extra cost. Learn more)
Table of Contents
- Introduction
- What is a Balance Sheet?
- Benefits of Creating a Balance Sheet in Excel
- Step 1: Setting up the Excel Spreadsheet
- Step 2: Determine the Categories and Items for the Balance Sheet
- Step 3: Enter the Assets Information
- Step 4: Enter the Liabilities Information
- Step 5: Calculate Owner’s Equity
- Step 6: Formatting the Balance Sheet
- Step 7: Review and Double-check the Balance Sheet
- Conclusion
Introduction
Welcome to the world of finance! Whether you are a business owner, a financial analyst, or just someone interested in managing your personal finances, understanding how to create and analyze a balance sheet is crucial. A balance sheet is a financial statement that provides a snapshot of a company’s financial position at a given point in time. It essentially shows the assets, liabilities, and owner’s equity of the company, giving an overview of its financial health.
While there are various tools available to create a balance sheet, using Microsoft Excel is a popular choice due to its versatility and flexibility. Excel allows you to input and calculate financial data efficiently, making it an ideal tool for creating and analyzing balance sheets.
In this article, we will guide you through the process of creating a balance sheet in Excel. We will cover the step-by-step process from setting up the spreadsheet to formatting the final balance sheet. Along the way, we will highlight the benefits of using Excel and provide practical tips to ensure accuracy and efficiency.
Whether you are a beginner or have some experience with Excel, this guide will equip you with the knowledge and skills to create professional balance sheets that can assist in making informed financial decisions.
So, let’s dive in and discover how Excel can simplify the creation of balance sheets, giving you a better understanding of your financial position.
What is a Balance Sheet?
A balance sheet is a financial statement that provides a snapshot of a company’s financial position at a specific point in time. It presents a summary of a company’s assets, liabilities, and owner’s equity, giving insight into its financial health and stability.
The balance sheet follows the fundamental accounting equation: Assets = Liabilities + Owner’s Equity. This equation signifies that a company’s assets are financed by either liabilities (obligations) or owner’s equity (ownership interest).
Let’s break down the key components of a balance sheet:
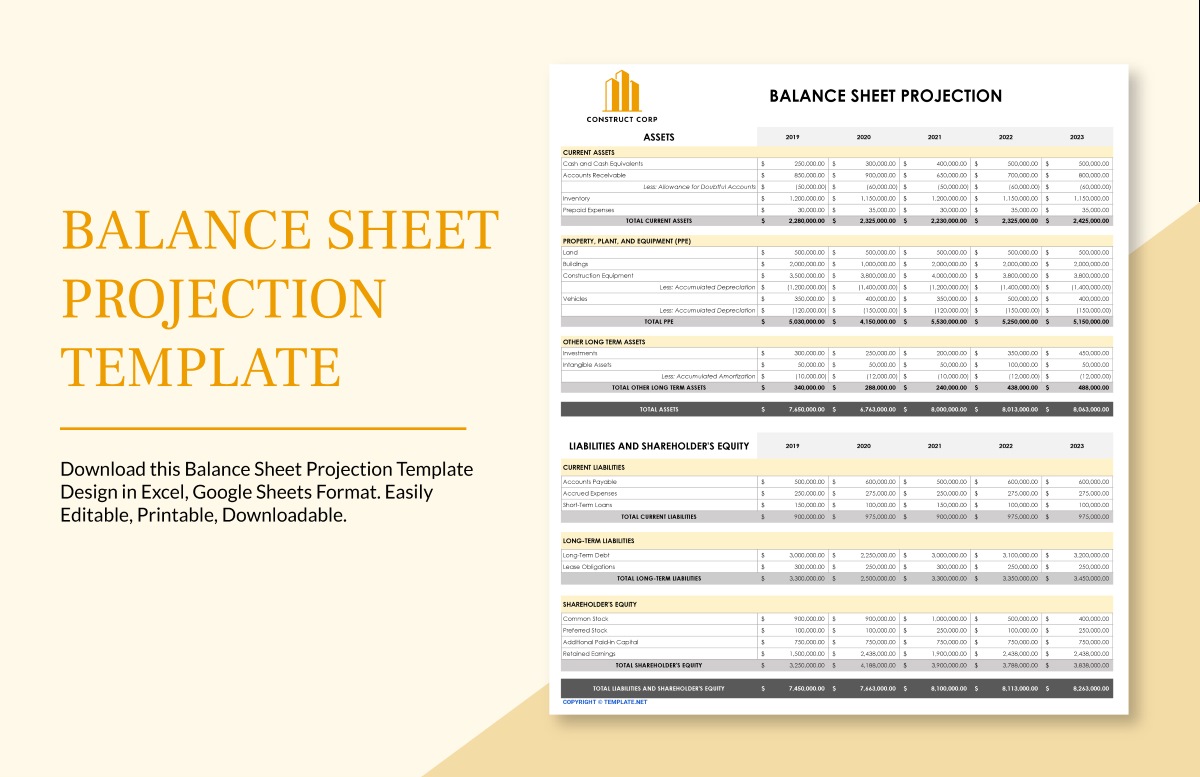
- Assets: These are the economic resources owned by the company and are classified as either current assets (expected to be converted into cash within a year) or non-current assets (expected to be held for more than a year). Examples of assets include cash, accounts receivable, inventory, equipment, and property.
- Liabilities: These represent the company’s obligations to external parties, such as suppliers, lenders, or other entities. Like assets, liabilities are categorized as current liabilities (due within a year) or long-term liabilities (due after a year). Common liabilities include accounts payable, loans, and mortgages.
- Owner’s Equity: Also known as shareholders’ equity or net worth, owner’s equity represents the residual interest in the company’s assets after deducting liabilities. It includes the initial investment by the owners and any retained earnings (profits reinvested into the business).
The balance sheet allows stakeholders, such as investors, creditors, and management, to assess a company’s financial strength, solvency, and liquidity. It provides valuable information for decision-making, such as evaluating the company’s ability to pay off debts, its operational efficiency, and its overall financial stability.
Now that we understand the purpose and components of a balance sheet, let’s explore the benefits of using Microsoft Excel to create and analyze balance sheets.
Benefits of Creating a Balance Sheet in Excel
When it comes to creating and analyzing balance sheets, using Microsoft Excel offers several benefits:
- Flexibility and Customization: Excel provides a wide range of tools and functions that allow you to customize your balance sheet according to your specific needs. You can easily adjust formatting, add formulas to calculate totals and ratios, and create charts and graphs to visualize your financial data.
- Efficiency and Accuracy: Excel’s spreadsheet format enables you to input and manipulate data efficiently. You can use formulas and functions to automatically calculate values, reducing the chances of human errors. This saves you time and ensures accuracy in your financial calculations.
- Organization and Structure: Excel allows you to structure your balance sheet in a clear and organized manner. You can create separate sections for assets, liabilities, and owner’s equity, and use cell formatting to distinguish different categories. This makes it easier to analyze and interpret your financial information.
- Easy Updates and Revisions: As your financial situation changes, you can easily update and revise your balance sheet in Excel. You can add or remove items, adjust values, and instantly see the impact on your financial position. This agility enables you to track your progress over time and make informed decisions based on real-time data.
- Data Analysis and Decision-Making: Excel offers powerful data analysis capabilities that allow you to calculate financial ratios, analyze trends, and conduct scenario analysis. You can use functions such as pivot tables and charts to gain insights from your balance sheet data and make informed financial decisions.
- Accessibility and Sharing: Excel spreadsheets can be easily shared and accessed by multiple users. This enables collaboration and facilitates communication among team members, stakeholders, and financial professionals. You can also save your balance sheet in different file formats, making it compatible with other software and systems.
By leveraging these benefits, you can create professional balance sheets in Excel that provide a comprehensive overview of your financial position, facilitate analysis, and support decision-making processes.
Now that we understand the advantages of using Excel for balance sheet creation, let’s dive into the step-by-step process of setting up an Excel spreadsheet for your balance sheet.
Step 1: Setting up the Excel Spreadsheet
The first step in creating a balance sheet in Excel is to set up the spreadsheet. Follow these steps to ensure a well-organized and structured foundation for your balance sheet:
- Open a New Excel Spreadsheet: Start by opening a new Excel spreadsheet to begin creating your balance sheet.
- Create Column Headers: In the first row of your spreadsheet, create column headers for each category of your balance sheet. Typically, you will have columns for assets, liabilities, and owner’s equity. Add additional columns as needed for specific items or subcategories.
- Set Row Labels: In the leftmost column of your spreadsheet, set row labels to identify individual items within each category. For example, under assets, you might include row labels such as cash, accounts receivable, inventory, etc.
- Add Total Rows: Leaving some space at the bottom of each category section, add rows to calculate the total of each category. These rows will be used to sum up the values in the respective category, providing a subtotal for assets, liabilities, and owner’s equity.
- Include Grand Total Row: At the very bottom of your spreadsheet, add a row to calculate the grand total of your balance sheet. This row will sum up the total assets, total liabilities, and owner’s equity.
- Format the Spreadsheet: Apply formatting to your spreadsheet to enhance its visual appeal and readability. Use bold fonts for the column headers and row labels, and consider using border lines to separate different sections. Adjust column widths to accommodate the length of your labels and data.
- Save Your Spreadsheet: Save your spreadsheet at regular intervals to prevent any potential data loss. It is recommended to save it with a clear and descriptive name that reflects the purpose and date of the balance sheet.
By following these steps, you will have a well-structured Excel spreadsheet ready for entering the financial information for your balance sheet. In the next step, we will determine the categories and items for the balance sheet.
Step 2: Determine the Categories and Items for the Balance Sheet
In step 2 of creating a balance sheet in Excel, you need to determine the categories and items that will be included in your balance sheet. This step is crucial as it lays the foundation for accurately representing your financial position. Follow these guidelines to help you determine the categories and items:
- Identify Assets: Start by listing all the assets owned by your company. Common categories of assets include current assets (cash, accounts receivable, inventory) and non-current assets (property, plant, equipment). Think about the specific items that fall under each category and add them to your balance sheet.
- List Liabilities: Next, identify the liabilities for your business. This can include current liabilities (accounts payable, short-term debts) and long-term liabilities (long-term loans, mortgages). Determine the specific items that fall under each liability category and include them on your balance sheet.
- Calculate Owner’s Equity: Owner’s equity represents the ownership interest in the company. It can include the original investment made by the owners as well as retained earnings. Calculate the total owner’s equity by subtracting total liabilities from total assets.
- Add Additional Categories: Depending on the nature of your business, you may need to add additional categories to your balance sheet. These could include items such as prepaid expenses, deferred revenue, or other specific assets or liabilities.
- Consider Subcategories: Within each main category, you may also want to include subcategories to provide more detail. For example, under assets, you could have subcategories like cash, accounts receivable, and inventory.
- Review Industry Standards: It can be helpful to review the balance sheets of companies in your industry to get an idea of common categories and items used. This can ensure that your balance sheet is in line with industry standards.
By carefully determining the categories and items for your balance sheet, you will create a comprehensive representation of your financial position. Once you have identified these elements, you are ready to move on to step 3: entering the assets information.
Step 3: Enter the Assets Information
In step 3 of creating a balance sheet in Excel, it’s time to enter the assets information into your spreadsheet. Assets represent the economic resources owned by your company. Here’s how you can enter the assets information:
- Identify Asset Items: Refer to your list of assets from step 2 and identify each asset item that needs to be included in your balance sheet. This could include cash, accounts receivable, inventory, equipment, and any other assets specific to your business.
- Assign Cells: In your spreadsheet, find the corresponding cells where you want to input the data for each asset item. Generally, this will be in the column under the asset category and in the row for the specific asset item.
- Enter Asset Values: Input the monetary values for each asset item into the respective cells. Make sure the values are accurate and up-to-date. You can use Excel’s currency formatting to display the values appropriately.
- Use Formulas: If applicable, use formulas to calculate the total values of each asset category and the subtotal for total assets. You can use the SUM function to add up the values in the corresponding cells. This ensures that your balance sheet reflects the accurate totals automatically.
- Add Descriptions: Optionally, you can include brief descriptions or additional details about specific assets in adjacent cells. This can provide more clarity and context for certain asset items.
- Double-Check Accuracy: Review the entered asset information to ensure accuracy. Check that all values are correctly inputted and that the formulas for the category totals and subtotal are functioning properly.
By following these steps, you will successfully enter the assets information into your Excel spreadsheet. Remember to save your work regularly to avoid any potential data loss. We will now move on to step 4, where you will enter the liabilities information for your balance sheet.
Step 4: Enter the Liabilities Information
In step 4 of creating a balance sheet in Excel, it’s time to enter the liabilities information into your spreadsheet. Liabilities represent the obligations or debts owed by your company. Follow these steps to enter the liabilities information:
- Identify Liability Items: Refer to your list of liabilities from step 2 and identify each liability item that needs to be included in your balance sheet. This could include accounts payable, loans, accrued expenses, and any other liabilities specific to your business.
- Assign Cells: In your spreadsheet, find the corresponding cells where you want to input the data for each liability item. This will typically be in the column under the liability category and the row for the specific liability item.
- Enter Liability Values: Input the monetary values for each liability item into the respective cells. Ensure the values are accurate and up-to-date. Apply Excel’s currency formatting to display the values correctly.
- Use Formulas: If necessary, use formulas to calculate the total values of each liability category and the subtotal for total liabilities. Utilize the SUM function to add up the values in the relevant cells. This will ensure that your balance sheet automatically reflects the accurate totals.
- Add Descriptions: Optionally, include brief descriptions or additional details about specific liabilities in adjacent cells. This can provide more clarity and context for certain liability items.
- Double-Check Accuracy: Review the entered liabilities information to ensure accuracy. Check that all values are correctly inputted, and the formulas for category totals and subtotals are functioning correctly.
Following these steps will help you accurately enter the liabilities information into your Excel spreadsheet. Remember to save your work periodically to avoid any potential loss of data. In the next step, we will calculate the owner’s equity for your balance sheet.
Step 5: Calculate Owner’s Equity
In step 5 of creating a balance sheet in Excel, it’s time to calculate the owner’s equity. Owner’s equity represents the ownership interest in a company and is calculated as the difference between total assets and total liabilities. Here’s how you can calculate owner’s equity:
- Determine Total Assets: Refer to the totals of the assets section that you calculated in step 3. This should give you the total value of all your assets combined.
- Determine Total Liabilities: Similarly, refer to the totals of the liabilities section that you calculated in step 4. This should give you the total value of all your liabilities combined.
- Calculate Owner’s Equity: Subtract the total liabilities from the total assets to calculate the owner’s equity. This can be done by entering the formula “= Total Assets – Total Liabilities” in the respective cell for owner’s equity.
- Format the Owner’s Equity Value: Apply Excel’s currency formatting to the cell containing the owner’s equity value to ensure it is properly displayed.
By following these steps, you will accurately calculate the owner’s equity for your balance sheet. This value represents the residual interest in the company after deducting liabilities from assets. It signifies the net worth or ownership stake of the company’s owners or shareholders.
In the next step, we’ll move on to formatting your balance sheet to make it visually appealing and easy to read.
Step 6: Formatting the Balance Sheet
In step 6 of creating a balance sheet in Excel, it’s time to format your spreadsheet to make the balance sheet visually appealing and easy to read. Formatting can help highlight important information and make your balance sheet more professional. Follow these steps to format your balance sheet:
- Apply Bold and Font Styles: Use bold fonts to make your column headers and row labels stand out. You can also consider adjusting the font size to improve readability.
- Add Borders and Gridlines: Apply borders around your table and between rows and columns. This helps visually separate different sections and makes it easier to navigate through the balance sheet.
- Format Currency Values: Use Excel’s currency formatting to display monetary values in a consistent and easy-to-read format. This ensures that all monetary values are clear and properly aligned.
- Align and Adjust Columns: Adjust the column widths to accommodate the length of your labels and data. Align the values within each column so that they are uniformly presented. You can also consider merging cells to create a more visually appealing layout.
- Add Totals and Subtotals Formatting: Apply formatting to your total and subtotal rows to make them visually distinct. Consider using bold fonts or shading to separate these rows from the rest of the balance sheet.
- Consider Using Conditional Formatting: For better data visualization, use conditional formatting to highlight specific values or ranges based on certain criteria. For example, you can highlight negative values in red or use color scales to show variations in data.
- Add Headers and Footers: Include headers and footers to provide additional information, such as the company name, balance sheet title, and date. This helps to maintain consistency across multiple pages and gives a professional touch to your balance sheet.
By applying these formatting techniques, you can enhance the overall appearance and readability of your balance sheet. Remember to save your work regularly and review the final formatting to ensure everything is aligned and visually appealing.
In the next step, we’ll focus on reviewing and double-checking your balance sheet to ensure accuracy and completeness.
Step 7: Review and Double-check the Balance Sheet
In the final step of creating a balance sheet in Excel, it’s crucial to review and double-check your balance sheet to ensure accuracy and completeness. This step is essential to detect any errors or discrepancies and to finalize your balance sheet with confidence. Follow these guidelines to review and double-check your balance sheet:
- Verify Data Entry: Go through each cell in your balance sheet and ensure that the data entered is correct and matches the corresponding financial information.
- Check Formulas: Double-check the formulas used to calculate totals and subtotals in your balance sheet. Verify that the formulas accurately calculate the values based on the entered data.
- Review Category Totals: Validate that the total values for each category (assets, liabilities, and owner’s equity) accurately reflect the sum of the individual items in those categories.
- Ensure Balance Sheet Balances: Confirm that the sum of total assets equals the sum of total liabilities plus owner’s equity. This ensures that the balance sheet adheres to the fundamental accounting equation.
- Cross-Check with Supporting Documents: If available, cross-check your balance sheet with supporting documents such as bank statements, invoices, and financial statements. This helps ensure the accuracy of the reported financial data.
- Proofread for Errors: Pay attention to typos, incorrect formatting, or any other visual inconsistencies in your balance sheet. Proofread the content to ensure there are no spelling mistakes or grammatical errors.
- Seek a Second Opinion: Consider having someone else review your balance sheet for a fresh perspective. Another set of eyes can help catch any potential errors or provide valuable feedback.
By diligently reviewing and double-checking your balance sheet, you can have confidence in the accuracy, completeness, and presentation of your financial information. Once you are satisfied with the final version of your balance sheet, you can save it, print it, or share it with relevant stakeholders.
Congratulations! You have successfully created a balance sheet in Excel and completed the step-by-step process. Now you have a powerful tool that provides a clear snapshot of your financial position. Regularly updating and referring to your balance sheet can help you make informed decisions and track the financial health of your business.
Remember that maintaining accurate and up-to-date financial records is crucial for effective financial management and planning. Make it a priority to periodically review and update your balance sheet to reflect any changes in your financial position.
Thank you for following along with this guide. We hope it has been helpful in creating and understanding balance sheets in Excel. Best of luck with your financial endeavors!
Conclusion
Creating a balance sheet in Excel is an essential component of managing your finances, whether for your business or personal use. Excel provides a versatile platform that allows you to organize, analyze, and present your financial data effectively. By following the step-by-step process outlined in this guide, you can easily create a professional balance sheet that accurately reflects your financial position.
A balance sheet provides crucial insights into your assets, liabilities, and owner’s equity, giving you a comprehensive understanding of your financial health. It enables you to make informed decisions, assess the solvency and liquidity of your company, and track your financial progress over time.
Throughout the steps, we discussed the benefits of using Excel, such as flexibility, customization, and efficiency. Excel’s array of functions and tools empowered you to input and manipulate data effortlessly, apply formulas, and create visually appealing balance sheets.
Remember, the accuracy of your balance sheet is vital. Double-checking your data, formulas, and totals ensures that your balance sheet represents an accurate reflection of your financial situation. Furthermore, reviewing and proofreading for errors helps maintain the integrity of your balance sheet.
Having a well-crafted balance sheet in Excel can bring numerous advantages, including improved financial decision-making, easier collaboration with stakeholders, and better tracking of your financial goals. Regularly updating and reviewing your balance sheet will enable you to stay on top of your financial standing and make any necessary adjustments.
Congratulations! You have mastered the process of creating a balance sheet in Excel. By utilizing this powerful tool, you are now equipped to effectively manage your finances and confidently plan for the future.
Remember to adapt your balance sheet as your financial circumstances change and to consult with financial professionals for guidance and support. By leveraging Excel’s capabilities, your journey towards financial success will be more organized, insightful, and rewarding.
Thank you for joining us in this guide. We hope it has been valuable in enhancing your understanding of balance sheets and Excel’s role in financial management. Here’s to your continued financial success!
What's Hot
Latest Articles
Related Post
By: • Finance
By: • Finance
By: • Finance

By: • Finance

By: • Finance

By: • Finance

By: • Finance

By: • Finance

By: • Finance

By: • Finance

By: • Finance

By: • Finance

By: • Finance