Home>Finance>How To Categorize A Credit Card Payment In Quickbooks
Finance
How To Categorize A Credit Card Payment In Quickbooks
Published: October 25, 2023
Learn how to categorize credit card payments in Quickbooks and efficiently manage your finances. Discover the best practices and tips to optimize your accounting process.
(Many of the links in this article redirect to a specific reviewed product. Your purchase of these products through affiliate links helps to generate commission for LiveWell, at no extra cost. Learn more)
Table of Contents
- Introduction
- Step 1: Accessing the Credit Card Payment Window in QuickBooks
- Step 2: Entering the Relevant Payment Details
- Step 3: Choosing the Appropriate Expense Account
- Step 4: Selecting the Customer or Vendor Associated with the Payment
- Step 5: Applying the Payment to Multiple Invoices (if applicable)
- Step 6: Reviewing and Saving the Categorized Credit Card Payment
- Conclusion
Introduction
Welcome to our comprehensive guide on how to categorize a credit card payment in QuickBooks. As a small business owner or financial professional, it is crucial to accurately categorize your credit card payments to maintain clean and organized financial records. QuickBooks, one of the leading accounting software programs, offers a user-friendly platform that makes this task simple and efficient.
While categorizing credit card payments may seem like a mundane task, it holds significant importance in maintaining accurate financial statements, tracking expenses, and ensuring compliance with tax regulations. By categorizing your credit card payments correctly, you gain insights into your business’s cash flow, profitability, and overall financial health.
In this article, we will take you through a step-by-step process on how to categorize a credit card payment in QuickBooks. Whether you are a seasoned QuickBooks user or a beginner looking to optimize your financial record-keeping, this guide will provide you with the necessary tools and knowledge to effectively categorize your credit card payments.
So let’s dive in and explore the steps required to accurately categorize your credit card payments in QuickBooks.
Step 1: Accessing the Credit Card Payment Window in QuickBooks
The first step in categorizing a credit card payment in QuickBooks is to access the Credit Card Payment window. Here’s how you can do it:
- Open QuickBooks and log in to your account.
- From the main dashboard, navigate to the “Banking” tab in the top navigation menu and select “Use Register.”
- In the “Account” drop-down menu, choose the credit card account for which you want to categorize the payment.
- A list of transactions for that credit card account will appear. Locate the specific credit card payment transaction that you want to categorize and double-click on it to open the transaction details.
- The “Payment” window will now open, displaying various fields for entering payment details and categorization information.
Now that you have accessed the Credit Card Payment window, you are ready to proceed with categorizing the payment. Make sure to have all the necessary information and documentation related to the payment, such as the payment amount, payment date, and any supporting invoices or receipts.
QuickBooks provides a user-friendly interface that facilitates the categorization process, allowing you to efficiently manage your credit card payments and maintain accurate financial records. Let’s move on to the next step to enter the relevant payment details.
Step 2: Entering the Relevant Payment Details
After accessing the Credit Card Payment window in QuickBooks, the next step in categorizing a credit card payment is to enter the relevant payment details. Follow these steps to ensure accuracy:
- In the “Payment” window, enter the payment date. This should be the date when the credit card payment was made.
- Input the payment amount in the designated field. Double-check the amount to ensure accuracy.
- If applicable, include any additional information in the memo field, such as a description of the payment purpose or any relevant notes.
- Review the payment details to ensure they are correct and complete. It is crucial to be meticulous in entering the payment information to maintain accurate financial records.
By entering the relevant payment details accurately, you provide a solid foundation for effectively categorizing the credit card payment. QuickBooks relies on accurate data input to generate accurate financial reports and analysis.
Once you have entered the payment details, it’s time to move on to the next step: choosing the appropriate expense account for categorizing the payment. This step ensures that your expenses are properly recorded, allowing you to analyze your business’s financial health and make informed decisions based on reliable data.
Step 3: Choosing the Appropriate Expense Account
After entering the relevant payment details for your credit card payment in QuickBooks, the next step is to choose the appropriate expense account. The expense account helps categorize the payment and provides insights into where the money was spent. Follow these steps to select the right expense account:
- In the “Payment” window, locate the “Account” field. This field is where you choose the expense account associated with the payment.
- Click on the drop-down menu within the “Account” field to view the list of available expense accounts in your QuickBooks chart of accounts.
- Select the expense account that best represents the nature of the payment. For example, if the credit card payment was made for office supplies, you may choose the “Office Expenses” expense account.
- If you cannot find a suitable expense account in the drop-down menu, you may need to set up a new expense account. To do this, select the “Add New” option and follow the prompts to create a new account.
- Double-check your selection to ensure accuracy. Make sure the chosen expense account aligns with the purpose of the credit card payment.
Choosing the appropriate expense account allows for effective expense tracking and analysis within QuickBooks. It helps you monitor specific spending categories and make informed decisions about budgeting and cost control.
Once you have selected the appropriate expense account, you can move on to the next step: selecting the customer or vendor associated with the credit card payment. This step is essential for maintaining accurate records and facilitating effective financial management.
Step 4: Selecting the Customer or Vendor Associated with the Payment
After choosing the appropriate expense account for your credit card payment in QuickBooks, the next step is to select the customer or vendor associated with the payment. This step helps you accurately track and categorize transactions with specific individuals or businesses. Follow these steps to select the appropriate customer or vendor:
- In the “Payment” window, locate the “Received From” or “Paid To” field, depending on whether the payment is coming from a customer or going to a vendor.
- Start typing the name of the customer or vendor in the “Received From” or “Paid To” field. QuickBooks will automatically suggest matching names based on your existing customer or vendor list.
- Choose the correct customer or vendor from the suggestions. If the customer or vendor is not in the list, you can manually add a new entry by selecting the “Add New” option.
- Review your selection to ensure accuracy. It’s important to associate the payment with the correct individual or business for proper record-keeping and analysis.
Selecting the appropriate customer or vendor allows for better transaction tracking and helps you establish clear relationships between payments and the parties involved. It also enables you to generate accurate reports, such as accounts payable or accounts receivable, tailored to specific customers or vendors.
Once you have selected the customer or vendor, you can proceed to the next step: applying the payment to multiple invoices if applicable. This step is crucial for managing outstanding balances and maintaining accurate accounts receivable or accounts payable records.
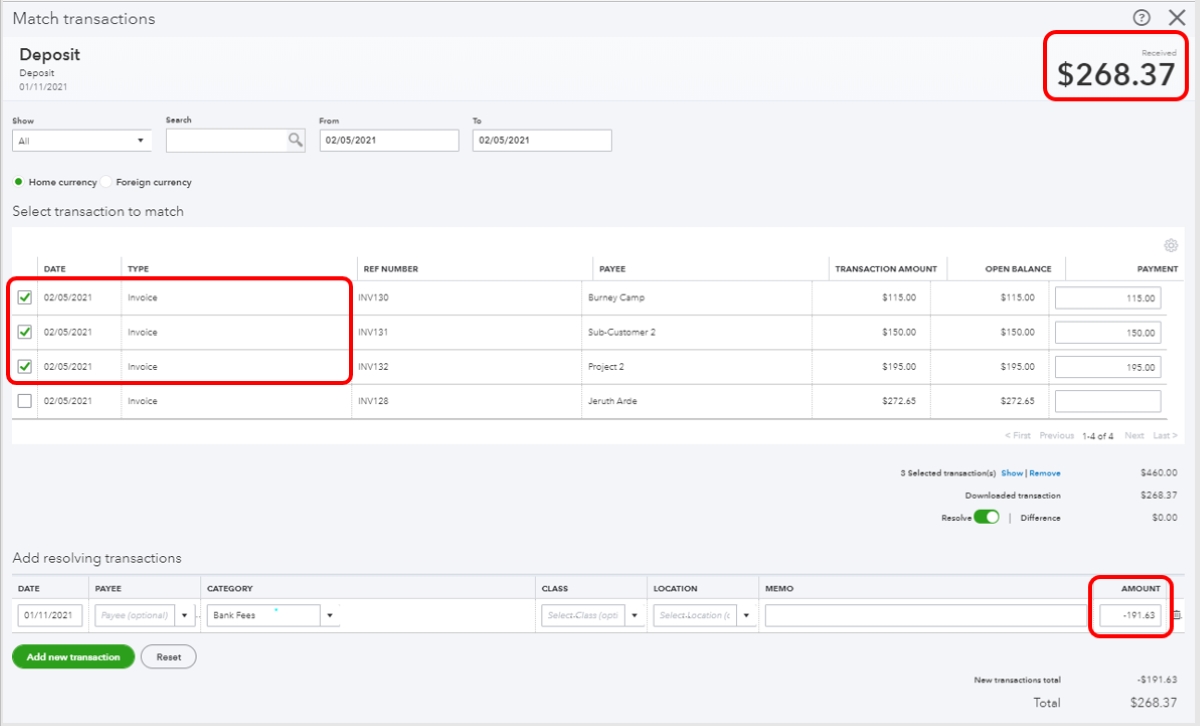
Step 5: Applying the Payment to Multiple Invoices (if applicable)
In some cases, you may need to apply a credit card payment in QuickBooks to multiple invoices. This step allows you to allocate the payment amount across multiple invoices, ensuring accurate record-keeping and maintaining correct accounts receivable or accounts payable balances. Follow these steps to apply the payment to multiple invoices:
- In the “Payment” window, locate the “Outstanding Transactions” section. This section shows any open invoices that are eligible for payment.
- Select the invoices that you want to apply the payment to by checking the respective checkboxes next to them. You can choose multiple invoices to allocate the payment amount accordingly.
- Once you have selected the invoices, enter the corresponding payment amount for each invoice in the “Amount” column. Ensure that the total payment amount matches the original payment amount you entered earlier in Step 2.
- Double-check your selections and payment amounts to ensure accuracy. Review the invoices and payment allocations to ensure proper distribution of the payment across all selected invoices.
Applying the payment to multiple invoices allows for precise management of outstanding balances and ensures that your accounts receivable or accounts payable records remain up to date. It helps you track customer payments and vendor expenses more effectively, providing a clearer picture of your financial standing.
Once you have applied the payment to the appropriate invoices, you can proceed to the final step: reviewing and saving the categorized credit card payment in QuickBooks.
Step 6: Reviewing and Saving the Categorized Credit Card Payment
After completing the previous steps and categorizing your credit card payment in QuickBooks, the final step is to review and save the payment. This ensures that the categorization is accurate and the payment is properly recorded in your financial records. Here’s what you need to do:
- Thoroughly review all the information entered in the “Payment” window. Check that the payment date, amount, expense account, customer/vendor association, and invoice allocations (if applicable) are all correct.
- If any adjustments need to be made, click on the corresponding field and make the necessary changes.
- Ensure that you have attached any supporting documentation, such as invoices or receipts, to the credit card payment transaction. This provides a complete record and serves as evidence for the transaction.
- Once you have reviewed and verified all the information, click on the “Save” button to save the categorized credit card payment in QuickBooks.
By thoroughly reviewing and saving the categorized credit card payment, you ensure that your financial records are accurate and up to date. This step is essential for maintaining compliance, making informed business decisions, and facilitating smooth financial operations.
After saving the payment, you can generate various reports in QuickBooks to analyze your expenses, track cash flows, and gain valuable insights into your business’s financial health. Additionally, having properly categorized credit card payments simplifies tax preparation, making it easier to calculate deductions and comply with tax regulations.
Congratulations! You have successfully categorized your credit card payment in QuickBooks. By following these steps, you can maintain accurate financial records and gain a better understanding of your business’s financial position.
Remember to repeat this process consistently and diligently for each credit card payment to ensure the integrity of your financial data. Doing so will enable you to make informed financial decisions, manage cash flow effectively, and enhance the overall financial management of your business.
Conclusion
Categorizing credit card payments in QuickBooks is a crucial task for maintaining accurate financial records and gaining valuable insights into your business’s financial health. By following the step-by-step process outlined in this guide, you can effectively categorize your credit card payments and streamline your financial management.
Starting with accessing the Credit Card Payment window, you learned how to enter the relevant payment details, choose the appropriate expense account, and select the customer or vendor associated with the payment. You also gained insights into applying the payment to multiple invoices, if applicable. Finally, after reviewing and saving the categorized credit card payment, you ensure the accuracy of your financial records.
Accurate categorization of credit card payments allows for better expense tracking, analysis, and decision-making. It simplifies tax preparation and compliance, enhances cash flow management, and aids in generating insightful financial reports. By utilizing QuickBooks, a powerful accounting software, you can efficiently manage your credit card payments and maintain a clear overview of your business’s financial position.
Consistency and attention to detail are key when categorizing credit card payments. Regularly review and verify your data to ensure accuracy, attach supporting documents, and save payments promptly. By doing so, you stay organized and well-prepared for financial analysis, audits, and tax reporting.
Now that you have a solid understanding of how to categorize credit card payments in QuickBooks, it’s time to put this knowledge into practice. Start categorizing your credit card payments systematically and experience the benefits of organized financial record-keeping.
Remember, accurate categorization of credit card payments is not only a financial management task but also a gateway to informed decision-making, better budget control, and long-term business success.
What's Hot
Latest Articles
Related Post


By: • Finance

By: • Finance

By: • Finance
By: • Finance


By: • Finance
By: • Finance

By: • Finance
By: • Finance


By: • Finance

By: • Finance

By: • Finance