Finance
How To Issue A Credit Memo In QuickBooks?
Modified: February 21, 2024
Learn how to issue a credit memo in QuickBooks to streamline your finance processes. Easily track and manage credits for improved financial management.
(Many of the links in this article redirect to a specific reviewed product. Your purchase of these products through affiliate links helps to generate commission for LiveWell, at no extra cost. Learn more)
Table of Contents
Introduction
In the world of business, it is not uncommon for errors to occur. Whether it’s a billing mistake, a product return, or a discount applied incorrectly, these situations can lead to a need for issuing a credit memo. A credit memo is a document that serves as a record of a credit or refund owed to a customer.
QuickBooks, the highly popular accounting software, offers a seamless solution for issuing credit memos. Whether you are a small business owner, a finance professional, or a bookkeeper, QuickBooks provides an easy-to-use platform for managing your financial transactions.
In this article, we will guide you through the process of issuing a credit memo in QuickBooks. We will walk you through each step, from opening QuickBooks to saving and sending the credit memo. By following these simple steps, you can ensure accurate record-keeping and maintain good customer relations.
Before we delve into the step-by-step process of issuing a credit memo, let’s take a moment to highlight the importance of credit memos in financial transactions. Credit memos serve several purposes:
- Correcting billing errors: If you have inadvertently overcharged a customer or applied incorrect discounts or fees, a credit memo can rectify the mistake and provide a refund.
- Handling product returns: When customers return products, a credit memo can be used to issue a refund or credit for the returned items.
- Resolving disputes: In situations where a customer is unsatisfied with a product or service and requests a refund, a credit memo can be issued to provide the necessary credit or refund.
Now that we understand the importance of credit memos, let’s dive into the step-by-step process of issuing a credit memo in QuickBooks.
Step 1: Open QuickBooks
The first step in issuing a credit memo in QuickBooks is to open the software on your computer or device. If you haven’t already installed QuickBooks, make sure you download and install the software from the official QuickBooks website.
Once QuickBooks is installed, locate the QuickBooks icon on your desktop or in your application folder and double-click it to launch the program.
If you are using an online version of QuickBooks, simply navigate to the QuickBooks website and log in to your account using your username and password.
Having trouble opening QuickBooks? Make sure you have a stable internet connection or check if there are any software updates available for QuickBooks. If the issue persists, you can reach out to QuickBooks support for further assistance.
Upon successfully launching QuickBooks, you will be greeted by the main dashboard or home screen, which serves as the central hub for all your financial activities.
Now that you have opened QuickBooks, let’s move on to the next step.
Step 2: Go to the Customers Tab
Once you have successfully opened QuickBooks, the next step is to navigate to the Customers tab. The Customers tab is where you can access and manage all customer-related information, including creating credit memos.
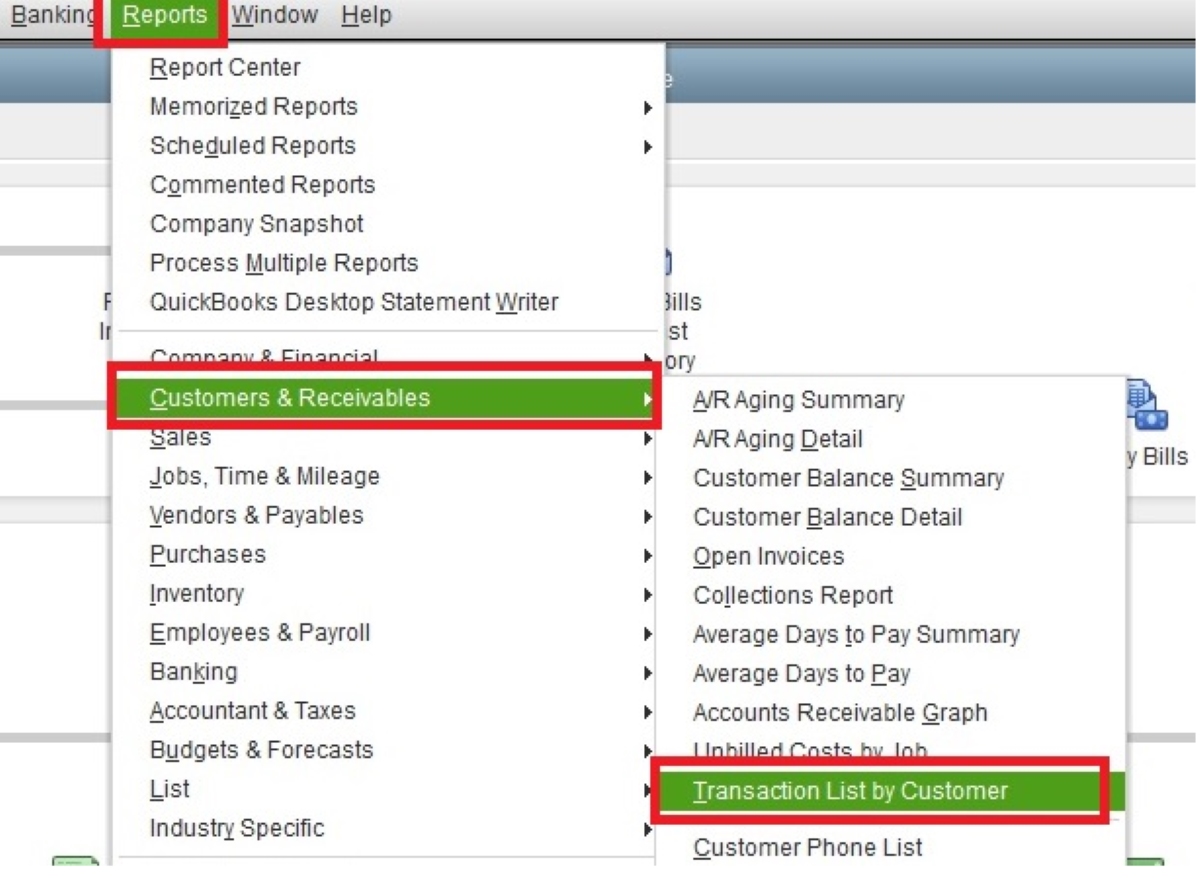
To locate the Customers tab, look for the navigation menu on the left-hand side of the QuickBooks dashboard. The navigation menu contains various tabs and options for managing different aspects of your financial activities.
Click on the Customers tab to access the customer management section. This section contains a list of all your customers and their respective information, such as contact details, transaction history, and open invoices.
On the Customers tab, you can perform various actions related to customer management, including creating credit memos, invoices, and estimates, as well as recording customer payments and generating customer reports.
By utilizing the Customers tab, you can efficiently manage your customer-related transactions and ensure accurate record-keeping.
Now that you have located and accessed the Customers tab, let’s proceed to the next step.
Step 3: Select the Customer for whom you want to issue a Credit Memo
Once you have accessed the Customers tab in QuickBooks, the next step is to select the specific customer for whom you want to issue a credit memo. This will ensure that the credit memo is linked to the correct customer account and facilitates accurate financial record-keeping.
To select a customer, you can either scroll through the list of customers displayed on the Customers tab or use the search bar at the top of the page to quickly find the desired customer. Simply enter the customer’s name or relevant search criteria, and QuickBooks will filter the customer list accordingly.
When you locate the desired customer, click on their name to access their customer profile. Within the customer profile, you will find detailed information about the customer, including their contact details, transaction history, and any open invoices or outstanding balances.
By selecting the specific customer, you ensure that any credit memo generated will be associated with their account, making it easier to track and reconcile transactions.
In some cases, you may need to create a new customer profile if the customer is not already listed in QuickBooks. This can be done by selecting the “New Customer” option or the plus (+) icon within the Customers tab.
Remember to verify the accuracy of the customer’s information before proceeding. This includes confirming their name, contact details, and any specific instructions or preferences they may have provided.
Now that you have selected the customer for whom you want to issue a credit memo, you are ready to move on to the next step.
Step 4: Create a Credit Memo
Once you have selected the customer for whom you want to issue a credit memo in QuickBooks, the next step is to create the credit memo itself. The credit memo serves as a formal document that outlines the details of the credit or refund to be provided to the customer.
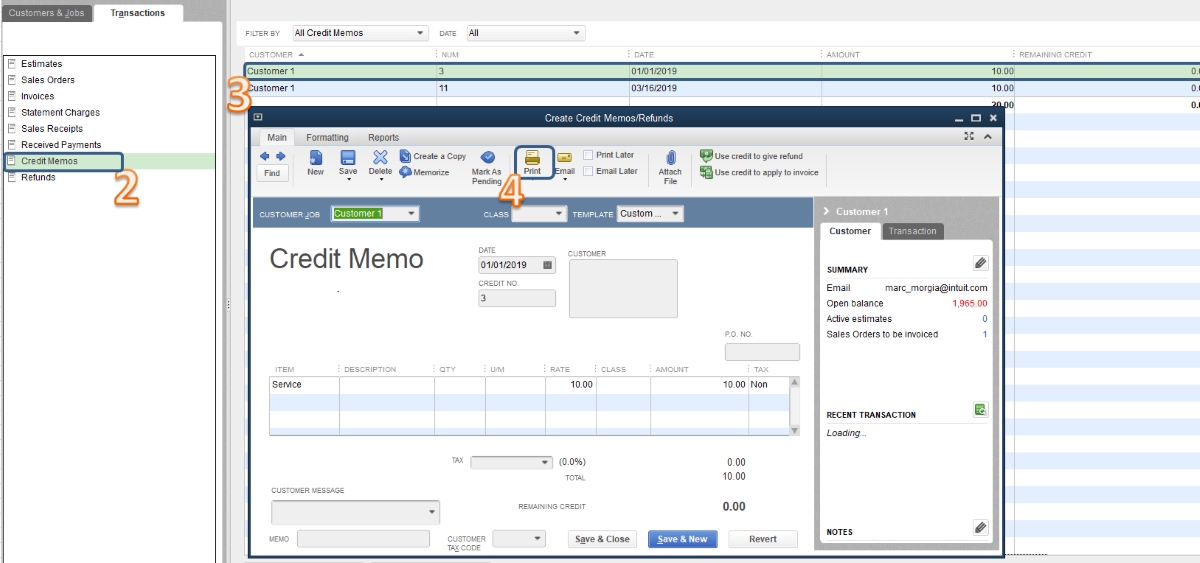
To create a credit memo, navigate to the customer profile you accessed in the previous step. Within the customer profile, there will be an option to create a new credit memo. Look for the “Create Credit Memo” button or the plus (+) icon, often located near the top right corner of the page.
Clicking on the “Create Credit Memo” button will open a new window or form where you can input the relevant information for the credit memo. This form allows you to specify the details of the credit, including the date, credit memo number, and any applicable terms or comments.
In addition to the general information, you will also need to fill in specific details related to the credit memo, such as the items being credited, the quantity, and any associated amounts or discounts. QuickBooks will prompt you to enter this information in the appropriate fields.
If you have regular items or services that you frequently credit, you can create pre-defined items in QuickBooks to simplify the process. This allows you to easily select the appropriate item from a drop-down list rather than manually entering the details each time.
Once you have filled in all the necessary information for the credit memo, double-check for accuracy and ensure that all relevant details are included.
Now that you have created the credit memo, you are ready to move on to the next step: filling in the credit memo details.
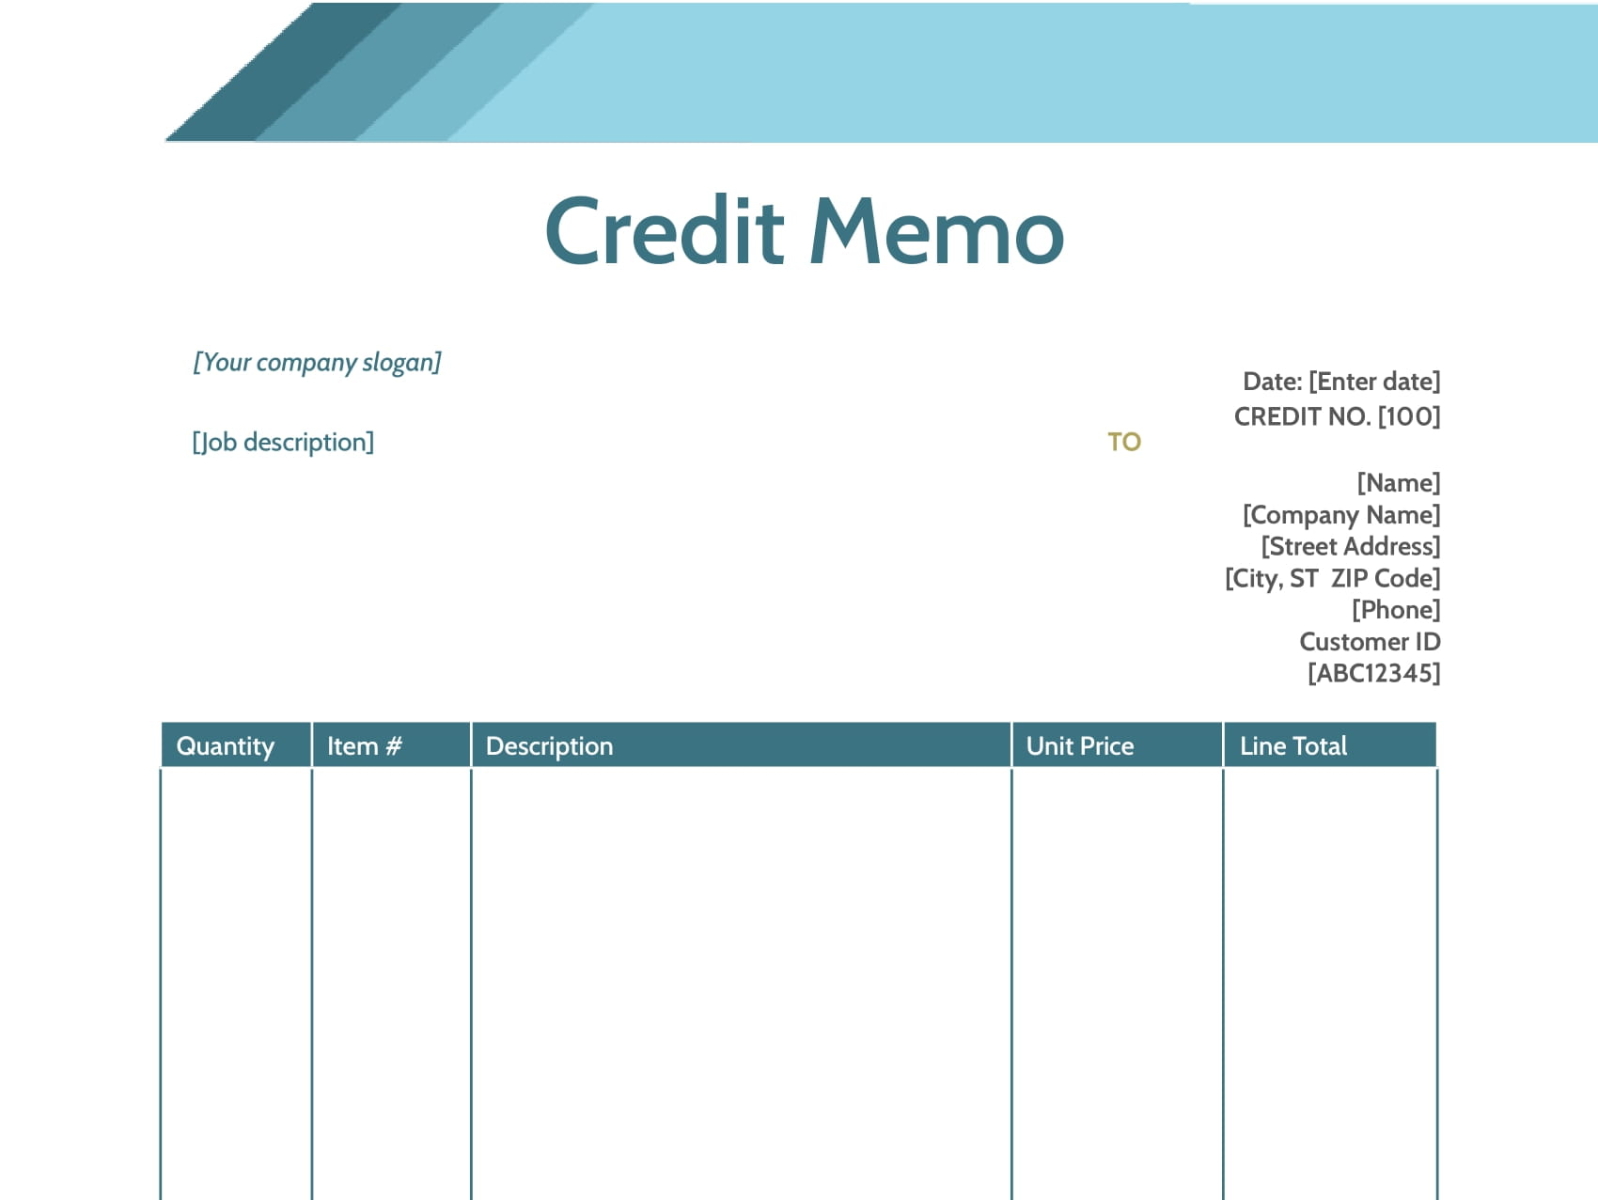
Step 5: Fill in the Credit Memo Details
After creating a credit memo in QuickBooks, the next step is to fill in the details of the credit memo. This involves providing specific information about the credit, such as the items being credited, quantities, and any associated amounts or discounts.
When you open the credit memo form in QuickBooks, you will see various fields and sections where you can input the necessary details. Let’s go through the key information you need to fill in:
- Date: Enter the date on which the credit memo is being issued. This should reflect the current date, or the date on which the credit was agreed upon with the customer.
- Credit Memo Number: Assign a unique identifier to the credit memo, such as a sequential number or a reference number that helps you track and identify the credit memo later.
- Customer: The customer’s name should already be pre-populated based on the customer you selected earlier. Verify that the correct customer is listed, as this ensures that the credit memo is associated with the correct customer account.
- Items/Services: Specify the items or services being credited to the customer. If you have pre-defined items, you can choose the appropriate item from a drop-down list. Otherwise, manually enter the details of the items or services being credited.
- Quantity: Enter the quantity of each item being credited. If the credit applies to all of the items, you can leave the quantity as 1.
- Rate: Depending on the setup of your QuickBooks account, this field may be automatically populated based on the item you selected. However, you can manually modify the rate if necessary.
- Amount: The amount field will calculate automatically based on the quantity and rate. However, you can edit this amount if needed.
- Discount: If you are offering a discount as part of the credit, enter the discount amount or percentage in the appropriate field. QuickBooks will adjust the credit accordingly.
- Additional Information: If there are any specific instructions or comments regarding the credit memo, you can enter them in the additional information section. This allows you to provide any necessary details or explanations to the customer.
After filling in all the required details, review the credit memo to ensure accuracy and completeness. Double-check that the quantities, amounts, and discounts are correct and match the agreed-upon terms with the customer.
Now that you have filled in the credit memo details, you are ready to move on to the next step: applying the credit memo to an invoice.
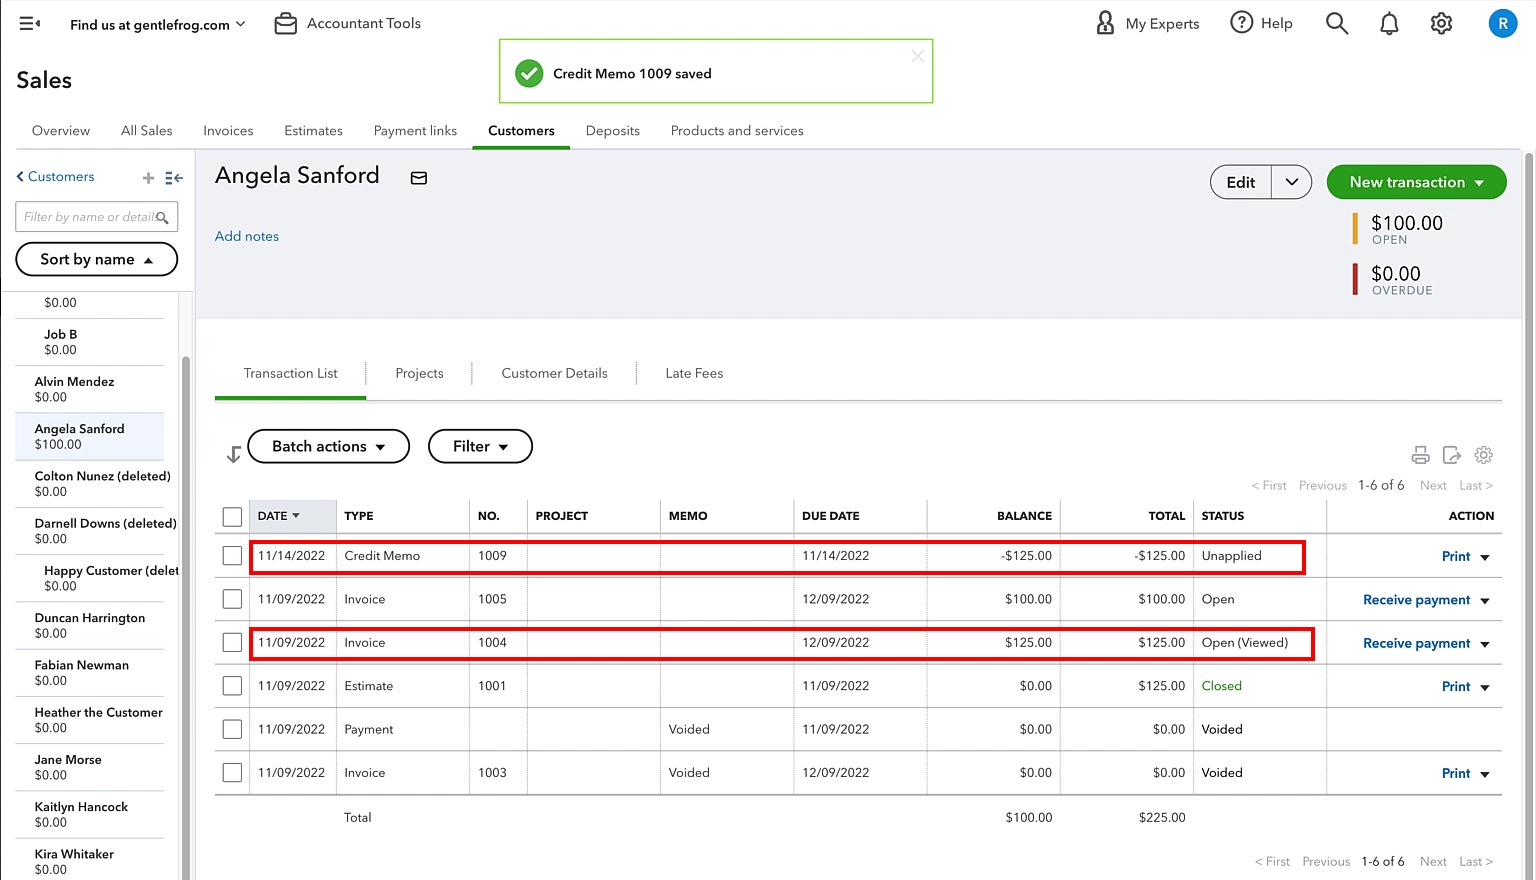
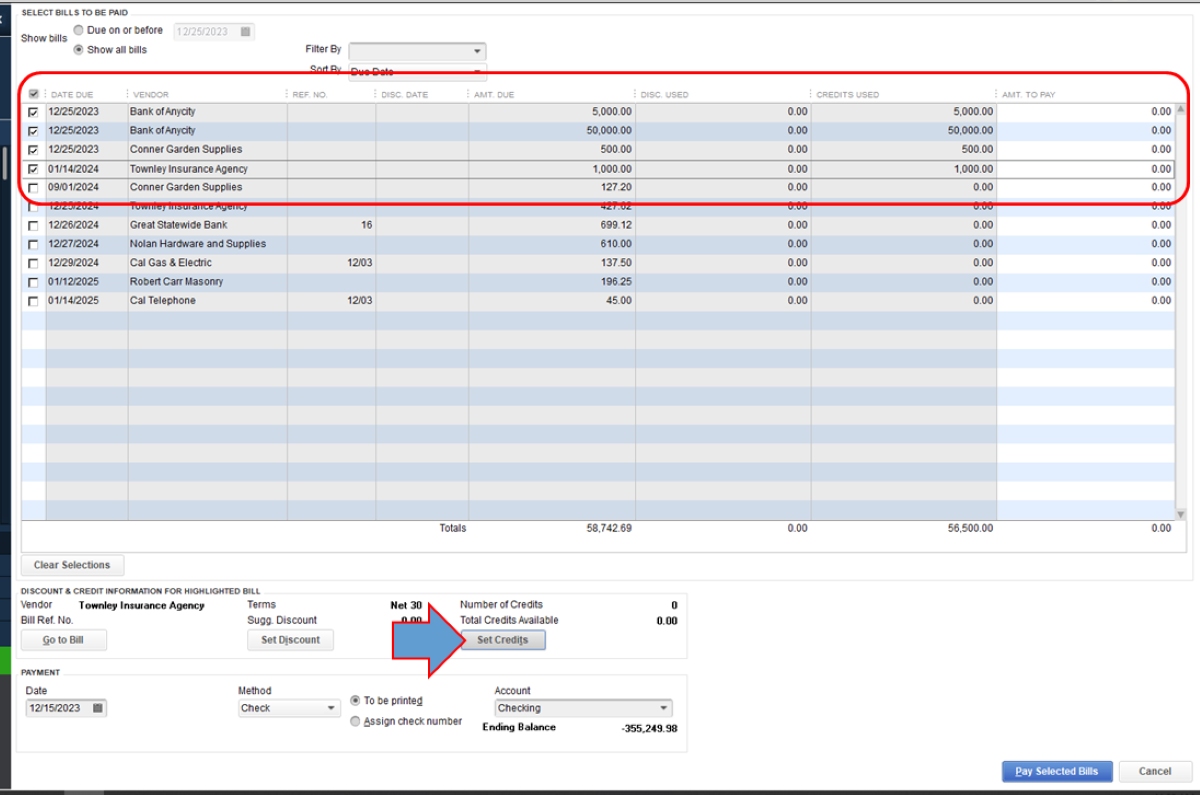
Step 6: Apply the Credit Memo to an Invoice
Applying the credit memo to an invoice is a crucial step in the process of issuing a credit in QuickBooks. This ensures that the credit amount is properly deducted from the customer’s outstanding balance and reflects the updated financial records.
To apply the credit memo to an invoice in QuickBooks, follow these steps:
- Locate the invoice that you want to apply the credit memo to. This can be done by searching for the specific invoice number or by navigating to the customer’s profile and locating the open invoices in the customer’s transaction history.
- Open the invoice by clicking on it or selecting the appropriate option.
- Within the invoice, look for the “Apply Credit” or “Payment” button. This button is usually located at the top right corner of the invoice.
- Click on the “Apply Credit” or “Payment” button to open a window where you can apply the credit memo.
- In the Apply Credits window, you will see a list of available credit memos associated with the customer. Select the specific credit memo that you want to apply to the invoice by clicking on it.
- Once you have selected the credit memo, the credit amount will automatically be applied to the invoice balance. QuickBooks will deduct the credit amount from the invoice total and display the updated balance.
- Review the applied credit and ensure that the correct amount has been deducted from the invoice balance. If there are any remaining credits or adjustments to be made, you can modify the applied credit accordingly.
- Once you are satisfied with the applied credit, save the changes and update the invoice to reflect the applied credit memo.
By applying the credit memo to the appropriate invoice, you ensure that the customer’s outstanding balance reflects the credit amount accurately. This helps maintain accurate financial records and prevents any confusion or discrepancies in the customer’s account.
Now that you have successfully applied the credit memo to the invoice, you are ready to move on to the final step: saving and sending the credit memo.
Step 7: Save and Send the Credit Memo
Once you have applied the credit memo to the appropriate invoice and ensured that the customer’s outstanding balance is correctly adjusted, the final step is to save and send the credit memo in QuickBooks.
To save and send the credit memo, follow these steps:
- Ensure that all the necessary information and details are accurately reflected in the credit memo.
- Review the credit memo to confirm that all calculations, dates, and customer information are correct.
- In the credit memo window, look for the “Save” button, often located at the top or bottom of the page. Click on the “Save” button to save the credit memo.
- After saving the credit memo, you will have various options for sending it to the customer. QuickBooks allows you to send the credit memo via email, print it for mailing, or save it as a PDF.
- If you choose to send the credit memo via email, QuickBooks will prompt you to enter the recipient’s email address and provide an option to customize the email message. Write a concise and clear message explaining the credit memo and any necessary instructions or additional information.
- After composing the email, click on the “Send” button to send the credit memo to the customer’s email address.
- If you prefer to print the credit memo for mailing or record-keeping purposes, click on the “Print” option and follow the instructions to print the credit memo.
- Alternatively, you can choose to save the credit memo as a PDF file by selecting the “Save as PDF” option. This allows you to store an electronic copy of the credit memo on your computer or device.
By saving and sending the credit memo, you provide the customer with a clear and official record of the credit due to them. This enhances transparency and helps maintain good customer relations.
Congratulations! You have successfully issued a credit memo in QuickBooks. Remember to keep a copy of the credit memo for your records and ensure that your financial records are accurately updated with the credit transaction.
Implementing effective credit memo management in QuickBooks enables you to streamline your financial processes, improve customer satisfaction, and maintain accurate records of credits and refunds.
Conclusion
Issuing a credit memo in QuickBooks is an essential task for businesses to manage billing errors, product returns, and customer refunds efficiently. By following the step-by-step process outlined in this guide, you can navigate through QuickBooks and issue credit memos with confidence.
Remember, the process begins with opening QuickBooks and navigating to the Customers tab. From there, select the customer for whom you want to issue a credit memo. Then, create the credit memo, ensuring you input the necessary details accurately.
Next, it’s crucial to fill in the credit memo details correctly, including the date, credit memo number, customer information, items/services being credited, quantities, rates, amounts, and any applicable discounts. This attention to detail guarantees accurate record-keeping and customer satisfaction.
The next step is to apply the credit memo to the corresponding invoice. This process ensures that the credit amount is deducted properly from the customer’s outstanding balance. Make sure to review and verify the applied credit for accuracy before saving the changes.
Finally, save and send the credit memo to the customer. Use QuickBooks’ email feature to send the credit memo directly or choose to print it for mailing purposes. Saving it as a PDF file is another option for electronic record-keeping.
By successfully issuing credit memos in QuickBooks, you maintain accurate financial records, improve customer relationships, and ensure timely and appropriate refunds or credits. QuickBooks provides a user-friendly interface that streamlines the credit memo process, helping you manage your business finances efficiently.
Now that you have a comprehensive understanding of how to issue a credit memo in QuickBooks, you can confidently handle billing errors, returns, and refunds, maintaining financial accuracy and customer satisfaction along the way.
What's Hot
Latest Articles
Related Post

By: • Finance
By: • Finance
By: • Finance
By: • Finance

By: • Finance
By: • Finance
By: • Finance
By: • Finance

By: • Finance

By: • Finance

By: • Finance

By: • Finance

By: • Finance
By: • Finance